You can edit the text in this area, and change where the contact form on the right submits to, by entering edit mode using the modes on the bottom right.
123 Street Avenue, City Town, 99999
(123) 555-6789
email@address.com
You can set your address, phone number, email and site description in the settings tab. Link to read me page with more information.
I prepared this post so long ago that it was actually photographed in the kitchen of the house we sold last May. Not to mention that, actually, the draft date was January of 2013. Two years ago. Before we even knew that we were having a baby. A baby who is now a 15-month old toddler.
Sorry, friends. Better late than never?
My tardiness does help to prove the point of this post, though; that roast chicken is a staple in our house, and this recipe in particular is our favorite. Because, two years later, these images are as relevant as the day I prepared them. Except for that kitchen.
Happy, healthy 2015 to any readers that may still have Bella Eats hooked into their feed reader. All two of you. Hi Brian, hi Momma.
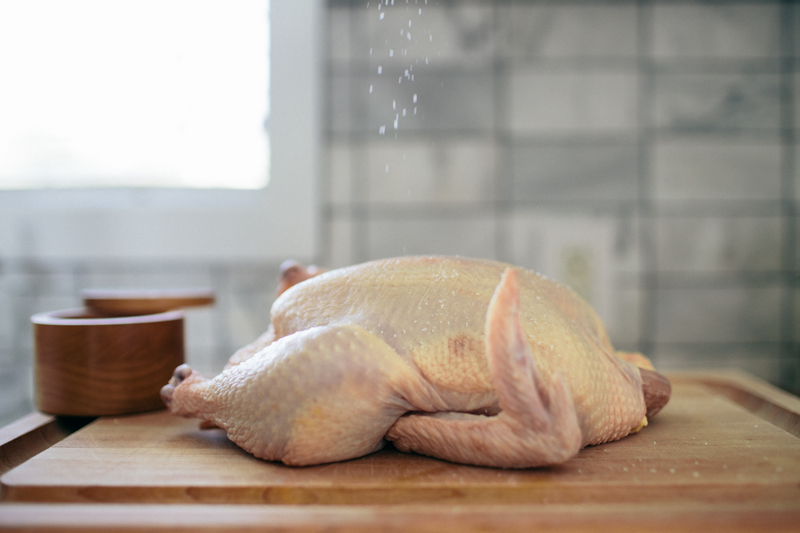
Preheat the oven to 450°F. Rinse the chicken, then dry it very well with paper towels, inside and out. The less it steams, the drier the heat, the better.
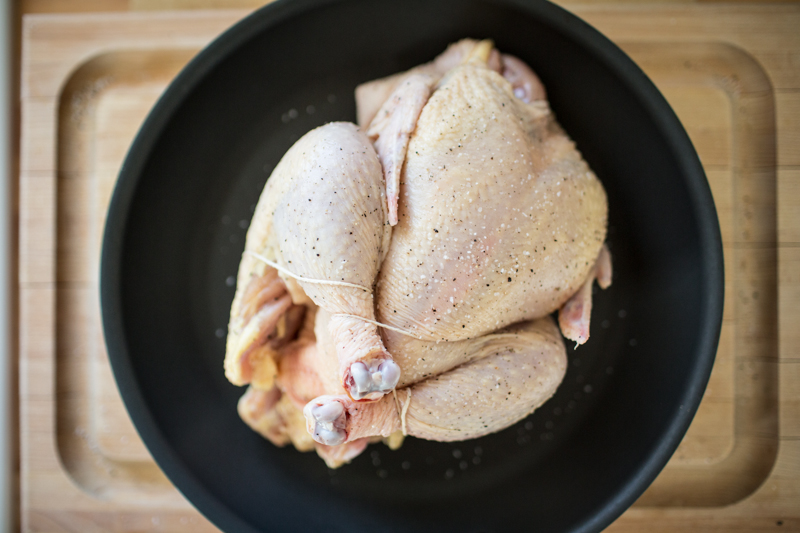
Salt and pepper the cavity, then truss the bird. Trussing is not difficult, and if you roast chicken often, it's a good technique to feel comfortable with. When you truss a bird, the wings and legs stay close to the body; the ends of the drumsticks cover the top of the breast and keep it from drying out. Trussing helps the chicken to cook evenly, and it also makes for a more beautiful roasted bird.
Now, salt the chicken—I like to rain the salt over the bird so that it has a nice uniform coating that will result in a crisp, salty, flavorful skin (about 1 tablespoon). When it's cooked, you should still be able to make out the salt baked onto the crisp skin. Season to taste with pepper.
Place the chicken in a sauté pan or roasting pan and, when the oven is up to temperature, put the chicken in the oven. I leave it alone—I don't baste it, I don't add butter; you can if you wish, but I feel this creates steam, which I don't want. Roast it until it's done, 50 to 60 minutes. Remove it from the oven and add the thyme, if using, to the pan. Baste the chicken with the juices and thyme and let it rest for 15 minutes on a cutting board.
Remove the twine. Separate the middle wing joint and eat that immediately. Remove the legs and thighs. I like to take off the backbone and eat one of the oysters, the two succulent morsels of meat embedded here, and give the other to the person I'm cooking with. But I take the chicken butt for myself. I could never understand why my brothers always fought over that triangular tip—until one day I got the crispy, juicy fat myself. These are the cook's rewards. Cut the breast down the middle and serve it on the bone, with one wing joint still attached to each. The preparation is not meant to be superelegant. Slather the meat with fresh butter. Serve with mustard on the side and, if you wish, a simple green salad. You'll start using a knife and fork, but finish with your fingers, because it's so good.
Hi, friends! Since the last time I checked in here at Bella Eats, Brian and I traveled to Spain. It was the most amazing trip, our honeymoon 6.5 years post-wedding, and we still can't quite believe that it's over. I have so much to share, and was so inspired while there, that I can barely contain myself! Once I parse through the thousands of images we captured I will share more, here, along with the recipes sure to emerge from our kitchen. We're already craving tortilla and albondigas like you wouldn't believe.
Also, if you're on Instagram, you can follow me there @andreahubbell. Brian (@brianmhubbell) and I made a special hashtag while abroad, #hubbellsinspain, which I still visit multiple times a day to relive small pieces of our time in Spain. Oh, how we miss it!
Also, have you met Sarah and Megan, the lovely ladies that I work with every week on Beyond the Flavor?
Together, at the beginning of November, we hosted the first annual Beyond the Flavor Friendsgiving. It was the best evening, filled with contributors, supporters, and friends of our project, without whom Beyond the Flavor wouldn't exist. You really should hop over to see our recap of the event, even if only for food inspiration. While the recipes shared were originally intended for the Thanksgiving table, several have made it to our regular menu and would be wonderful for other holiday meals as well. My favorites so far: Autumn Israeli Couscous, Crispy Kale Salad, and Pecan Corn Bread Pudding.
Coming home from 12 days of travel makes one crave cooking in one's own kitchen, and I am no exception. While I won't make any promises, I do have the best of intentions for Bella Eats. I hope to see more happening here, soon. We made the best, simplest roast chicken on Sunday, and it deserves an audience. Until then...happy December!
Happy Thanksgiving, friends! I hope you are all enjoying a leisurely morning of coffee and cooking with loved ones. We are about to embark on our meal prep, after a bit of time invested last night. Oh, and the Wizarding World of Harry Potter is magical...in case you were wondering. :)
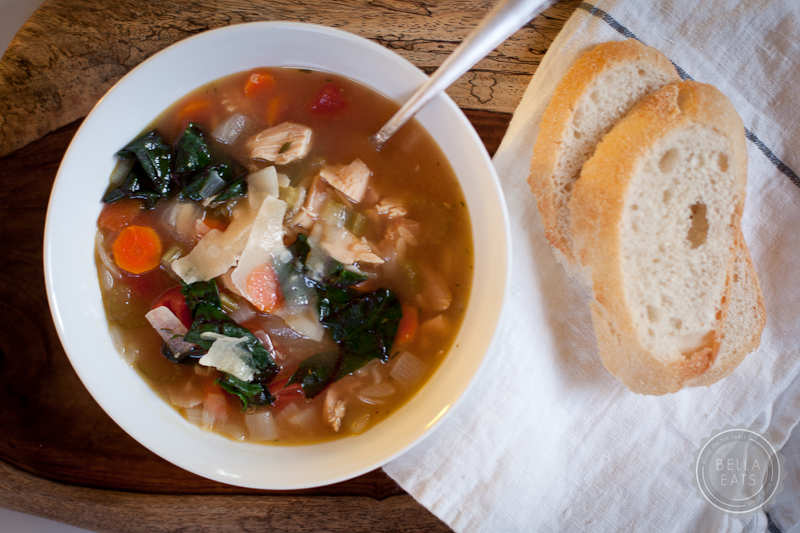
I have a day-after recipe for you this morning; a hearty, veggie-filled soup that uses your leftover turkey meat as well as the carcass. We're all about using the whole animal around here, and fresh stock is truly the best base for any soup you can make. So chop some extra onions, celery, and carrots today and stow them away in a ziplock bag in your refrigerator. You can even make the stock tonight to keep things really simple tomorrow. Because tomorrow is all about relaxation and dirtying as few dishes as possible, right? :)
Again, Happy Thanksgiving! I am thankful for so many things this year, including each one of you for continuing to read and share your comments here at Bella Eats. Have a wonderful holiday, all!!!
Leftover Bird + Orzo Soup
for the stock:
3 tbsp vegetable oil
2 medium onions, diced (about 2 cups)
3 large carrots, chopped (about 1 cup)
3 ribs of celery, chopped (about 1 cup)
water
1 turkey or chicken carcass
for the soup:
3 tbsp vegetable oil
2 medium onions, diced (about 2 cups)
3 large carrots, chopped (about 1 cup)
3 ribs of celery, chopped (about 1 cup)
2 garlic cloves, minced
10 cups of stock (if you have less than that, add water. more, simmer it until it reduces)
2 bay leaves
3 large sprigs of thyme
(1) 15-oz can of diced tomatoes, drained
2 cups leftover chicken or turkey, chopped or torn into bite-size pieces
1 cup dried orzo
3 large handfuls of swiss chard leaves, stems removed, torn into bite-size pieces
salt + pepper
method:
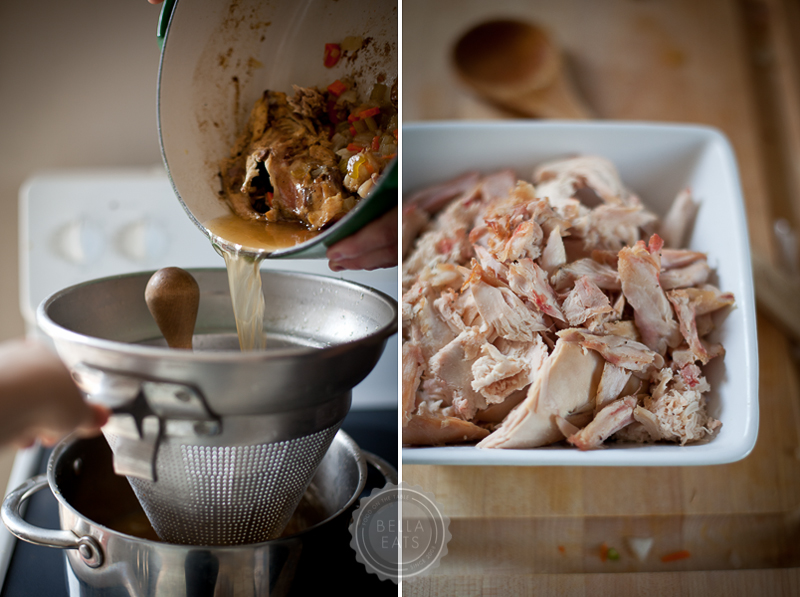
First, make the stock. Heat the oil in a large pot over medium-high heat. Add the onions, carrots, and celery and sauté until soft and translucent, about 8 minutes. Add the bird carcass and enough water to mostly cover, about 16 cups. Bring everything to a boil and then drop the heat to medium-low, letting the stock simmer for 2-3 hours until full of flavor and reduced to 8-10 cups. Strain the stock through a fine sieve, and discard the bird carcass and all vegetables. Let the stock cool completely before refrigerating if you're not going to use it the same day.
Clean the pot, and start again with heating the oil and sautéing the second batch of onions, carrots, celery, and garlic. After 3 minutes, add the stock, herbs, tomatoes, and leftover meat. Bring to a boil and drop to medium-low, letting the soup simmer until the vegetables are tender, about 20 minutes. Add the orzo and continue to simmer until tender, another 10 minutes. Add the swiss chard and cook until wilted, about 3 minutes. Season with salt + pepper and serve, being careful to remove the thyme sprigs and bay leaves.
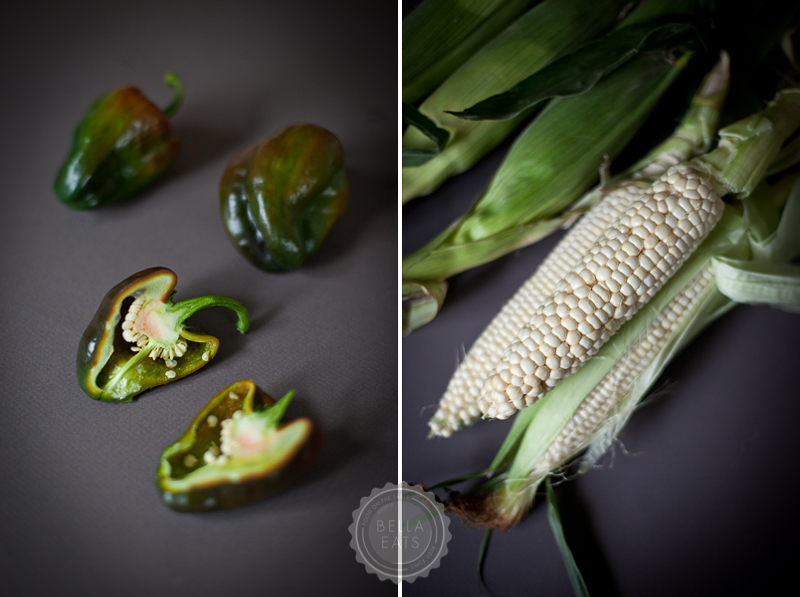
The final days of summer are upon us. Already I've worn a scarf, contemplated tights, and polished my boots. The weather this Sunday past was Perfect (yes, with a capital 'P')...temperature in the upper sixties, sunny skies, a crisp breeze. Our windows have been flung wide open, the air conditioner *hopefully* retired until next June. Brian happily gave our lawn what he wishes to be its last cut, and I've planted the garden beds full with beets, carrots, collards, and lettuce. We're ready...for Fall festivals, warm jackets, rosy cheeks, mulled cider, creamy soups, firey leaves, golden light, and crisp air.
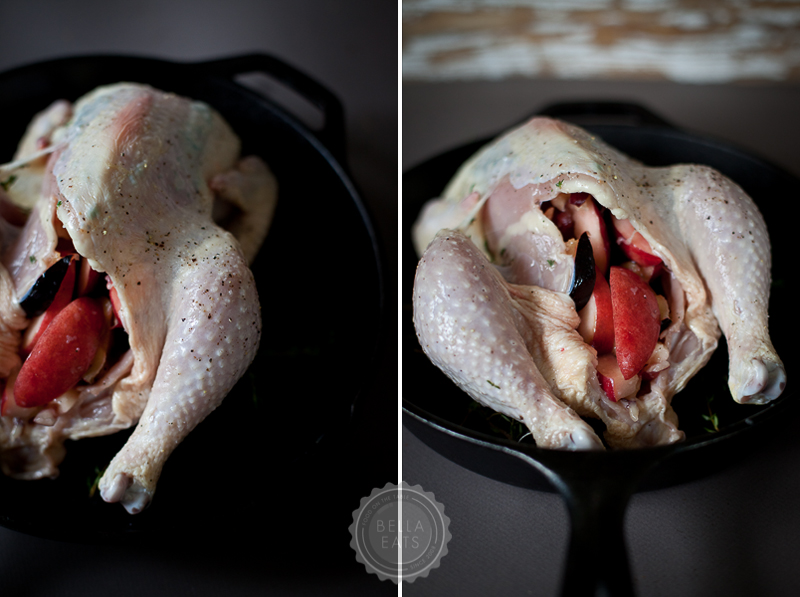
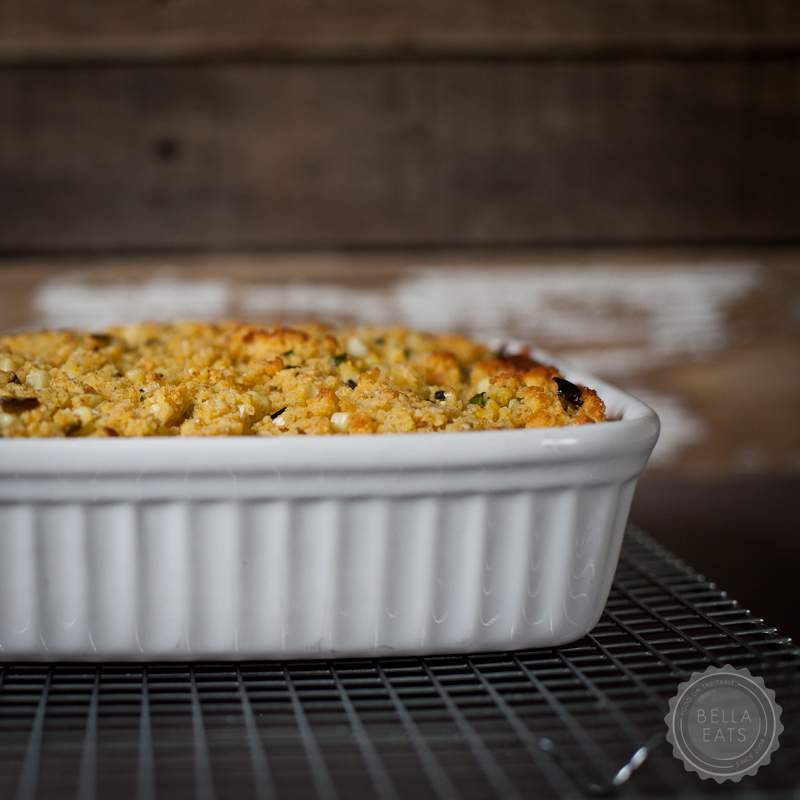
As a send-off to Summer we're embracing her end-of-season bounty. There are still local peppers and corn to be had and I, ever the fan of fresh, local corn, am consuming as much as I possibly can until it is gone. We've had corn chowder, corn pancakes, cornmeal cake. And now, perhaps my favorite thus far, corn bread stuffing laced with green chilies. And alongside that, a roast chicken stuffed with local plums and nectarines. The perfect meal for these last Summer days, when cooler temperatures have us craving warm and comforting fare at their end.
I expected the stuffing to be very, very spicy, but was pleasantly surprised by the mild heat the chilies provide. Still, if you have an aversion to spice, consider substituting anaheim peppers for the jalapenos.
Roast Chicken with Summer or Fall Fruit
serves 2-4, depending on the size of the bird
Ingredients
one fresh, organic, whole chicken (this bird was about 2.5 lbs)
a few tablespoons of canola oil
salt + pepper
12 fresh thyme sprigs
2-4 nectarines, peachs, or plums (or a mix of all three) cut into wedges (and, when Fall hits full-force, this would be delicious with apples, too)
Method
The morning you are planning to cook the bird for dinner, rub him down with oil. Work your fingers between the skin and meat of the bird's thighs and breast, separating the two to form pockets for the herbs. Stuff the thyme underneath the skin in as many places as you can, reserving a few sprigs. Finally, rub the bird thoroughly with salt and pepper, over top and underneath the skin. Refrigerate the bird until you're ready to cook him.
Preheat your oven to 325° and place a rack in the middle. Lay the remaining thyme sprigs in the center of a medium cast iron pan. Place the bird, breast-side up, on top of the thyme. Stuff as many fruit wedges as you can inside of the cavity, and lay the rest in the pan around the bird.
Cook the chicken for 45 minutes, then remove from oven and turn him over. Cook for another 45 minutes, remove from oven, and turn him again. Make a small incision in the breast to see if the meat is cooked through, white and not pink. For a small bird, 90 minutes is about all you need. If you're cooking a larger bird, he will take longer. Just keep turning him every 45 minutes until the meat is white and the interior juices run clear.
When the chicken is done, turn the oven to broil. Place the chicken, breast side up, back in the oven on the middle rack. Broil until the skin browns and crisps, about 5 minutes.
Remove the chicken from the pan, retaining the juices and fruit in the pan. Let the chicken rest for about 15 minutes before carving him.
Bring the juices and fruit to a boil on the stovetop. Reduce to a simmer and cook for about 10 minutes, until the juice is reduced to a thicker glaze. Spoon the glaze and fruit over top of the carved chicken, on individual plates.
Melt the butter in a large skillet over medium-high heat. Add all of the chilies and saute until they begin to soften, about 8 minutes. Stir in half of the corn and all of the green onions. Transfer the mixture to a large bowl. Coarsely crumble the day-old cornbread into the bowl and mix together.
Blend the rest of the corn, the eggs, sugar, salt, and pepper in a food processor until you have a course puree. Stir the puree into the stuffing mixture.
Preheat oven to 350°. Generously butter a 13x9x2 or a 10x10x2 baking dish. Transfer the stuffing mixture to the baking dish and pat down into dish. Butter a piece of aluminum foil and place the foil, butter side down, over the stuffing. Bake until heated through, about 40 minutes. Uncover the dish and bake until the stuffing is slightly crisp and golden, about 15 minutes.
Buttermilk Corn Bread
Ingredients
1/2 cup (1 stick) unsalted butter
1 1/2 cups buttermilk
2 large eggs
2 cups yellow cornmeal
1 cup unbleached all purpose flour
1/2 cup sugar
4 teaspoons baking powder
1 teaspoon salt
1/4 teaspoon ground black pepper
Method
Preheat oven to 400°. Butter a 13x9x2 inch baking pan.
Melt butter in a large saucepan over low heat. Remove from the heat and whisk in the buttermilk, and then whisk in the eggs.
Mix all of the remaining ingredients together in a large bowl. Stir in the buttermilk mixture. Transfer batter to the buttered baking pan.
Bake corn bread until edges are lightly browned, about 20 minutes. Cool completely in pan. Cover the pan tightly and store at room temperature for at least one day, and up to two days.
Those of you local to Charlottesville or Richmond: I've been providing Relay Foods with recipes and photography for some time now. I typically try to post recipes here, on Bella Eats, prior to their appearance on Relay, but have been a little swamped lately. So, this means that if you're interested in adding the ingredients for the Corn Bread Stuffing with Green Chilies to your Relay order with just one click, you can do so here.
My heels hit the pavement with a muffled thud that keeps time with the music streaming in my ear. I've been fussing with the wire to my headphones, trying to rearrange the line moving down the inside of my shirt to the iPhone in my hand without losing my balance and accidentally stepping out in front of a car. Frustrated, I finally pull the plugs from my ears and wrap the cord around my wrist, content to let my feet provide base to accompany the chirping birds' melody as I finish my jog.
I’ve only recently started running again, pounding the pavement on my neighborhood streets as much for the fitness benefits as for the opportunity to get outside and absorb the beauty of my environment. Running and I don’t really get along (you can read a bit about that here, from the old Bella Eats) so my mileage is pretty light and my pace is fairly slow. I typically try to distract myself either with a talkative buddy or a good Pandora station on my iPod, but lately have found that my surroundings are distraction enough.
In the last few weeks I’ve witnessed the transition of dry, yellow lawns into luscious, chartreuse carpets speckled with sunny dandelions and dusty purple violets. I’ve waited patiently for the lilac bush at the top of one long, steadily-sloped hill to come to bloom and finally, just last week, was able to stop for a few deep inhales of oh-so-sweet perfume from its clumps of delicate blossoms. As my feet pad-pad-pad the concrete sidewalk I’ve found my head spinning in all directions to absorb freshly-mulched flower beds that first showcased crocuses in mid-March, revealed daffodils two weeks later and tulips two weeks after that. The ethereal quality of each April day is enough to entice me to lace up my shoes and walk out the door, always excited to see what’s changed in the few days since I last plodded around the neighborhood.
As I peak the last small hill before the intersection one block from my house I am hot and sweaty, my skin bright pink and glistening with tiny beads of moisture. I reach the corner and slow to a walk, raising my hands to the top of my head and taking in a few deep, slightly ragged breaths. The breeze picks up just then, sweeping through the branches overhead to send a cascade of browning cherry blossoms swirling towards the ground. This is the last of them, the white and pink flowers have been slowly pushed out by darkening green leaves over the last couple of weeks. I’ll miss the bright, cottony treetops, but now we have floppy dogwood blossoms and bright fuchsia azaleas to admire. And after that there will be wild sweet peas and multiflora rose, both lending the air surrounding Charlottesville with the sweetest scent you can imagine, making the deep, ragged breaths at the end of a run a bit more tolerable.
The sun is setting now, giving the golden evening light a hint of green as beams filter through the new growth on our backyard trees. I stretch on the back deck for a few minutes, sinking my hips deep into a lunge as the Spring breeze brushes over my still-damp skin, sending a little smattering of goosebumps up my cooling arms. It’s going to get chilly overnight, despite the mid-day temperature of 65-degrees.
This is so typical for Charlottesville this time of year - daily temperatures that swing from the 30's to the 70's and back in just 24 hours' time. It calls for a little planning in the morning, a layering of clothing to be sure you're warm enough when you walk out the door but not too hot when you step out for lunch. It means watching the forecast carefully to be sure that those plants that spent the Winter indoors and "just want a little sunshine!" on the back deck are brought in before the air turns too cool. It also means preparing meals that satisfy a plethora of cravings, from light and bright to comforting and warm.
As I finish my stretching and head inside my nose absorbs the scent of chicken braising in a bath of milk, lemon, sage and cinnamon. There is soup too, a zippy puree of Winter-Spring veggies. I am glad that I thought to start dinner prior to my run, because although standing in a hot kitchen prepping dinner sounds miserable right now, in thirty minutes the cool air slipping through our windows will have me wanting a warm and comforting meal. A warm and comforting meal that is, at the same time, light and bright with the promise of Spring.
This soup is perfect on these Spring days with nights that feel closer to Winter. The parsnips are strong, so if you're looking for just a hint of the root I'd reduce their amount to 1/2 pound and up your potato count to 3. Be sure to add the squeeze of lemon at the end, it really makes the asparagus shine.
Creamy Asparagus and Parsnip Soup
serves 4
Ingredients
3 tbsp butter
2 large russet potatoes, peeled and diced to 1-inch chunks
about 3/4 pound parsnips, peeled and diced to 1-inch rounds
1/2 large onion, diced
3 garlic cloves, minced
1 pound asparagus, tough ends removed, chopped to 1-inch pieces
1 cup white wine
4-5 cups chicken broth
salt and pepper
1 lemon
Method
Melt butter in a large soup pot over medium-high heat. Add the potatoes, parsnips, onion, garlic, and asparagus and stir to coat with butter. Cover pot and let veggies sweat for 10-15 minutes, until the potatoes and parsnips are slightly tender.
Add white wine to pot and stir to deglaze bottom of pan if there are any bits of veggie stuck. Add the chicken broth, enough to just cover all of the vegetables. Bring to a boil, then reduce to a simmer and cook until potatoes and parsnips are fully tender, another 10 minutes or so.
Using an immersion blender or a regular blender, puree the vegetables until you have a smooth, creamy consistency devoid of any chunks. Season with salt, pepper, and lemon juice, to taste.
This chicken is everything that everybody has raved about. Moist and flavorful, it is wonderful on its own dressed simply with the sauce created from the braising liquid.
cinnamon stick (mine was about 3 inches in length)
handful of fresh sage leaves, removed from stem
zest of 2 lemons
10 cloves of garlic (I removed the skin)
1 pint milk
Method
Preheat your oven to 375*.
Rinse and thoroughly dry your chicken.
Rub your chicken down with sea salt and black pepper, evenly and thoroughly. Heat a large oven-proof pot on your stove top and melt the stick of butter and a glug of olive oil together. Place the chicken in the pot, breast-side down, and fry until golden brown. Turn bird to all sides to get even, golden color. This should take about 10 minutes.
Remove the bird from the pot and place on a plate. Discard the remaining butter and oil. Put the bird back in the pot (don't mind all of the little brown bits at the bottom of the pot, they will add tremendous flavor to the final sauce) and add the rest of your ingredients. Place the pot in the oven, covered, and cook chicken for 90 minutes. Baste with the cooking juices whenever you remember (which I did 2 or 3 times). If you think about it, remove the lid for the last 30 minutes of cooking, so that the skin will crisp up a bit. If not, no biggie.
To serve, pull all of the neat from the bones and divide amongst 4 plates. Be sure to siphon up the juices in the pot including the curds, which I know look weird but add so much flavor to the sauce. I put the sauce in a jelly jar and shook it really hard, to help incorporate those curds into the liquid so that they didn't look so funny on my chicken. Spoon the sauce over the pulled chicken and ENJOY!
Be sure to fish out all of the garlic cloves from the pot when the chicken is done. Spread them over thick slices of chunky bread, and swoon!