You can edit the text in this area, and change where the contact form on the right submits to, by entering edit mode using the modes on the bottom right.
Form Block
This form needs a storage option. Double-click here to edit this form, and tell us where to save form submissions in the Storage tab.
Learn more
123 Street Avenue, City Town, 99999
(123) 555-6789
email@address.com
You can set your address, phone number, email and site description in the settings tab. Link to read me page with more information.
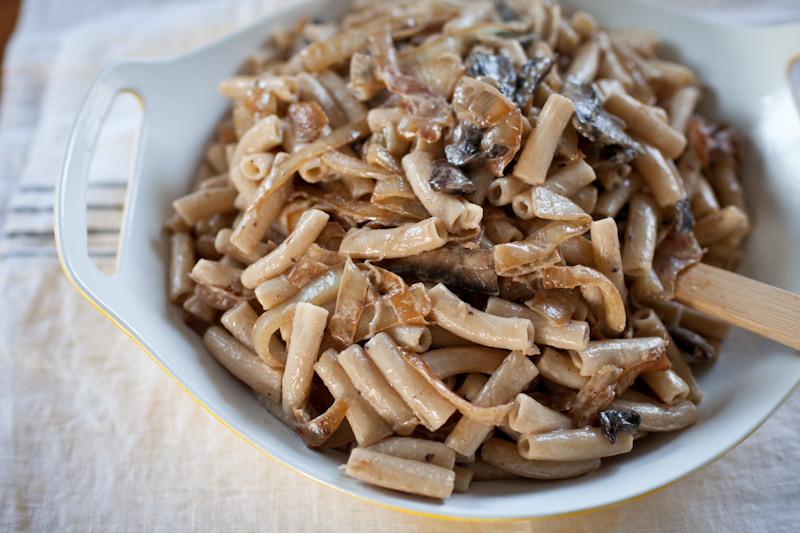
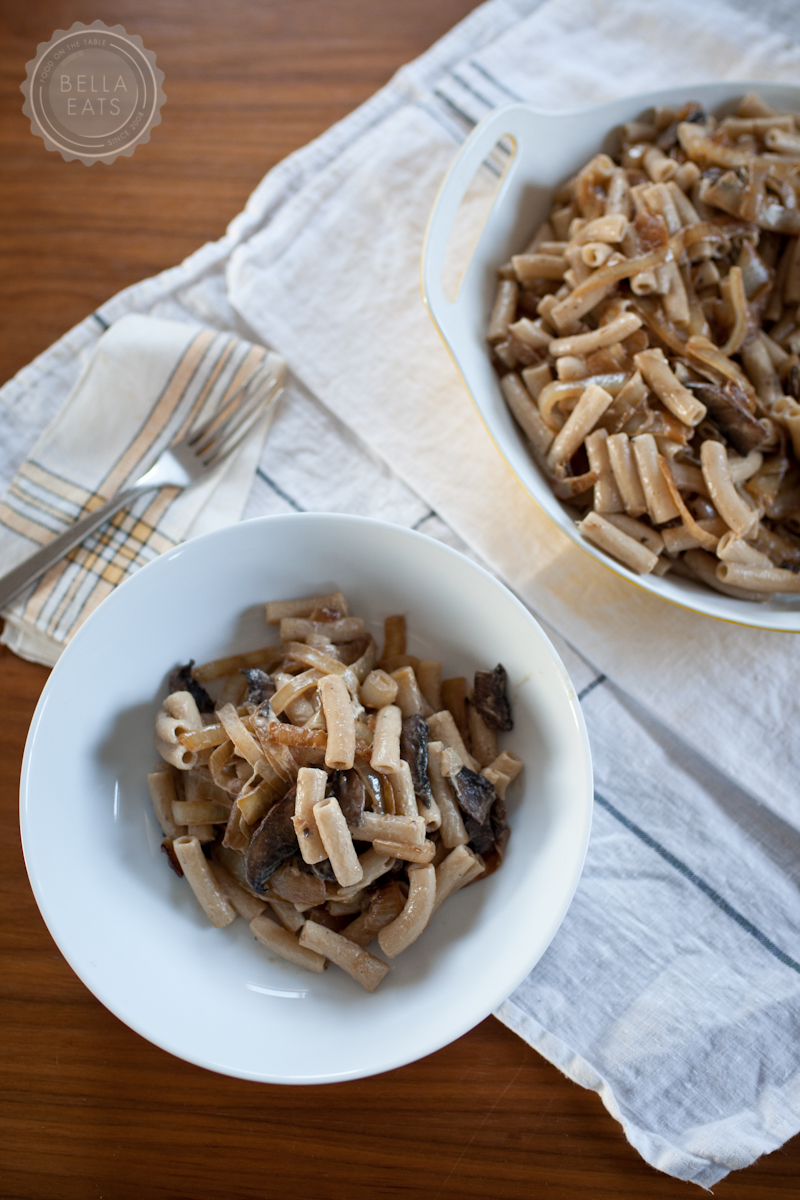
Goodness, I am not doing so well in the beauty department with the recipes I've shared in 2012. But again, this one is worth trying even with the overall brownness of the dish. It is relatively quick and involves inexpensive ingredients that we typically have every day. With little flecks of green parsley it is even more tasty and just a tad prettier but, as you can see, parsley wasn't in my fridge when I prepared this meal (for the 3rd time in a month, I'll add) and it was still really wonderful. Maybe not 'share with company' delicious, but perfect for a weeknight with family, or with friends who are family.
Virginia is in a weird, in-between phase of weather right now. One day we'll have sleet and snow dust and misty skies, the next sunshine and fluffy clouds and crocuses peaking from beneath fallen leaves. Mother Nature can't decide if she should buckle down and get serious about Winter or skip on ahead to Spring. I'll take either, but the back and forth is really throwing me off. I waver between wanting a thick + meaty stew for dinner or a light salad with citrus. Grocery shopping is nearly impossible since the chances of my craving what I actually buy are slim, given that the weather is bound to drastically change 2 days later. I am falling back on old staples; meals that have proven themselves worthy no matter the time of year. Like this one, which I'll either fill my bowl to the brim with (cold, Winter day) or pair equally with a fresh salad (warm, Spring day). Either way it's a winner, and sure to stay in our rotation year-round.
Ziti with Portobello Mushrooms, Caramelized Onions, + Chevre
1 lb portobello mushrooms, stems removed, caps halved and then cut into 1/4-inch slices
3 tbsp chopped fresh parsley
1/4 tsp fresh-ground black pepper
3/4 lb ziti (we use brown rice pasta in our house...just as silky as semolina, but whole grain)
3 oz soft goat cheese, crumbled
3 tbsp grated parmesan cheese, plus more for serving
Method
In a large sauté pan, melt 1 tbsp of the butter with 2 tbsp of the oil over moderate heat. Add the onions, 1/2 tsp of the salt, and the sugar and cook, stirring frequently, until the onions are well browned, about 20 minutes (I let them go for closer to 30). Remove from the pan.
In the same pan, melt the remaining 1 tbsp butter with 1 tbsp of the oil over moderate heat. Add the mushrooms and 1/4 tsp of the salt and cook, stirring occasionally, until tender and brown, about 8 minutes. Add the reserved onions, the parsley, the remaining 1/4 tsp salt, and the pepper.
In a large pot of boiling, salted water, cook the ziti until just done. Reserve 3/4 cup of the pasta water and drain. Toss the ziti and 1/2 cup of the reserved pasta water with the mushroom mixture, the remaining 1 tbsp oil, the goat cheese, and the Parmesan. If the pasta seems dry, add more of the reserved pasta water. Serve with additional Parmesan.
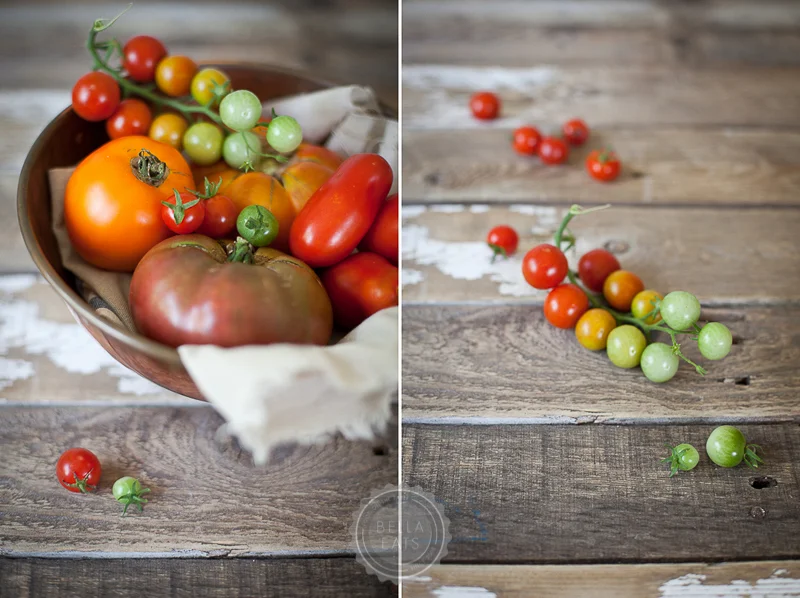
Summer. Tomatoes. Summer tomatoes. Summer tomatoes summer tomatoes summer tomatoes. The two words belong together, do they not?
With a high of 101° in Charlottesville today (real feel 115° to 120°...um, when did we move to the equator?!?), I am not finding a whole lot to be happy with Summer about at the moment. Except for tomatoes. We are overrun with summer's favorite fruit right now...big ones, little ones, red ones, orange ones. All picture frames and candles have been removed from my dining room sideboard to make way for our bounty from the farm. It is the official tomato storage and ripening spot in our house, a constantly revolving inventory of heirloom varieties. I've made pints of marinara to store away for winter, and have plans to can soups and salsas in the coming weeks. But still, my very favorite way to consume a perfectly ripe tomato is thickly sliced, with sea salt. It just doesn't get much better than that. Unless you sandwich one of those slices between two hunks of bread with some bacon...that's pretty darn good too.
Most of our meals this week involved, you guessed it, tomatoes. In sauce over pasta, in salsa on fish tacos, sliced with fresh mozzarella on pizza, the 'T' in our BLTs. And this lovely, simple, rustic tart. It breaks my 'don't turn on the oven' rule, but at least it isn't the stove top.
First, I have to say again how much I love Jack Bishop's book, A Year in a Vegetarian Kitchen. I have shared several recipes from there, here, and cannot praise it enough. We have been thrilled with every single dish we've made between its covers, and love how simple and quick they always are. This tart is no exception. The crust dough comes together beautifully and is so easy to work. The filling ingredients are simple. The whole tart is finished with just 15 minutes of prep time, which I love. If the crust weren't so butter-full we'd have this meal multiple days each week.
Be sure to only make this tart when tomatoes are at their peak...a pink and grainy 'mater just wouldn't do...
6 oz fresh goat cheese, crumbled (about 1-1/3 cups)
3 medium, delicious tomatoes, cored, sliced crosswise 1/4-inch thick, and blotted dry between paper towels*
1 tbsp extra-virgin olive oil
salt + freshly ground black pepper
Method
First, make the crust dough (about 1 hour before you're ready to assemble the tart). Place the flour, salt, and rosemary in a food processor and pulse several times to combine. Add the butter and pulse until the mixture resembles pea-sized crumbs, about ten 1-second pulses. Add the water, 1 tbsp at a time, and pulse briefly after each addition. After 4 tbsp of water have been added, process the dough for several seconds to see if it will come together. If not, add the remaining 1 tbsp water. Process just until the dough comes together in a rough ball. Do not overprocess or the dough will not be flakey. Transfer the dough to a lightly-floured work surface and knead briefly to for a smooth ball. Flatten the dough into a 5-inch disk and wrap it in plastic wrap. Refrigerate the dough for at least 1 hour and up to 2 days. Note: My dough was very sticky with just 4 tbsp of water, so I wound up adding some flour to help it to come together. The final dough should be smooth and supple before refrigerating. Also, if you don't have a food processor, you can still make the dough by using forks or a pastry blender to cut the butter into the flour mixture, then add your water.
Move an oven rack to the middle position and heat oven to 375°.
Unwrap the chilled dough and roll it into a 12-inch circle on a lightly floured surface. Lay the dough over a 10-inch tart pan with a removable bottom, fitting the dough into the bottom and sides of the pan. Run the rolling pin over the top of the tart pan to trim the excess dough. Prick the bottom of the tart shell all over with a fork.
Finally, fill and bake the tart. Scatter the goat cheese evenly across the bottom of the tart shell. Arrange the tomatoes over the cheese in two rings, one around the outside edge of the tart pan and another in the center, overlapping them slightly. Drizzle the tomatoes with the olive oil and sprinkle with salt and pepper to taste.
Bake until the edges of the crust pull away from the sides of the pan and are golden brown, 45 to 50 minutes. Cool the tart on a wire rack for at least 10 minutes. Cut the tart into wedges and serve. Also, it is really good at room temperature so feel free to make this ahead and let it cool for several hours.
* To dry tomatoes, lay 3 layers of paper towels on a flat surface. Place your tomato slices on the paper towels, and then cover with 3 more layers of towels. Gently press your hands over the tomatoes to extract as much liquid as you can without crushing the tomatoes. When you lift the slices from the towels, many of the seeds should stay behind. This will keep your tart crust from becoming soggy.
The mosquitoes are out in full force, covering my skin with pink welts each time I venture into our overgrown garden. My hair frizzes to twice its volume as soon as I consider stepping outside. I can’t walk down the block without tiny beads of sweat popping up on the back of my neck, yet my office is frigid enough to require a sweater. Spring seems to have moved on early this year, leaving in her wake an abrasive and demanding Summer.
But, despite all of this personal discomfort, I love this time of year. Truly, I do.
I love the thunderstorms that sweep in like clockwork each afternoon, lending the sky an ominous tone and the air an electric buzz. I love the booths at the farmer’s market, the tables full of greens and berries and cucumbers and beets. I love that the water is warm enough to take the dogs swimming at the reservoir, and that those trips are the perfect opportunity for a picnic. I love drinking Moscow Mules on the back deck while watching fireflies glow in the trees, and the smell of sun screen and citronella and bug spray made sweeter by the intoxicating aroma of freshly-mown grass and trampled mint.
Those are all compelling arguments, I know, but what I love most about this Almost-Summer time of year is the local Virginia fruit. Those few days where I find myself wandering between tidy rows of strawberries, or ducking under tree branches dripping with both rainwater and cherries, are worth every welt on my itchy legs. Filling our basket with blueberries and melons at Charlottesville's City Market makes the sweltering heat just bearable as we make our way between stalls. And folding homegrown raspberries into whipped buttercream...oh my. There aren't many discomforts that fresh raspberry buttercream can't fix.
But today, let's focus on those cherries. Ten-year-old Andrea would probably tell you that they are her favorite fruit...ever...for their appearance at the grocery store was always perfectly timed with the end of school and the beginning of Summer vacation. My momma, a teacher and just as excited for the break, would plan day trips to Florida’s fresh water springs for my friends and me. A bag full of sweet cherries was always packed as part of our lunch. After a few hours of swimming and snorkeling and sharks’ tooth hunting the dark-skinned globes would come out of the cooler, icy cold and immediately covered in tiny beads of condensation.
We’d find a spot in the grass, out of the shade of our claimed pavilion. The spring water was frigid, and the sun felt good on our skin as we spread a blanket and chose our places for the competition that was sure to follow. Small hands reached into the Ziplock bag, pulling out handfuls of tangled fruit to place in cross-legged laps. One-by-one, plucked from the mass by rubbery stems, the cherries were popped into eager mouths. Rolled around and around the tongue, the pit was picked clean before being spat from juice-stained lips across the sun-soaked lawn.
Oh, summer.
I won't deny that my adult days have seen the occasional cherry-pit-spitting contest. Yes, I do that. But 28-year-old Andrea has also learned how to bake and how to make jam, and that cherries pair well with savory partners as well as sweet. Take this dish, for instance, a variation on the classic tomato and basil bread salad. In it, sweet cherries are paired with the tang of balsamic vinegar and spicy arugula, all held together by a base of crisped bread and a topping of creamy chevre. It is a very adult meal, a lovely, rustic dinner for two on the back deck that is complimented nicely by an effervescent vinho verde.
Just be sure to save some of those whole cherries for dessert...you never know when your inner child will demand a little friendly competition.
Bread Salad with Cherries, Arugula and Goat Cheese
from A Homemade Life, by Molly Wizenbergmakes 4 first-course servings, or a meal for 2
Ingredients
6 oz rustic bread, preferably a day old (I used a whole wheat baguette)
olive oil
1/2 pound cherries, halved and pitted (I used sweet cherries, and a cherry pitter was SO handy)
1/8 tsp pressed or crushed garlic
balsamic vinegar
salt
arugula
fresh chevre, coarsely crumbled
black pepper
Method
Preheat oven to 400 degrees.
Trim crust from bread, and discard the crust. Tear the bread into rough, bite-size pieces (you should have about 4 cups, total). Dump the bread onto a rimmed baking sheet, and drizzle it with olive oil. Toss to coat. Bake until crispy and golden in spots, shaking the pan once, 8 to 10 minutes.
Meanwhile, put about one-third of the cherries in a small bowl and mash them lightly with a fork to release their juices.
When the bread is nicely toasted, turn it into a large bowl. While it is still hot, add the crushed garlic and toss well. Set the bowl aside to cool for a minute or two, then add all of the cherries, both mashed and halved, and toss. Add 2 tsp balsamic vinegar and toss again. Add 1 tablespoon olive oil and a pinch or two of salt and toss again.
Taste, and adjust the vinegar, oil and salt as needed. The bread and cherries should taste good on their own. When you're satisfied with the flavor, add about 2 handfuls of arugula and toss one last time. Finish with a generous amount of crumbled goat cheese and a few grinds of the pepper mill, and serve.
I’d been wanting some of these little tart tins for, oh, at least one year. Its not that I make a lot of tarts and require a variety of vessels for filling...it really comes down to the fact that I love the tiny proportions of the tins themselves. There's just something very appealing about baked goods in small packages.
Although the tins aren’t that expensive, I hadn’t been able to justify purchasing them for their aesthetic appeal alone. I felt that I needed to have in mind a specific recipe that absolutely required the use of such tins. Or perhaps, at the very least, to have gone through some serious experimentation in the full-size tart pan that I already owned to justify my graduation to experimentation with its smaller siblings.
Lucky for me, my stepfather came to my rescue and put me out of my indecisive misery. While home for Thanksgiving, Joe took me shopping. For baking pans. Many, many baking pans. So many pans that Brian and I had to reorganize our entire kitchen. I now have my tiny tart tins, a beautiful tube cake pan, additional sheet pans and cooling racks, even some ice cream scoops for balling cookie dough. Suddenly recipe searching has taken on a whole new agenda, with me thinking “oh! I could use my new [insert baking tool here]!”.
And so, although things have been quiet on this little blog of mine this last week I assure you, I’ve been busy in the kitchen. And busy shopping. And busy wrapping. And busy writing out holiday cards. But mostly, I’ve been busy enjoying my new toys.
I have a few recipes I still want to share with you prior to Christmas Eve and so, in the interest of getting all of the items on my holiday ‘To Do’ list crossed off [and therefore maintaining my own sanity...I'm just a little bit OCD...] I’m going to have to keep posts a bit shorter than usual. I hope you won’t mind. My guess is, you all are pretty busy too. :)
I was certain that the debut of these little tins would involve sharing something sweet with you all, and so was surprised when the urge to make a savory tart struck me first. The possibilities for fillings are endless, truly, but we were pretty pleased with the results of our first attempt, which I’ve shared below. I think they would be a great addition to the buffet table at a party, easy to pick up with one hand while holding your cocktail glass in the other.
Savory Winter Tarts
makes (6) 4-inch tarts
Ingredients
9-inch pie crust dough (the rolled dough, not the kind in the aluminum dish)
1/2 pound bacon, fried
1 medium leek, light green part only, sliced
1 medium red potato, very thinly sliced
4 large mustard green leaves, washed and chopped finely
3-oz chevre, crumbled
2 eggs
3/4 cup whole milk
salt + pepper
Method
Thaw your pie crust dough according to the instructions on the package. Preheat oven to temperature indicated on package. Roll out the dough until it is 1/8-inch thick, and cut into roughly 5-inch by 5-inch squares. You'll probably only get 4 squares from this first pass. You'll want to gather the scraps, ball them up, and roll the dough back out to cut the remaining squares. Place a square of dough into each tart tin, pressing the dough into the bottom and sides of the tin. Trim the dough to be flush with the top of the tin. Place tart shells on a baking sheet covered with aluminum foil and bake according to the instructions on the dough package.
Gather your filling ingredients (other than the eggs, milk, salt and pepper) and set aside.
Whisk together the eggs and milk. Add salt and pepper to taste.
Remove the tart shells from the oven once they are starting to turn golden brown. Set oven temperature to 400*.
Once the tart shells have been baked and cooled about 10 minutes, you can fill them. Fill tarts first with potatoes, mustard greens, leeks then bacon. Do not overfill the tarts, you may not use all of the ingredients.
Carefully pour the egg/milk mixture into each tart, dividing it evenly amongst all 6 tart tins, being careful not to let the custard overflow. Drop chevre on top of the tarts in bits.
Bake the tarts on the cookie sheet at 400* for 25-35 minutes, until custard is set and toppings are starting to brown.
*Note - Tiny tart tins aren't absolutely necessary for this recipe, (1) 10-inch tart tin will accommodate these ingredients. But, the miniature tins sure are fun...