Contact Us

Use the form on the right to contact us.

You can edit the text in this area, and change where the contact form on the right submits to, by entering edit mode using the modes on the bottom right. 


123 Street Avenue, City Town, 99999

(123) 555-6789

email@address.com


You can set your address, phone number, email and site description in the settings tab.
Link to read me page with more information.

Blog

Filtering by Tag: savory

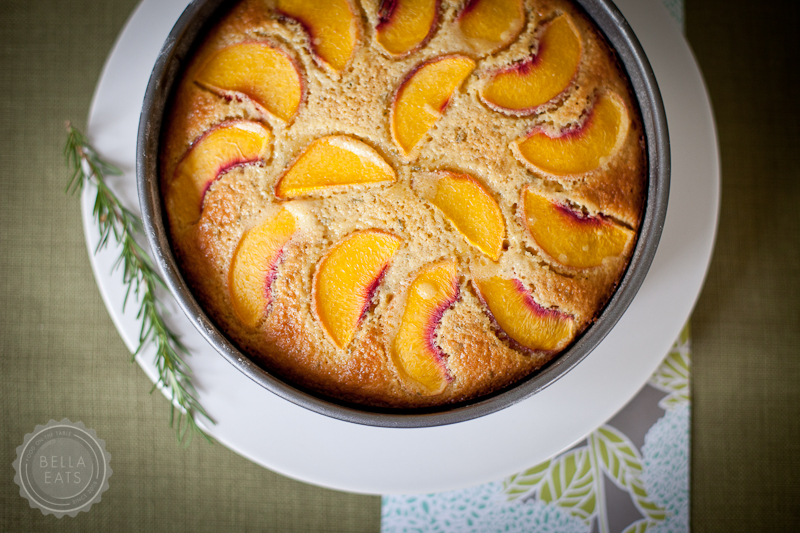
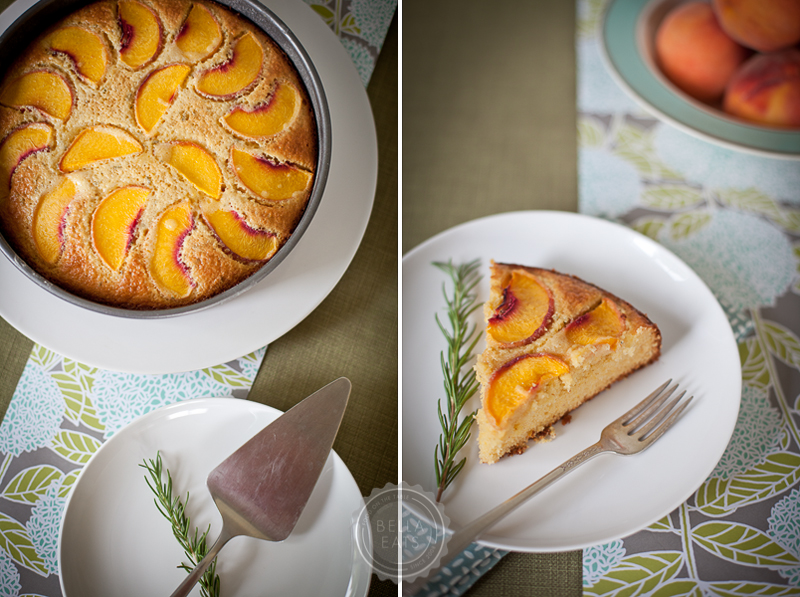
cornmeal cake with peaches + rosemary

Andrea

I find it appropriate that I am following up a post about summer tomatoes with a post about summer peaches. Brian and I have long had the argument over which is our favorite summer fruit, with him typically landing on the tomato side of the line and me on the peach. It is a close race, for sure. Both are delicious only during their season, each overlapping the other during July and August in Virginia. We rarely eat tomatoes outside of summer, and never peaches, unless we've put some away in jars and freezer bags. The limited window of availability makes peaches and tomatoes all the more special, precious even, and we indulge ourselves in both when they are available. Right now, as I write this, there are roughly 20 pounds of peaches and 30 pounds of tomatoes spread across my dining room. 50 pounds of fruit, friends. I think we have a problem...

After venturing out to Chiles Peach Orchard with a girlfriend a few days ago, I found the first thought swirling through my head involved a dense, peach-topped, breakfast-y cake. A cake with some heft; a good base to start the morning off just right. After some searching I came across Emeril's Cornmeal Olive Oil Cake with Poached Peaches...(the name goes on...), and modified it to suit my own desire for a simple, one-component breakfast cake. I am so very, very pleased with the result. The rosemary-scented cornmeal crumb is dense and savory with moments of crunch and highlights of salt. It sounds strange, I know, but there really are occasional bites that taste salty, while the majority offer a mild sweetness courtesy of the honey and fruit. It is a cake full of wonderful contrasts; sweet paired with salty, the crunch of cornmeal with the softness of peaches.

I wouldn't pigeonhole this cake into the dessert category; it really could pass as a cornbread side dish at a backyard barbecue. But I think the perfect place for it would be brunch...where savory sweets are wanted and expected. It is a new favorite in our house, for sure, and even further muddies the race between the tomato and the peach...

Cornmeal Cake with Peaches + Rosemary

adapted from Emeril Lagasse via Food Network

serves 8

Ingredients

  • 3/4 cup all-purpose flour
  • 1 tsp baking powder
  • 3/4 tsp salt
  • 1 cup yellow cornmeal
  • 1/2 tsp minced, fresh rosemary
  • 2 large eggs
  • 1 large egg yolk
  • 2/3 cup milk
  • 1/2 cup olive oil
  • 1 tbsp finely grated lemon zest
  • 3/4 cup sugar
  • 1/4 cup honey
  • 1 ripe peach, sliced thinly (1/8-inch thick)

Method

  1. Preheat oven to 350°. Lightly grease and flour a 9 by 2-inch round cake pan. (next time I will use a springform pan so that I can remove the cake whole)
  2. Into a medium bowl, sift together the flour, baking powder and salt.  Stir in the cornmeal and the rosemary. 
  3. In a large bowl, beat the eggs, egg yolk, milk, olive oil, and lemon zest with an electric mixer until frothy. Add the sugar and honey, and mix to combine. Add the dry ingredients and beat until the batter is smooth. Pour into the prepared pan and top with the peach slices.
  4. Bake in the middle of the oven for 35 minutes, or until a tester comes out with a few crumbs attached. Let the cake cool in the pan on a wire rack. If using a springform pan you can remove the cake whole, otherwise you can slice it in the pan and remove individual slices to serve.

butternut squash + mushroom empanadas

Andrea

It may seem odd to be posting a recipe for empanadas in the dead of Winter. To me empanadas are a Summer food, or maybe Fall; plucked up from a street vendor or taco stand, wrapped in waxed paper, eaten as you walk an outdoor festival or Charlottesville’s downtown pedestrian mall. They are perfect on-the-go, warm weather, sandals and short sleeves food; self-contained pockets of goodness you can eat as you walk. Outside. In the sunshine. So why, then, am I sharing these with you in the gray and bitter cold of January?

Well, for one, I am long overdue in posting this recipe on Bella Eats. Had I uploaded the images of empanadas just after making them, at the beginning of October, when butternut squash was just starting its weekly appearance on our menu, there would still be Fall festivals and backyard BBQs to attend. I wavered with whether or not to even publish this one, thinking that I’d lost its window of opportunity along with that of a handful of apple dishes I’d prepared, until I received an email from a friend on Saturday. She and her husband were on their way to Bali. Bali! In January! How lovely.

Shortly after reading that email I watched Eat, Pray, Love (which, it turns out, is not nearly as good as the book) and stared longingly at the beaches and bike riding and sundresses of Indonesia, the warmth of it all seeping from the screen. That is what I crave this time of year, the ability to escape to someplace warm and tropical, if even for just one meal. If you’re at all similar to me then a dish like these empanadas, which are made up of Winter-ish ingredients but convey the spirit of warmer times, will be just what you’re looking for this January.

Unless, of course, your resolutions for the new year include limiting luxuries like butter in your diet. To that I say, “everything in moderation” and “invite some friends over”! These rich, savory, chock-full-of-butter pockets certainly are not something to have on hand for multiple days at a time, and so are really the perfect thing to make and experiment with when you have plans to eat with a group of people. Just as empanadas are an excellent walking food, they also work well at a mostly-standing, “lose the Winter blahs with tequila in one hand” party. I have a feeling that we will all be looking to add one of those gatherings to our calendars towards the end of this gray and dreary month, so keeping this recipe close will be handy. Trust me.

Butternut squash roasted with mushrooms and wrapped in a delicate, butter-full pastry has all the makings for a hearty Fall-Winter meal. The fresh tomatillo sauce, however, does throw me off. In a space where I try to share mostly seasonal recipes, anything that calls for tomatillos in the heart of January seems a bit hypocritical, does it not? Luckily, there are some good options for jarred tomatillo salsa out there, any of which would be an excellent (and much less time-intensive) addition to the empanadas. I would, however, keep this sauce in mind next Summer when tomatillos are available, and think about making and putting some away for the Fall and Winter months ahead.

Butternut Squash + Mushroom Empanadas with Tomatillo Sauce
from Gourmet, October 2002
makes 8 empanadas

Filling

  • 1 cup diced (1/4 inch) butternut squash
  • 1/2 cup finely chopped white onion
  • 6 small garlic cloves, minced
  • 2 tbsp olive oil
  • 2 (2 to 3 inch) fresh jalepeño chiles, seeded and ribs discarded, finely chopped
  • 1 pound fresh exotic mushrooms, trimmed and coarsely chopped (I just used cremini mushrooms, because I had them)

Sauce

  • 1 dried pasilla de Oaxaca chile (I used a canned chipotle chile in adobo sauce, also, because I had it) chopped finely
  • 3 garlic cloves, left unpeeled
  • 1 pound fresh tomatillos, husks discarded and tomatillos rinsed and quartered
  • 1/4 cup finely chopped white onion
  • 1/4 cup water
  • 1/2 tsp salt

Empanada Dough (from Gourmet, October 2004 - makes enough for 12 empañadas)

  • 2-1/4 cups unbleached all-purpose flour
  • 1-1/2 tsp salt
  • 1 stick (1/2 cup) cold unsalted butter, cut into 1/2 inch cubes
  • 1 large egg
  • 1/3 cup ice water
  • 1 tbsp distilled white vinegar

Egg Wash

  • 1 large egg beaten with 1 tbsp water

Method

  1. First, make empanada dough. Sift flour and salt together in a large bowl. Blend in butter with your fingertips or with a pastry blender until mixture resembles course meal with some (roughly pea-size) butter lumps.
  2. Beat together egg, water, and vinegar in a small bowl with a fork. Add to flour mixture, stirring with fork until just incorporated (the mixture should look shaggy).
  3. Turn out mixture onto a lightly floured surface and gather together, then knead gently with heel of your hand once or twice, just enough to bring dough together. Form dough into a flat rectangle and chill, wrapped in plastic wrap, at least one hour.
  4. Next, make filling. Preheat oven to 400˚. Combine together the squash, onion, garlic, jalepeño, and mushrooms. Toss with olive oil and a good sprinkling of salt and pepper, and spread in an even layer on a baking sheet. (The Gourmet recipe differs here, boiling and sauteing the vegetables. I love the flavor that is brought forth with roasting, so chose to cook the filling using this method instead.) Roast for 25-35 minutes, until the squash is tender and the mushrooms have released their liquid, stirring every 10 minutes or so. Remove from oven and cool in pan on rack.
  5. Meanwhile, make the sauce. Heat dry, non-stick pan over moderately high heat until hot, then toast unpeeled garlic until lightly blackened, 2 to 3 minutes on each side. Cool garlic and peel.
  6. Simmer tomatillos, onion, garlic, chile, water, and salt in a large saucepan, covered, until tomatillos are very tender, about 20 minutes, and cool slightly. Puree sauce in a blender (or with an immersion blender) until smooth (use caution as liquid is VERY hot). Return sauce to pan and season with salt. 
  7. Finally, assemble the empanadas! Keep the oven heated to 400˚. Divide dough into 12 equal pieces and form each into a disk (you will only need 8 of these pieces, the rest can be stored in the freezer for up to 1 month). On a floured surface, roll out one disk into a 6 to 7 inch round. Spoon about 1/3 cup of filling onto center and brush edge of pastry with egg wash. Fold dough in half to form a half-moon, enclosing filling, and press edges together to seal. Crimp edge decoratively and move empañada to a large baking sheet. Make 6 more empañadas using the same method.
  8. Lightly brush empanadas with remaining egg wash and sprinkle tops with coarse sea salt. Bake on middle rack of oven until golden, 25-30 minutes. 
  9. While empanadas are baking, reheat sauce. Cut each empanada in half when slightly cooled, and drizzle about 3 tablespoons of sauce around them. The sauce will keep for about a week in an airtight container in the refrigerator, and is wonderful as a salsa or drizzled over burritos, fish, or chicken. 

small packages

Andrea

I’d been wanting some of these little tart tins for, oh, at least one year. Its not that I make a lot of tarts and require a variety of vessels for filling...it really comes down to the fact that I love the tiny proportions of the tins themselves.  There's just something very appealing about baked goods in small packages. Although the tins aren’t that expensive, I hadn’t been able to justify purchasing them for their aesthetic appeal alone. I felt that I needed to have in mind a specific recipe that absolutely required the use of such tins. Or perhaps, at the very least, to have gone through some serious experimentation in the full-size tart pan that I already owned to justify my graduation to experimentation with its smaller siblings. Lucky for me, my stepfather came to my rescue and put me out of my indecisive misery. While home for Thanksgiving, Joe took me shopping. For baking pans. Many, many baking pans. So many pans that Brian and I had to reorganize our entire kitchen. I now have my tiny tart tins, a beautiful tube cake pan, additional sheet pans and cooling racks, even some ice cream scoops for balling cookie dough. Suddenly recipe searching has taken on a whole new agenda, with me thinking “oh! I could use my new [insert baking tool here]!”. And so, although things have been quiet on this little blog of mine this last week I assure you, I’ve been busy in the kitchen. And busy shopping. And busy wrapping. And busy writing out holiday cards. But mostly, I’ve been busy enjoying my new toys. I have a few recipes I still want to share with you prior to Christmas Eve and so, in the interest of getting all of the items on my holiday ‘To Do’ list crossed off [and therefore maintaining my own sanity...I'm just a little bit OCD...] I’m going to have to keep posts a bit shorter than usual. I hope you won’t mind.  My guess is, you all are pretty busy too.  :) I was certain that the debut of these little tins would involve sharing something sweet with you all, and so was surprised when the urge to make a savory tart struck me first. The possibilities for fillings are endless, truly, but we were pretty pleased with the results of our first attempt, which I’ve shared below. I think they would be a great addition to the buffet table at a party, easy to pick up with one hand while holding your cocktail glass in the other.

Savory Winter Tarts

makes (6) 4-inch tarts Ingredients
  • 9-inch pie crust dough (the rolled dough, not the kind in the aluminum dish)
  • 1/2 pound bacon, fried
  • 1 medium leek, light green part only, sliced
  • 1 medium red potato, very thinly sliced
  • 4 large mustard green leaves, washed and chopped finely
  • 3-oz chevre, crumbled
  • 2 eggs
  • 3/4 cup whole milk
  • salt + pepper
Method
  1. Thaw your pie crust dough according to the instructions on the package.  Preheat oven to temperature indicated on package.  Roll out the dough until it is 1/8-inch thick, and cut into roughly 5-inch by 5-inch squares.  You'll probably only get 4 squares from this first pass.  You'll want to gather the scraps, ball them up, and roll the dough back out to cut the remaining squares.  Place a square of dough into each tart tin, pressing the dough into the bottom and sides of the tin.  Trim the dough to be flush with the top of the tin.  Place tart shells on a baking sheet covered with aluminum foil and bake according to the instructions on the dough package.
  2. Gather your filling ingredients (other than the eggs, milk, salt and pepper) and set aside.
  3. Whisk together the eggs and milk.  Add salt and pepper to taste.
  4. Remove the tart shells from the oven once they are starting to turn golden brown. Set oven temperature to 400*.
  5. Once the tart shells have been baked and cooled about 10 minutes, you can fill them.  Fill tarts first with potatoes, mustard greens, leeks then bacon.  Do not overfill the tarts, you may not use all of the ingredients.
  6. Carefully pour the egg/milk mixture into each tart, dividing it evenly amongst all 6 tart tins, being careful not to let the custard overflow.  Drop chevre on top of the tarts in bits.
  7. Bake the tarts on the cookie sheet at 400* for 25-35 minutes, until custard is set and toppings are starting to brown.
*Note - Tiny tart tins aren't absolutely necessary for this recipe, (1) 10-inch tart tin will accommodate these ingredients.  But, the miniature tins sure are fun...
Read More