perfect as they are
Andrea
Last month, at the very beginning of May (where did you go, sweet May?) Brian and I went strawberry picking. I’d received the email days before that shouted against a bright green backdrop “strawberries are here!”. I anxiously await this announcement each year. Not only does it mark Spring’s firm hold on this time in Charlottesville, it also foreshadows the other emails to come reporting the arrival of cherries(!) and peaches(!!) throughout the summer. (I'll add that, since it has taken me so very long to share this post and recipe with you, I've already received both the "cherries are ready!" and "peaches are early, and ready!" emails. I'll try to do better this month with timely posting...)


And so Brian and I hopped in the car that Friday and drove out to the country to fill a flat with ten pounds of bright and beautiful berries. Never mind the fact that we have a garden on the side of our house that is absolutely FULL of strawberry plants. Plants that have well exceeded their raised bed boundary and tumbled into the aisles of what was once a very organized patch. Plants that, during the time we were heading towards the orchard with windows down and music blaring, were completely covered with star-shaped flowers and tiny green fruit. But those country strawberries, they were ready RIGHT THEN, and I just couldn’t wait another week for ours to ripen.

There is something very special about moving slowly between those neat rows of plants, bending down to push emerald leaves aside, revealing the ripe and ready gems hiding in their shade. The berries come off their stems with the most satisfying "snap!", and if popped in your mouth at that exact moment are one of the most delicious treats to ever touch your tongue. Warmed by the sun, the fruit seems to explode in the mouth as vibrant juice seeps into every nook and cranny. It is so overwhelmingly good that you must close your eyes, tilt your face up towards the sky and slip into a little food dance of happiness. Yes, I do that.
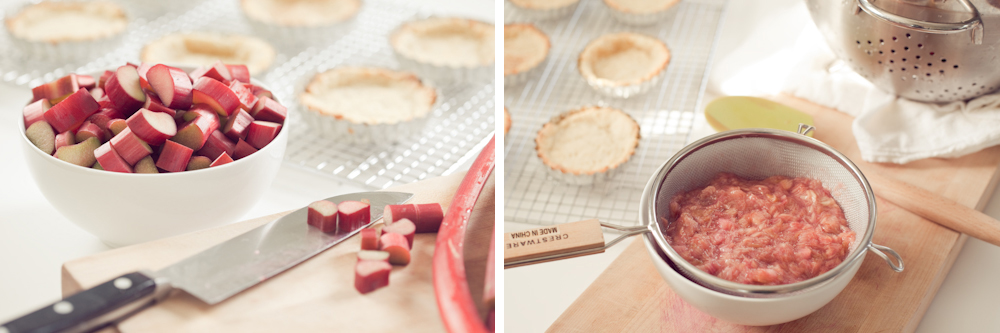

Once home, I set to work finding recipes for our bounty. I thought about pie and jam and cobbler, but in the end decided that the berries were perfect just as they were. And so I rinsed them all and placed most in a large colander in the fridge, ready for breakfast yogurt and cereal, afternoon snacks and ice cream topping. The pint that I set aside was slated for tiny tarts, the raw berries sliced thinly and laid across a filling of cooked rhubarb within a crisp, buttery shell.

The marriage of rhubarb and strawberry is timeless, like that of chocolate and peanut butter, or coconut and lime. One will never tire of the other, and folks will undoubtably continue to enjoy their combined company for years to come. In these tarts, the rhubarb is cooked down in a process that resembles the making of jam, and the end result is quite similar to the classic jarred spread. The tartness of the rhubarb is gently subdued by the sugar it is reduced with, but still punchy enough to provide nice balance to the sweet berries.

The best part of these tarts is the strawberries themselves, kept raw and firm and perfectly sweet on their own. Find the freshest fruit possible and you can't go wrong.
Rhubarb Strawberry Tarts
from The Greyston Bakery Cookbook
makes one 9-inch tart or six 4-inch tartsIngredients
- 1/3 cup sugar
- 1/2 cup water
- 1-1/4 pounds fresh rhubarb, trimmed and cut diagonally into 1/4"-thick pieces (about 5-6 cups)
- 1 pint strawberries
- 1 fully baked 9" Tart Pastry (see recipe below), cooled
Method
Tart Pastry
- In a heavy saucepan, combine the sugar and water. Stir over medium-low heat until the sugar dissolves. Add the rhubarb, increase the heat, and bring to a boil. Reduce the heat to medium-low, cover, and simmer for 5 minutes, or until the rhubarb is just beginning to soften. Remove the pan from the heat. Let stand, covered, for 10 minutes, or until the rhubarb is tender.
- Set a mesh strainer over a medium bowl and drain the rhubarb, reserving the liquid. Allow the rhubarb to cool completely. In a small saucepan, simmer the reserved liquid over medium-low heat for 5 minutes, or until it is reduced to a thick syrup. Set the syrup aside and allow it to cool completely.
- Meanwhile, wash and hull the strawberries. Thinly slice the strawberries lengthwise.
- Spread the cooled rhubarb evenly over the bottom of the tart shell. Arrange the strawberry slices in concentric circles over the rhubarb filling, covering it completely. Brush or spoon the cooled syrup over the top of the strawberries. Chill before serving.
Ingredients
- 1-1/4 cups all-purpose flour
- 2 tbsp sugar
- 1/4 tsp salt
- 7 tbsp unsalted butter, cut into very small pieces and chilled
- 1-3 tbsp ice water, as needed
Method
- In a bowl, whisk together the flour, sugar, and salt to blend thoroughly. Using a pastry blender, metal pastry scraper, two knives or your fingers, cut or rub the butter in the dry ingredients until the mixture resembles a coarse meal.
- Using a fork, stir in the water, 1 tbsp at a time, adding just enough for the dough to hold together without becoming wet. Gather the dough into a ball and then flatten it into a disk. Wrap the disk of dough in plastic wrap and chill for 1 hour.
- Remove the dough from the refrigerator. Using a rolling pin on a lightly floured board, roll the dough to form a rough circle about 1/4" thick. Carefully transfer the dough to a 9" fluted tart pan (or six 4" pans) with a removable bottom. Press the dough lightly but firmly into the edges of the pan, allowing the excess dough to hang over the edges of the pan. Roll the rolling pin over the top of the pan to trim the excess dough from the pan rim. Pierce the bottom of the dough several times with the tines of a fork. Chill for at least 30 minutes before baking.
- Position a rack in the center of the oven and preheat the oven to 400*F. Line the chilled shell with foil or parchment and fill with pie weights, dried beans, or raw rice.
- Bake the shell for 12 minutes, or until the pastry is set and golden. Carefully remove the foil or parchment and weights and continue to bake the shell another 10 to 15 minutes (a little less if you use the smaller pans), or until the pastry is golden brown. If the edges start to brown too much, cover them with strips of foil or piecrust shields. Cool on a rack.
