You can edit the text in this area, and change where the contact form on the right submits to, by entering edit mode using the modes on the bottom right.
Form Block
This form needs a storage option. Double-click here to edit this form, and tell us where to save form submissions in the Storage tab.
Learn more
123 Street Avenue, City Town, 99999
(123) 555-6789
email@address.com
You can set your address, phone number, email and site description in the settings tab. Link to read me page with more information.
Figs. Quite possibly the most beautiful edible fruit in existence. They are at their peak in Charlottesville, and I can't get enough of the soft globes that are actually inverted flowers (Did you know? I did not. Thanks, Megan!). We foraged for them over on Beyond the Flavor, joining our friend Daniel as he visited some of his favorite fig-gathering haunts around the city. Eagerly awaiting their arrival each September, I've been known to stake out trees on the University of Virginia grounds; faithfully driving by each day for weeks waiting for the green fruit to turn rosey, only to be foiled by a student who reached the trees an hour before us on the day they were finally ripe. The sight of his retreating form, bag of fresh figs full to bursting at his side, still saddens my heart.
On Beyond the Flavor, we've asked our readers to submit their favorite fig recipes. (Like us on Facebook and submit your recipe here, if you've got a favorite to share. There's a prize for the winner!) While my preferred way to consume a fig is fresh, straight from the tree, I wanted to try something new for this little contest we're holding. I thought about a savory treat, but settled on sweet because, let's be honest, that's my area.
A quick internet search resulted in this recipe, whose simplicity and un-touched figs caught my attention. There were obstacles that stood in my way - a lack of sour cream in the refrigerator and an oven that broke in the middle of baking the crust - but I persevered and was able to share four pieces amongst friends. The firm crust with a cornmeal crunch paired nicely with soft, lemon-scented cream and the pop of tiny fig seeds between teeth. We four enjoyed it immensely, outside under the stars, while our friends' dog enjoyed the leftovers on the countertop in the kitchen upstairs. A disappointment, for sure, as I had at least one more piece earmarked for the next morning's breakfast.
My craving not fully satisfied, I'll be making this tart again. As soon as we fix the oven.
Fresh Fig Tart with Rosemary Cornmeal Crust + Lemon Mascarpone Cream
1 stick (1/2 cup) cold unsalted butter, cut into pieces
1 1/2 tablespoons finely chopped fresh rosemary
4 to 5 tablespoons ice water
filling ingredients
1/3 cup sour cream (I used Greek yogurt instead)
1 cup mascarpone cheese (8 oz)
1/4 cup sugar
1 1/2 teaspoons finely grated fresh lemon zest
1/8 teaspoon salt
1 1/2 lb fresh figs
crust method
Pulse together flour, cornmeal, sugar, and salt in a food processor. Add butter and rosemary and pulse until mixture resembles coarse meal with some small (roughly pea-size) butter lumps. Drizzle evenly with 4 tablespoons ice water and pulse until just incorporated.
Gently squeeze a small handful: If it doesn't hold together, add more water, 1/2 tablespoon at a time, pulsing after each addition and continuing to test.
Press dough evenly onto bottom and up sides of tart pan with floured fingers. Smooth dough with a small offset metal spatula or back of a spoon (floured if necessary), then roll a rolling pin over top of pan to trim dough flush with rim. Chill crust until firm, about 30 minutes.
filling + assembly
Preheat oven to 400°F.
Bake crust in middle of oven until center and edges are golden, 25 to 30 minutes (don't worry if bottom of crust cracks), then cool in pan on a rack.
filling + assembly
Whisk together sour cream, mascarpone, sugar, zest, and salt in a bowl.
Remove side of tart pan and spread mascarpone cream in shell. Cut figs lengthwise into 1/4-inch-thick slices and arrange decoratively over cream.
For those of you missing more regular Bella Eats posts, you really should hop over to Beyond the Flavor. I am there more often than I am here, although I haven't given up on this little corner of the internet. I know I've said this before, many times, but I do hope to carve out more time to spend in this space I created nearly four (4!!!) years ago. After all, it was the inspiration for everything I am doing today with food and photography, and I can't bear to see it fade away. Many thanks to all of you who stick around, comment, and poke me with emails to say hello. I appreciate each and every one of you. xoxo.
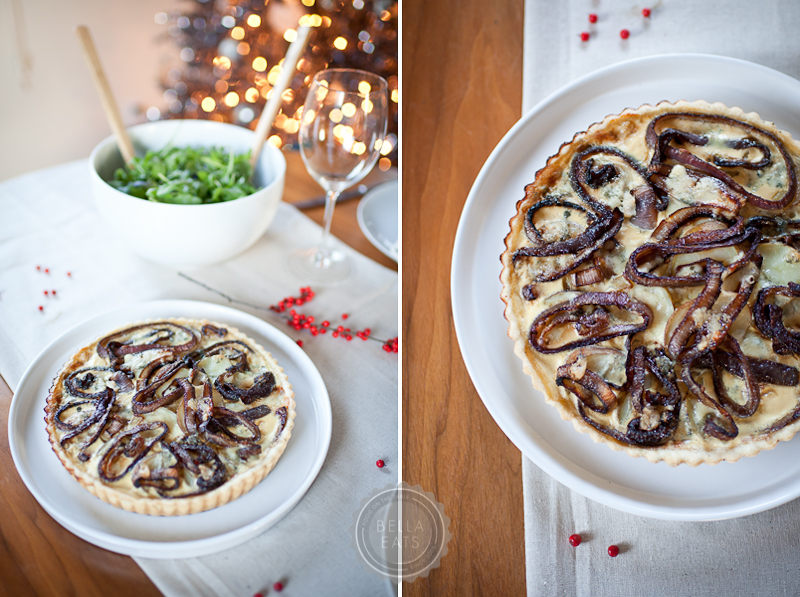
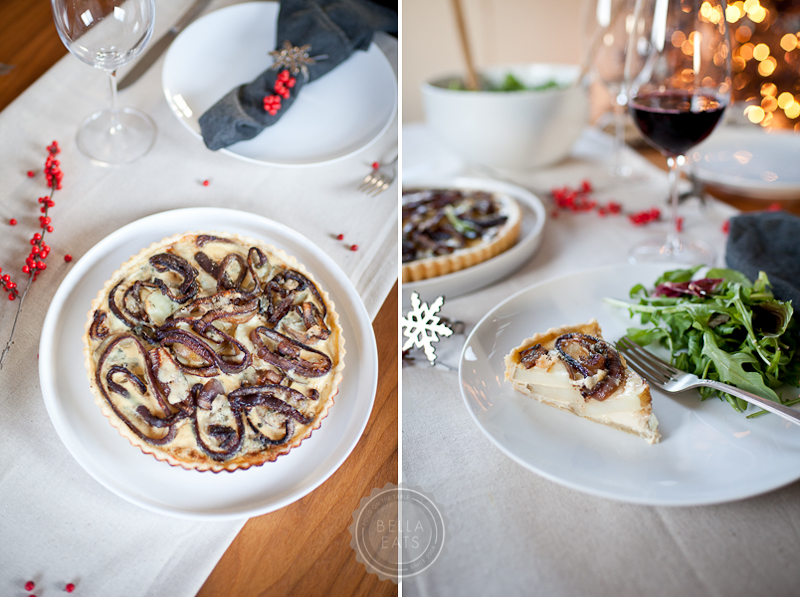
Gosh, I seem to have been in some kind of post-Thanksgiving funk these past 2 weeks! There was that big push to get recipes out to you before the holiday, and then I stopped cooking. Seriously, I was proud on nights that I picked up prepared sauce and fresh fettucini from the local pasta shop and managed to throw together a salad for the side. It has been a busy couple of weeks for our household, with me finishing up a bunch of photography projects and Brian wrapping up his most complicated website build yet. Hopefully life will return to a regular schedule these last weeks of 2011 (ha! when are the weeks before and after Christmas ever regular!) and I'll manage to get some holiday baking slipped onto my schedule!
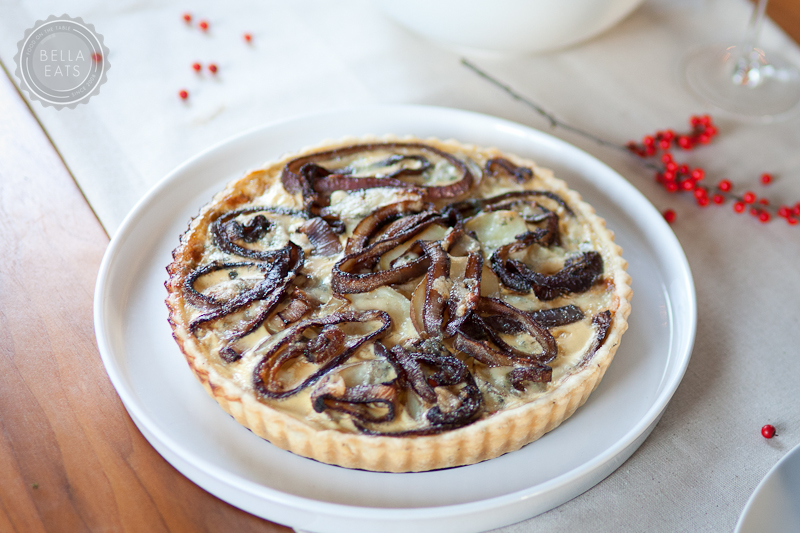
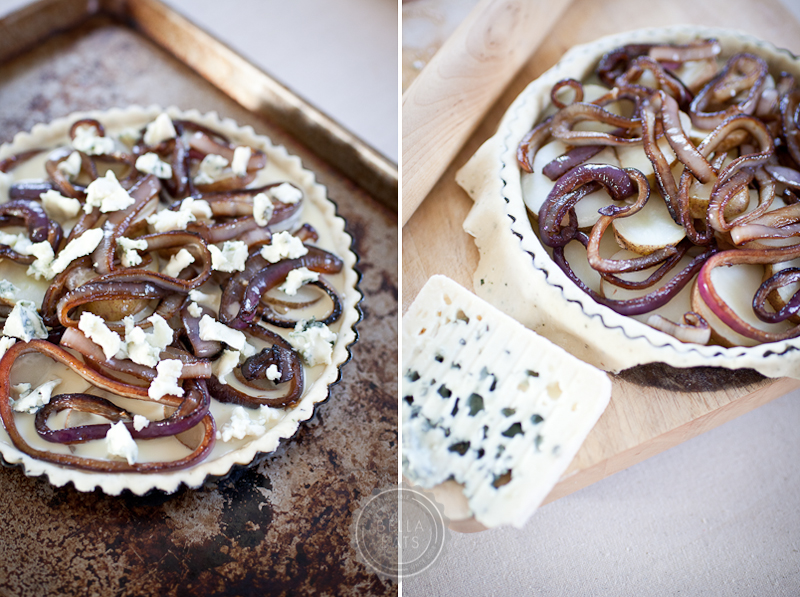
This tart recipe has been on my list for, oh, about 3 months now. I'm not really sure why it popped into my head, but one day the idea of a potato tart with caramelized red onions and stinky blue cheese landed and stuck. Last Friday I finally got around to experimenting, first doing a little research to see how others had tackled similar recipes. I wasn't sure whether the potatoes should be cooked first etc., and luckily found a similar dish to launch mine from over at Smitten Kitchen. I can't even tell you how amazing this tart smelled as it was finishing its time in the oven. If only there were some way to bottle scent and upload it here on my Charlottesville computer, to be distributed to you all through your own computer speakers. Come on Apple, why haven't you figured that one out yet?
I guess you'll just have to make it yourselves, and I'm thinking a holiday potluck could be the perfect excuse. You know you have a few of those on your calendar...
I am so glad that I found the foundation recipe on Smitten Kitchen because I was alerted to the fact that the filling for the tart doesn't set up as solidly as a quiche would. Good to know, because this cook likes to make sure her eggs are good and done, and I definitely would have over-cooked the tart had I not been warned.
Crust Ingredients (this is my favorite, all-purpose savory tart crust)
1-1/4 cups all-purpose flour
1/2 tsp salt
1/2 tsp chopped rosemary
8 tbsp unsalted butter, cut into 8 pieces
4-5 tbsp cold water
Filling Ingredients
about 1 pound of potatoes (I used russet, but red potatoes would be fantastic too)
1 large red onion, sliced to 1/4-inch rings
1 tbsp olive oil
1 cup milk (I used 1%)
2 egg yolks
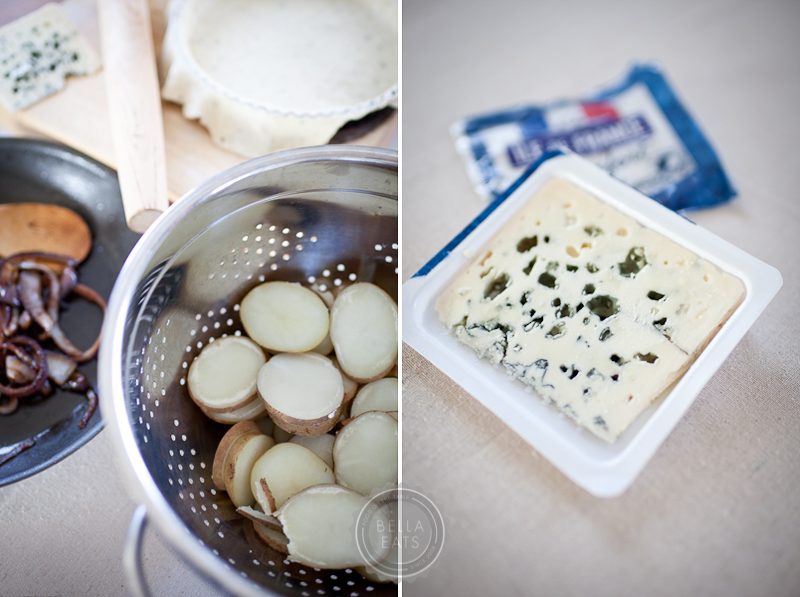
1/4 cup crumbled blue cheese (I used Ile de France Roquefort, which was sent to me as a sample to try)
salt + pepper
Method
First, make the crust dough (about 1 hour before you're ready to assemble the tart). Place the flour, salt, and rosemary in a food processor and pulse several times to combine. Add the butter and pulse until the mixture resembles pea-sized crumbs, about ten 1-second pulses. Add the water, 1 tbsp at a time, and pulse briefly after each addition. After 4 tbsp of water have been added, process the dough for several seconds to see if it will come together. If not, add the remaining 1 tbsp water. Process just until the dough comes together in a rough ball. Do not overprocess or the dough will not be flakey. Transfer the dough to a lightly-floured work surface and knead briefly to for a smooth ball. Flatten the dough into a 5-inch disk and wrap it in plastic wrap. Refrigerate the dough for at least 1 hour and up to 2 days. Note: My dough was very sticky with just 4 tbsp of water, so I wound up adding some flour to help it to come together. The final dough should be smooth and supple before refrigerating. Also, if you don't have a food processor, you can still make the dough by using forks or a pastry blender to cut the butter into the flour mixture, then add your water.
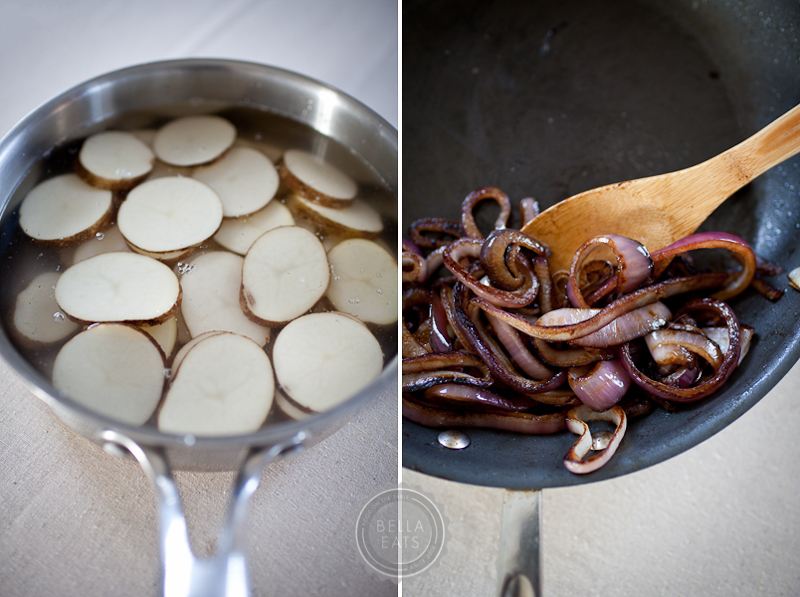
While the dough is chilling, prepare the filling ingredients. Scrub the potatoes and remove any eyes or rough patches, leaving most of the skin in place. Slice potatoe into 1/4-inch thick rounds. Place in a large pan and cover with water. Bring to a boil, and simmer for about 10 minutes until the potatoes are just tender. Drain and set aside.
Meanwhile, heat the olive oil over medium-high heat in a large skillet. Add the onion rings and stir to coat with oil. Drop heat to medium-low and allow unions to caramelize, stirring occasionally, for 20-30 minutes. Remove from heat and set aside.
Whisk together the milk and egg yolks, set aside.
Preheat oven to 350℉.
After an hour, remove the dough from the refrigerator. Roll to a round about 12 inches in diameter. Place the dough in a 9-inch tart pan with removable bottom. Press the dough to the bottom and sides of the pan, and remove excess dough from around edge of pan.
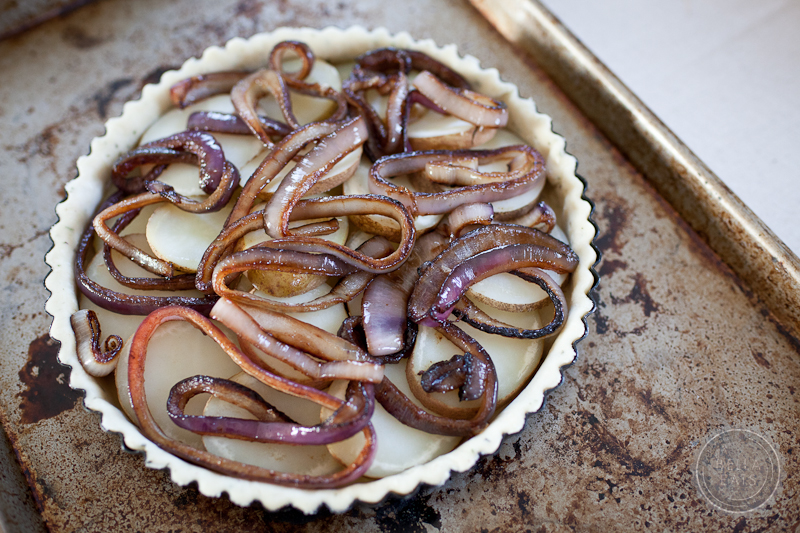
Place cooked potatoes in concentric rings along the bottom of the pan, overlapping and adding layers until pan is full. Distribute the caramelized onions across the tops of the potatoes. Pour the milk/egg mixture over the potatoes and onions. Drop bits of blue cheese evenly across the surface of the tart. Sprinkle with sea salt and freshly ground pepper.
Bake the tart for 45-55 minutes, until browning at edges. Filling will still be slightly jiggly, as the milk to egg ratio doesn't allow for it to set as a quiche would. The final consistancy should be creamy.
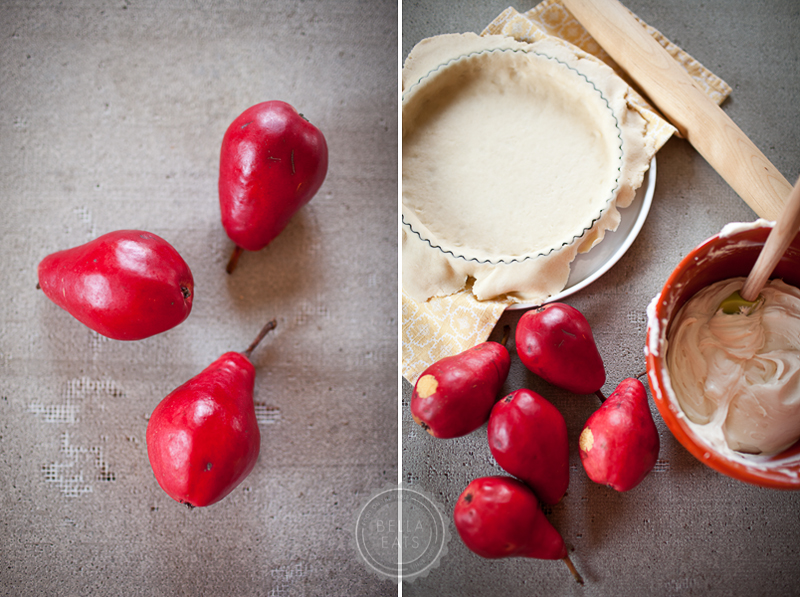
I have been a little obsessed with ricotta cheesecake lately. I've made it several times, trying out a few different recipes, tweaking as I go. I've landed on one that I love but cannot seem to get a decent picture of it to save my life. And, quite frankly, I can't continue to eat ricotta cheesecake every other week. That doesn't work with the ol' 'stay in my jeans' plan. While browsing the produce section last week I came upon these lovely red pears and knew that a Thanksgiving dessert recipe must be developed to showcase their beauty. And then I thought, why not combine that idea with what I've learned about the perfect ricotta cheesecake? Voila, a new dessert star is born.
This recipe combines three of my favorite things: seasonal fruit, tender crust, and ricotta cheesecake. Shared with loved ones it makes the perfect end to an Autumn meal. Enjoy, my friends!
3 pears, sliced and pressed between paper towels to remove some moisture
method
First, make the tart dough. Blend the flour and sugar in a food processor. Add the butter and pulse until the mixture resembles small peas, about 10 times. Add 4 tbsp of the water and process until the dough comes together, adding the last tbsp of water if needed. Gently gather the dough into a ball and press to a disk. Wrap with plastic wrap and refrigerate for at least 1 hour, up to 2 days.
Preheat the oven to 350°F.
After the dough has been refrigerated, remove it from the plastic and roll flat to a circle approximately 12-inches in diameter. Lay the dough across a 9-inch tart pan and press the dough to the bottom and sides of the pan. Roll a rolling pin over the top of the pan to cut the excess dough. Prick the bottom of the dough with a fork in several places. Bake the tart crust for 10 minutes and remove from oven.
Blend together the ricotta, cream cheese, 3 tbsp of the honey, the egg, and the vanilla extract until well combined. Pour the mixture into the tart pan and smooth the top. Lay the pear slices across the top of the ricotta mixture, and drizzle with the final tbsp of honey.
Bake for 45-60 minutes, until the tart only jiggles slightly and is starting to brown at the edges.
My goodness...I should not have underestimated the powers of a beautiful salad! Thank you all for your sweet comments and enthusiasm. I won't lie, I fully expected to receive a whopping 2 comments on yesterday's post, so I appreciate all 10 of you proving me wrong. :)
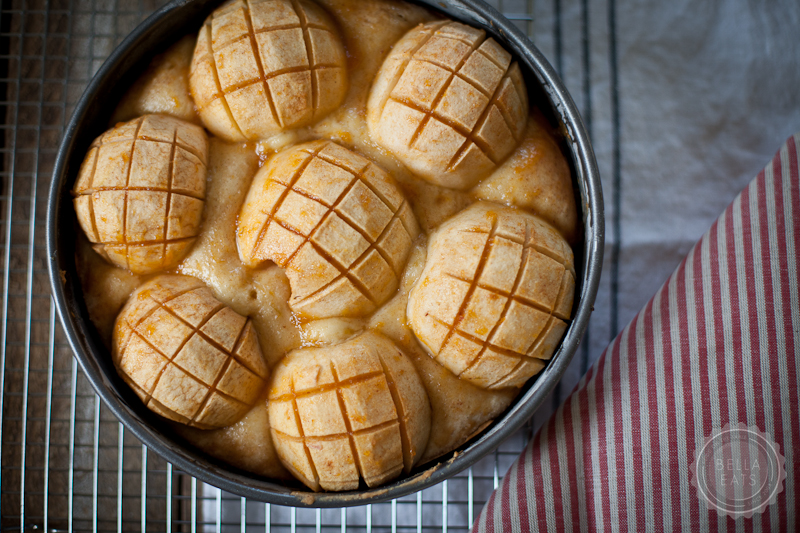
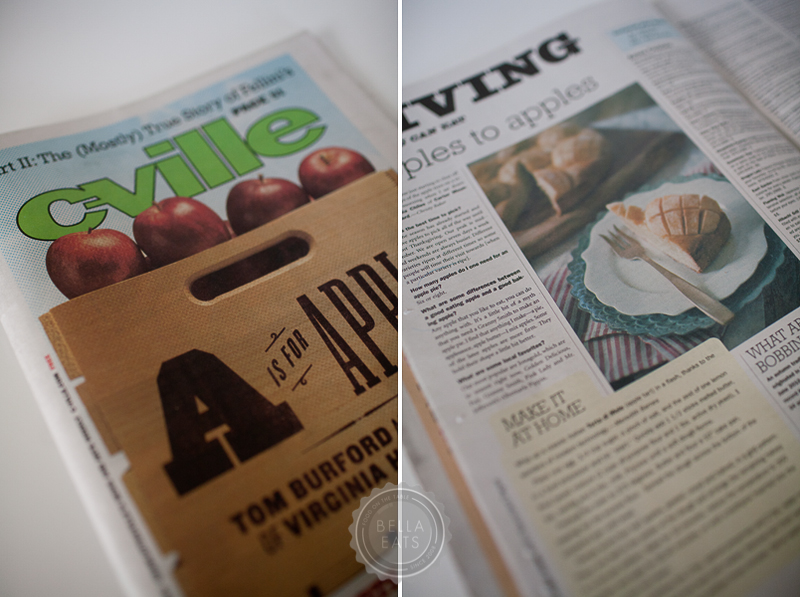
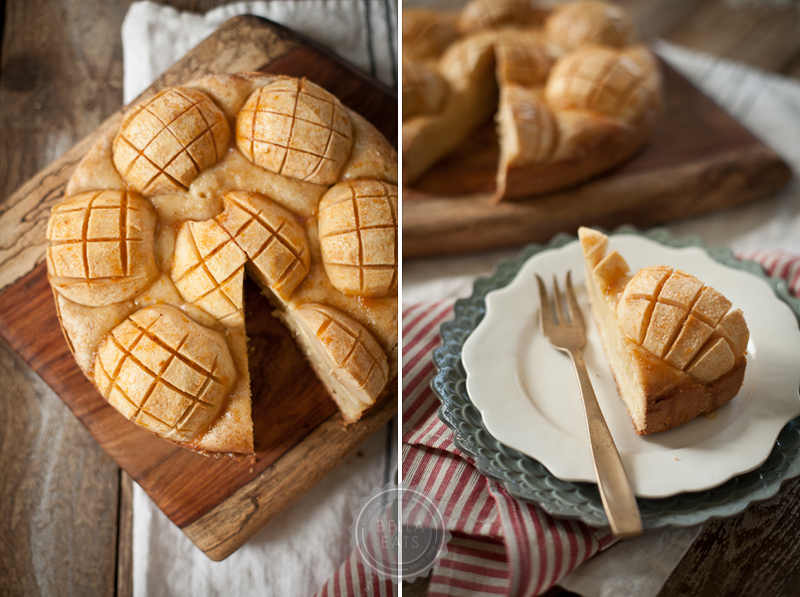
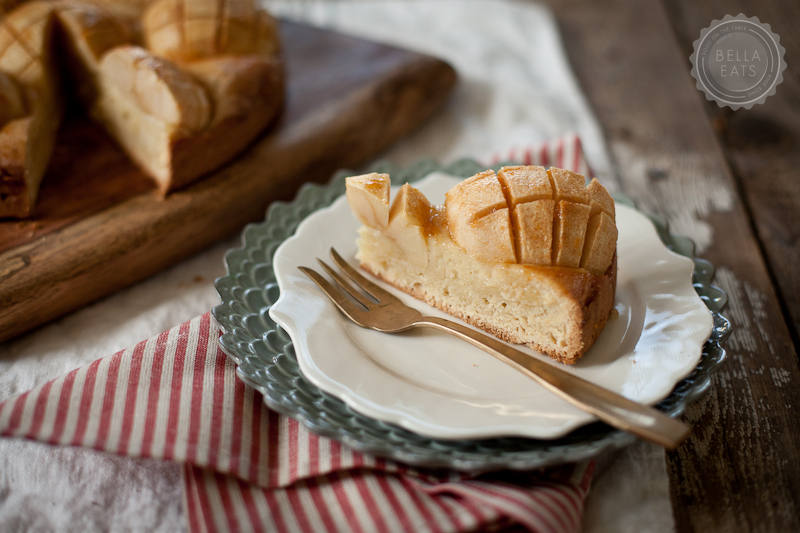
As promised, here is an apple tart to kick off your weekend. It is your reward for yesterday's salad love, friends. This here tart is one of those pesky editorial assignments that I was telling you about, the completely fun and delicious and right-up-my-ally projects that cause me to eat more sweets/sushi/potato chips/wedding cake than maybe I should. This particular recipe was made and photographed for C-Ville Weekly and published in last week's issue. I'm just a little behind in getting it up here on Bella Eats. But, for all of you Charlottesville folks, Relay Foods has all of the ingredients ready to add to your cart in one click should you choose to make this apple tart this Fall. And you really should, as it is simple and lovely and delicious...three qualities I strive for in most food coming out of my kitchen.
Your tart will most likely look just a little bit different than mine because, well, I messed with the recipe a little bit. And wrongly, I might add. Your apples probably won't sit so high on the base, and the base itself won't be quite as dense. Even though I added a tad too much flour we still loved this treat. I can't wait to make it again, sticking to the recipe below.
The pattern cut into the apples is, other than pretty, very helpful to slicing the tart in any way you might wish.
Preheat the oven to 375°. Butter and flour a 9" or 10" cake pan, tapping to remove excess flour.
Place the egg, sugar, salt, and lemon zest in the large bowl of a food processor. Pulse until mixture is starting to combine and then add the melted butter, continuing to pulse until smooth.
Combine the flour and yeast, and add to the mixture in the processor. Pulse until evenly distributed, add the milk and vanilla, and then process until a soft batter forms.
Pour the batter into the prepared pan and spread across the pan until it is level.
Deeply score the 8 apple halves in a grid pattern. Place one half in the center of the cake pan and arrange the remaining halves in a circular pattern. Bake for 10 minutes, the reduce the oven temperature to 350° and bake for 35-40 minutes more, until a toothpick inserted into the center comes out clean.
Meanwhile, combine the 2 tbsp apricot preserves with the 2 tbsp water in a small saucepan and stir over low heat until melted. When the tart comes out of the oven, brush it with the preserves and bake for an additional 3 minutes. Serve warm.
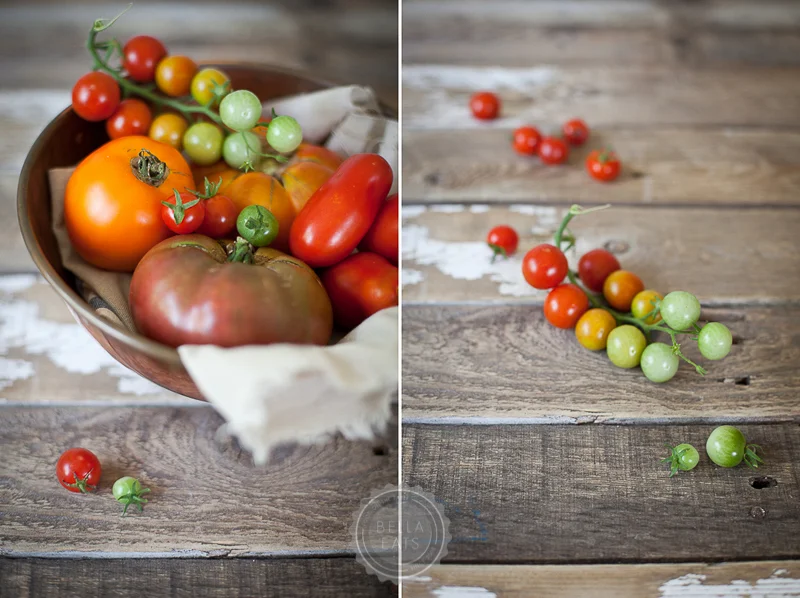
Summer. Tomatoes. Summer tomatoes. Summer tomatoes summer tomatoes summer tomatoes. The two words belong together, do they not?
With a high of 101° in Charlottesville today (real feel 115° to 120°...um, when did we move to the equator?!?), I am not finding a whole lot to be happy with Summer about at the moment. Except for tomatoes. We are overrun with summer's favorite fruit right now...big ones, little ones, red ones, orange ones. All picture frames and candles have been removed from my dining room sideboard to make way for our bounty from the farm. It is the official tomato storage and ripening spot in our house, a constantly revolving inventory of heirloom varieties. I've made pints of marinara to store away for winter, and have plans to can soups and salsas in the coming weeks. But still, my very favorite way to consume a perfectly ripe tomato is thickly sliced, with sea salt. It just doesn't get much better than that. Unless you sandwich one of those slices between two hunks of bread with some bacon...that's pretty darn good too.
Most of our meals this week involved, you guessed it, tomatoes. In sauce over pasta, in salsa on fish tacos, sliced with fresh mozzarella on pizza, the 'T' in our BLTs. And this lovely, simple, rustic tart. It breaks my 'don't turn on the oven' rule, but at least it isn't the stove top.
First, I have to say again how much I love Jack Bishop's book, A Year in a Vegetarian Kitchen. I have shared several recipes from there, here, and cannot praise it enough. We have been thrilled with every single dish we've made between its covers, and love how simple and quick they always are. This tart is no exception. The crust dough comes together beautifully and is so easy to work. The filling ingredients are simple. The whole tart is finished with just 15 minutes of prep time, which I love. If the crust weren't so butter-full we'd have this meal multiple days each week.
Be sure to only make this tart when tomatoes are at their peak...a pink and grainy 'mater just wouldn't do...
6 oz fresh goat cheese, crumbled (about 1-1/3 cups)
3 medium, delicious tomatoes, cored, sliced crosswise 1/4-inch thick, and blotted dry between paper towels*
1 tbsp extra-virgin olive oil
salt + freshly ground black pepper
Method
First, make the crust dough (about 1 hour before you're ready to assemble the tart). Place the flour, salt, and rosemary in a food processor and pulse several times to combine. Add the butter and pulse until the mixture resembles pea-sized crumbs, about ten 1-second pulses. Add the water, 1 tbsp at a time, and pulse briefly after each addition. After 4 tbsp of water have been added, process the dough for several seconds to see if it will come together. If not, add the remaining 1 tbsp water. Process just until the dough comes together in a rough ball. Do not overprocess or the dough will not be flakey. Transfer the dough to a lightly-floured work surface and knead briefly to for a smooth ball. Flatten the dough into a 5-inch disk and wrap it in plastic wrap. Refrigerate the dough for at least 1 hour and up to 2 days. Note: My dough was very sticky with just 4 tbsp of water, so I wound up adding some flour to help it to come together. The final dough should be smooth and supple before refrigerating. Also, if you don't have a food processor, you can still make the dough by using forks or a pastry blender to cut the butter into the flour mixture, then add your water.
Move an oven rack to the middle position and heat oven to 375°.
Unwrap the chilled dough and roll it into a 12-inch circle on a lightly floured surface. Lay the dough over a 10-inch tart pan with a removable bottom, fitting the dough into the bottom and sides of the pan. Run the rolling pin over the top of the tart pan to trim the excess dough. Prick the bottom of the tart shell all over with a fork.
Finally, fill and bake the tart. Scatter the goat cheese evenly across the bottom of the tart shell. Arrange the tomatoes over the cheese in two rings, one around the outside edge of the tart pan and another in the center, overlapping them slightly. Drizzle the tomatoes with the olive oil and sprinkle with salt and pepper to taste.
Bake until the edges of the crust pull away from the sides of the pan and are golden brown, 45 to 50 minutes. Cool the tart on a wire rack for at least 10 minutes. Cut the tart into wedges and serve. Also, it is really good at room temperature so feel free to make this ahead and let it cool for several hours.
* To dry tomatoes, lay 3 layers of paper towels on a flat surface. Place your tomato slices on the paper towels, and then cover with 3 more layers of towels. Gently press your hands over the tomatoes to extract as much liquid as you can without crushing the tomatoes. When you lift the slices from the towels, many of the seeds should stay behind. This will keep your tart crust from becoming soggy.
Hello. My name is Andrea. I write this food blog, Bella Eats. You may remember me, or due to my long absence you may not. I’m sorry about that, truly I am. I miss this space! Life has been busy. So so so busy. I started teaching architectural design at the University of Virginia. Teaching. At a University. !!! And before that teaching officially began there was training for teaching. And in the middle of all of that I photographed the wedding of a dear friend I’ve known since the fifth grade. Fifth grade! She was such a beautiful bride, and if you’re interested in seeing some of those images please check out the AHPhoto blog.
Oh, and I started a photography business. Because I love taking pictures of people. And buildings. And food. So if you know anybody who needs somebody to take pictures of people, or buildings, or food...feel free to send them my way. I’d appreciate it so so much. And thank you, all of you, who have commented and tweeted and emailed your support. You’re the best, truly.
And yes, I am still working for an architecture firm here in Charlottesville. So...yeah. Busy.
It feels as though summer has completely passed by Bella Eats. Since June I’ve posted about cherries, blackberries, and blueberries. There have been no luscious heirloom tomatoes, no juice-laden peaches, no golden ears of corn. I even have a new trick for releasing kernels from their cob without making a complete mess of the kitchen counter and floor, and I haven’t had the opportunity to share it with you. That is sad my friends, because this trick is a good one. It will change the way you view corn entirely. Soon, I hope.
Way back in the middle of July our dear friend Kristin celebrated her birthday. She celebrated with us, and with this lime tart topped with blackberries from our garden. Blackberry season is just about over, a sign that summer is drawing to a quick close. Our bush has shed it’s bounty completely, leaving only the tiny shriveled berries that didn’t ever come to full ripeness. Our freezer is packed full of quart-size bags of the frozen fruit, our pantry shelf stocked with various forms of blackberry jam. This tart was one of the last recipes made this summer using berries fresh from the garden, and looking at these pictures already has me feeling nostalgic.
What is it about food that stirs memories stronger than those evoked by any other sense? While blackberries don't take me back to any point of my childhood, they do plop me down solidly in our backyard here in Charlottesville. For the past 4 years we've spent countless July and August evenings standing in our garden, bowls in hand, fingers stained purple, arms eaten by mosquitos, quietly and contently plucking berries one-by-one from a bush WE planted. I know that forever, no matter where we are, when I pop a freshly picked blackberry into my mouth I will be transported back to this place. I love that.
If you’re lucky you can still find pints of deep purple blackberries at your local farmers’ market, and if you do, I recommend you make this dessert before summer's end. The crust is quite perfect, nearly the consistency and flavor of a shortbread cookie. It doesn't flake and melt in your mouth like many pastry shells, but instead offers a firm vessel on which to carry a scoop of zippy lime curd. And scoop you will, because this tart never really sets up to a solid, sliceable state. Which is fine by me. The delightful combination of sweet shortbread, tart curd, and fresh blackberries had us all going back for seconds, despite our use of a spoon rather than a fork.
For the record, I am so unhappy with the spacing that this new Wordpress theme defaults too, but I just haven't had the time/energy to dig into the CSS code to fix it. And, we're working on a redesign of Bella Eats to be launched right around the two year (two years!) anniversary of this site at the end of October. So, please bear with me and the awkward/awful spacing of the text in my recipes... Thank you.
Lime Tart with Blackberries
from bon appetit, June 2010Ingredients
for the lime curd:
3 large eggs
3 large egg yolks
1 cup sugar
3/4 cup fresh lime juice
6 tbsp (3/4 stick) unsalted butter, cut into 6 pieces
for the topping:
(3) 6-ounce containers fresh blackberries
1 tbsp blackberry jam
for the crust:
1/2 cup (1 stick) unsalted butter, room temperature
1/4 cup sugar
1 large egg yolk
1 1/4 cups all purpose flour
1 large pinch of salt
Method
for the lime curd:
Set a fine metal strainer over a medium bowl and set aside. Whisk the eggs, egg yolks, and sugar in another medium metal bowl to blend. Whisk in lime juice.
Set bowl over large saucepan of gently simmering water (do not allow bottom of bowl to touch water). Whisk constantly until curd thickens and an instant-read thermometer inserted into curd registers 178ºF to 180ºF, about 6 minutes. Immediately pour curd through prepared strainer set over bowl.
Add butter to warm strained curd; let stand 1 minute, then whisk until blended and smooth. Press plastic wrap directly onto surface of curd, covering completely. Refrigerate until cold, about 4 hours.*
*Lime curd can be made up to 2 days ahead. Keep chilled.
for the crust:
Using an electric mixer, beat the butter and sugar in a medium bowl until well blended, 1 to 2 minutes. Add egg yolk; beat to blend. Add flour and salt and mix on low speed until mixture resembles large peas. Using hands, knead in bowl just until dough comes together.
Transfer dough to a 9-inch diameter tart pan with removable bottom. Break dough into pieces, then press dough evenly up sides and onto bottom of pan. Cover and chill 1 hour.**
Preheat oven to 350ºF. Uncover crust and bake until golden brown, about 35 minutes. Cool completely in pan on rack.
**Dough can be made 1 day ahead. Keep chilled.
assembly:
Remove sides from tart pan and place crust on plate. Spread lime curd evenly in baked crust. Arrange blackberries in concentric circles on top of tart.
Place am in small microwave-safe bowl. Heat in microwave until jam is melted, about 15 seconds. Whisk to loosen and blend, adding water by teaspoonfuls if thick. Brush jam over berries.*** (I only brushed jam over the outer ring, because I liked how they looked without the glaze.)
***Tart can be made up to 8 hours ahead. Chill uncovered.
Last month, at the very beginning of May (where did you go, sweet May?) Brian and I went strawberry picking. I’d received the email days before that shouted against a bright green backdrop “strawberries are here!”. I anxiously await this announcement each year. Not only does it mark Spring’s firm hold on this time in Charlottesville, it also foreshadows the other emails to come reporting the arrival of cherries(!) and peaches(!!) throughout the summer. (I'll add that, since it has taken me so very long to share this post and recipe with you, I've already received both the "cherries are ready!" and "peaches are early, and ready!" emails. I'll try to do better this month with timely posting...)
And so Brian and I hopped in the car that Friday and drove out to the country to fill a flat with ten pounds of bright and beautiful berries. Never mind the fact that we have a garden on the side of our house that is absolutely FULL of strawberry plants. Plants that have well exceeded their raised bed boundary and tumbled into the aisles of what was once a very organized patch. Plants that, during the time we were heading towards the orchard with windows down and music blaring, were completely covered with star-shaped flowers and tiny green fruit. But those country strawberries, they were ready RIGHT THEN, and I just couldn’t wait another week for ours to ripen.
There is something very special about moving slowly between those neat rows of plants, bending down to push emerald leaves aside, revealing the ripe and ready gems hiding in their shade. The berries come off their stems with the most satisfying "snap!", and if popped in your mouth at that exact moment are one of the most delicious treats to ever touch your tongue. Warmed by the sun, the fruit seems to explode in the mouth as vibrant juice seeps into every nook and cranny. It is so overwhelmingly good that you must close your eyes, tilt your face up towards the sky and slip into a little food dance of happiness. Yes, I do that.
Once home, I set to work finding recipes for our bounty. I thought about pie and jam and cobbler, but in the end decided that the berries were perfect just as they were. And so I rinsed them all and placed most in a large colander in the fridge, ready for breakfast yogurt and cereal, afternoon snacks and ice cream topping. The pint that I set aside was slated for tiny tarts, the raw berries sliced thinly and laid across a filling of cooked rhubarb within a crisp, buttery shell.
The marriage of rhubarb and strawberry is timeless, like that of chocolate and peanut butter, or coconut and lime. One will never tire of the other, and folks will undoubtably continue to enjoy their combined company for years to come. In these tarts, the rhubarb is cooked down in a process that resembles the making of jam, and the end result is quite similar to the classic jarred spread. The tartness of the rhubarb is gently subdued by the sugar it is reduced with, but still punchy enough to provide nice balance to the sweet berries.
The best part of these tarts is the strawberries themselves, kept raw and firm and perfectly sweet on their own. Find the freshest fruit possible and you can't go wrong.
1-1/4 pounds fresh rhubarb, trimmed and cut diagonally into 1/4"-thick pieces (about 5-6 cups)
1 pint strawberries
1 fully baked 9" Tart Pastry (see recipe below), cooled
Method
In a heavy saucepan, combine the sugar and water. Stir over medium-low heat until the sugar dissolves. Add the rhubarb, increase the heat, and bring to a boil. Reduce the heat to medium-low, cover, and simmer for 5 minutes, or until the rhubarb is just beginning to soften. Remove the pan from the heat. Let stand, covered, for 10 minutes, or until the rhubarb is tender.
Set a mesh strainer over a medium bowl and drain the rhubarb, reserving the liquid. Allow the rhubarb to cool completely. In a small saucepan, simmer the reserved liquid over medium-low heat for 5 minutes, or until it is reduced to a thick syrup. Set the syrup aside and allow it to cool completely.
Meanwhile, wash and hull the strawberries. Thinly slice the strawberries lengthwise.
Spread the cooled rhubarb evenly over the bottom of the tart shell. Arrange the strawberry slices in concentric circles over the rhubarb filling, covering it completely. Brush or spoon the cooled syrup over the top of the strawberries. Chill before serving.
Tart Pastry
Ingredients
1-1/4 cups all-purpose flour
2 tbsp sugar
1/4 tsp salt
7 tbsp unsalted butter, cut into very small pieces and chilled
1-3 tbsp ice water, as needed
Method
In a bowl, whisk together the flour, sugar, and salt to blend thoroughly. Using a pastry blender, metal pastry scraper, two knives or your fingers, cut or rub the butter in the dry ingredients until the mixture resembles a coarse meal.
Using a fork, stir in the water, 1 tbsp at a time, adding just enough for the dough to hold together without becoming wet. Gather the dough into a ball and then flatten it into a disk. Wrap the disk of dough in plastic wrap and chill for 1 hour.
Remove the dough from the refrigerator. Using a rolling pin on a lightly floured board, roll the dough to form a rough circle about 1/4" thick. Carefully transfer the dough to a 9" fluted tart pan (or six 4" pans) with a removable bottom. Press the dough lightly but firmly into the edges of the pan, allowing the excess dough to hang over the edges of the pan. Roll the rolling pin over the top of the pan to trim the excess dough from the pan rim. Pierce the bottom of the dough several times with the tines of a fork. Chill for at least 30 minutes before baking.
Position a rack in the center of the oven and preheat the oven to 400*F. Line the chilled shell with foil or parchment and fill with pie weights, dried beans, or raw rice.
Bake the shell for 12 minutes, or until the pastry is set and golden. Carefully remove the foil or parchment and weights and continue to bake the shell another 10 to 15 minutes (a little less if you use the smaller pans), or until the pastry is golden brown. If the edges start to brown too much, cover them with strips of foil or piecrust shields. Cool on a rack.
I’d been wanting some of these little tart tins for, oh, at least one year. Its not that I make a lot of tarts and require a variety of vessels for filling...it really comes down to the fact that I love the tiny proportions of the tins themselves. There's just something very appealing about baked goods in small packages.
Although the tins aren’t that expensive, I hadn’t been able to justify purchasing them for their aesthetic appeal alone. I felt that I needed to have in mind a specific recipe that absolutely required the use of such tins. Or perhaps, at the very least, to have gone through some serious experimentation in the full-size tart pan that I already owned to justify my graduation to experimentation with its smaller siblings.
Lucky for me, my stepfather came to my rescue and put me out of my indecisive misery. While home for Thanksgiving, Joe took me shopping. For baking pans. Many, many baking pans. So many pans that Brian and I had to reorganize our entire kitchen. I now have my tiny tart tins, a beautiful tube cake pan, additional sheet pans and cooling racks, even some ice cream scoops for balling cookie dough. Suddenly recipe searching has taken on a whole new agenda, with me thinking “oh! I could use my new [insert baking tool here]!”.
And so, although things have been quiet on this little blog of mine this last week I assure you, I’ve been busy in the kitchen. And busy shopping. And busy wrapping. And busy writing out holiday cards. But mostly, I’ve been busy enjoying my new toys.
I have a few recipes I still want to share with you prior to Christmas Eve and so, in the interest of getting all of the items on my holiday ‘To Do’ list crossed off [and therefore maintaining my own sanity...I'm just a little bit OCD...] I’m going to have to keep posts a bit shorter than usual. I hope you won’t mind. My guess is, you all are pretty busy too. :)
I was certain that the debut of these little tins would involve sharing something sweet with you all, and so was surprised when the urge to make a savory tart struck me first. The possibilities for fillings are endless, truly, but we were pretty pleased with the results of our first attempt, which I’ve shared below. I think they would be a great addition to the buffet table at a party, easy to pick up with one hand while holding your cocktail glass in the other.
Savory Winter Tarts
makes (6) 4-inch tarts
Ingredients
9-inch pie crust dough (the rolled dough, not the kind in the aluminum dish)
1/2 pound bacon, fried
1 medium leek, light green part only, sliced
1 medium red potato, very thinly sliced
4 large mustard green leaves, washed and chopped finely
3-oz chevre, crumbled
2 eggs
3/4 cup whole milk
salt + pepper
Method
Thaw your pie crust dough according to the instructions on the package. Preheat oven to temperature indicated on package. Roll out the dough until it is 1/8-inch thick, and cut into roughly 5-inch by 5-inch squares. You'll probably only get 4 squares from this first pass. You'll want to gather the scraps, ball them up, and roll the dough back out to cut the remaining squares. Place a square of dough into each tart tin, pressing the dough into the bottom and sides of the tin. Trim the dough to be flush with the top of the tin. Place tart shells on a baking sheet covered with aluminum foil and bake according to the instructions on the dough package.
Gather your filling ingredients (other than the eggs, milk, salt and pepper) and set aside.
Whisk together the eggs and milk. Add salt and pepper to taste.
Remove the tart shells from the oven once they are starting to turn golden brown. Set oven temperature to 400*.
Once the tart shells have been baked and cooled about 10 minutes, you can fill them. Fill tarts first with potatoes, mustard greens, leeks then bacon. Do not overfill the tarts, you may not use all of the ingredients.
Carefully pour the egg/milk mixture into each tart, dividing it evenly amongst all 6 tart tins, being careful not to let the custard overflow. Drop chevre on top of the tarts in bits.
Bake the tarts on the cookie sheet at 400* for 25-35 minutes, until custard is set and toppings are starting to brown.
*Note - Tiny tart tins aren't absolutely necessary for this recipe, (1) 10-inch tart tin will accommodate these ingredients. But, the miniature tins sure are fun...