Contact Us

Use the form on the right to contact us.

You can edit the text in this area, and change where the contact form on the right submits to, by entering edit mode using the modes on the bottom right. 


123 Street Avenue, City Town, 99999

(123) 555-6789

email@address.com


You can set your address, phone number, email and site description in the settings tab.
Link to read me page with more information.

Blog

Filtering by Tag: crust

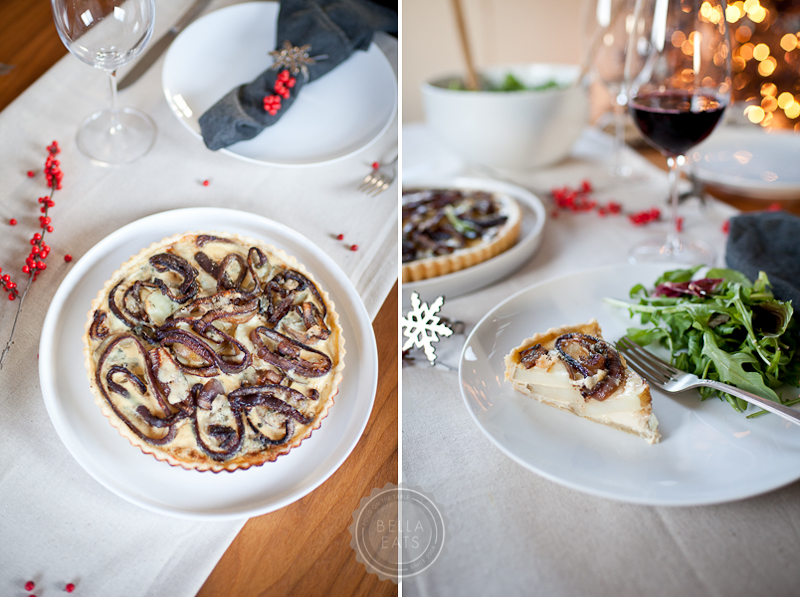
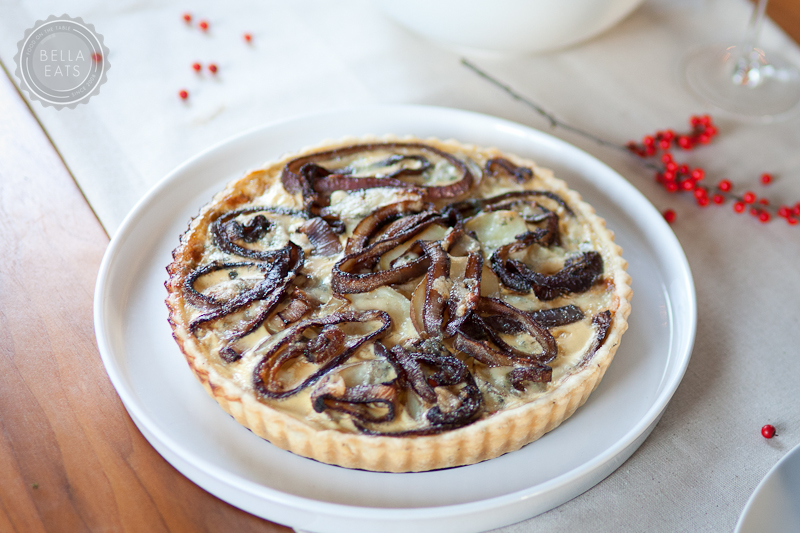
potato, red onion + blue cheese tart

Andrea

Gosh, I seem to have been in some kind of post-Thanksgiving funk these past 2 weeks! There was that big push to get recipes out to you before the holiday, and then I stopped cooking. Seriously, I was proud on nights that I picked up prepared sauce and fresh fettucini from the local pasta shop and managed to throw together a salad for the side. It has been a busy couple of weeks for our household, with me finishing up a bunch of photography projects and Brian wrapping up his most complicated website build yet. Hopefully life will return to a regular schedule these last weeks of 2011 (ha! when are the weeks before and after Christmas ever regular!) and I'll manage to get some holiday baking slipped onto my schedule!

This tart recipe has been on my list for, oh, about 3 months now. I'm not really sure why it popped into my head, but one day the idea of a potato tart with caramelized red onions and stinky blue cheese landed and stuck. Last Friday I finally got around to experimenting, first doing a little research to see how others had tackled similar recipes. I wasn't sure whether the potatoes should be cooked first etc., and luckily found a similar dish to launch mine from over at Smitten Kitchen. I can't even tell you how amazing this tart smelled as it was finishing its time in the oven. If only there were some way to bottle scent and upload it here on my Charlottesville computer, to be distributed to you all through your own computer speakers. Come on Apple, why haven't you figured that one out yet?

I guess you'll just have to make it yourselves, and I'm thinking a holiday potluck could be the perfect excuse. You know you have a few of those on your calendar...

I am so glad that I found the foundation recipe on Smitten Kitchen because I was alerted to the fact that the filling for the tart doesn't set up as solidly as a quiche would.  Good to know, because this cook likes to make sure her eggs are good and done, and I definitely would have over-cooked the tart had I not been warned.

Potato, Red Onion + Blue Cheese Tart

inspired by this recipe at Smitten Kitchen

serves 4 with a salad

Crust Ingredients (this is my favorite, all-purpose savory tart crust)

  • 1-1/4 cups all-purpose flour
  • 1/2 tsp salt
  • 1/2 tsp chopped rosemary
  • 8 tbsp unsalted butter, cut into 8 pieces
  • 4-5 tbsp cold water

Filling Ingredients

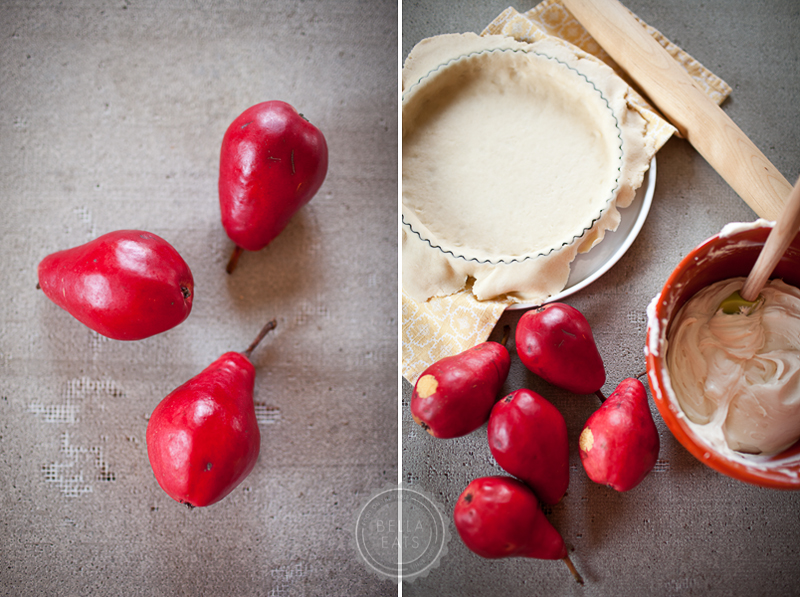
  • about 1 pound of potatoes (I used russet, but red potatoes would be fantastic too)
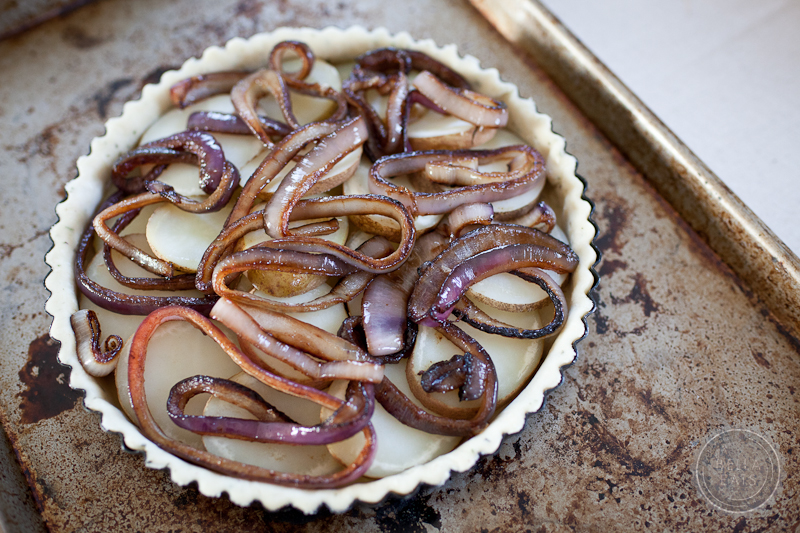
  • 1 large red onion, sliced to 1/4-inch rings
  • 1 tbsp olive oil
  • 1 cup milk (I used 1%)
  • 2 egg yolks
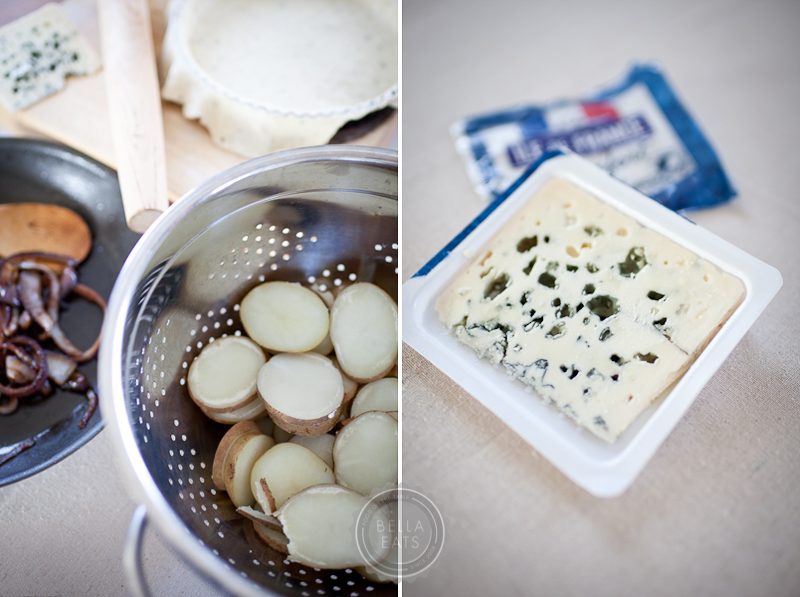
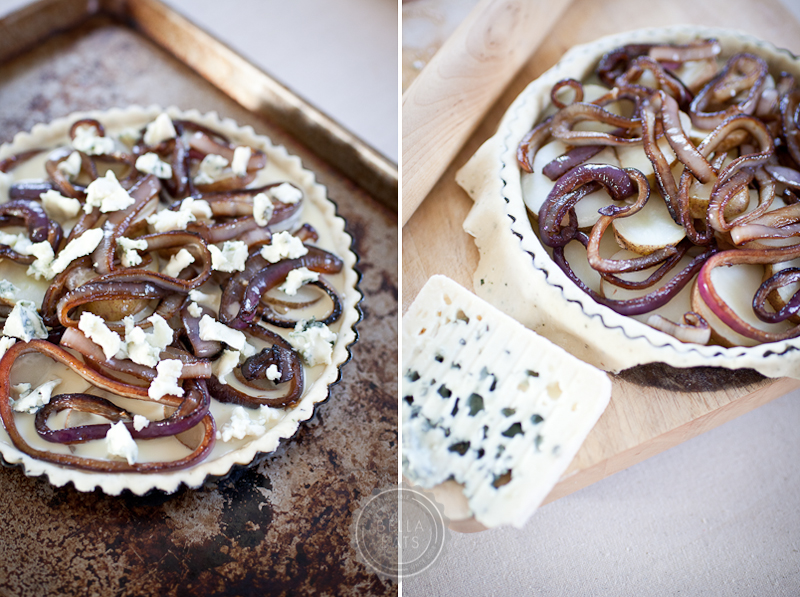
  • 1/4 cup crumbled blue cheese (I used Ile de France Roquefort, which was sent to me as a sample to try)
  • salt + pepper

Method

  1. First, make the crust dough (about 1 hour before you're ready to assemble the tart). Place the flour, salt, and rosemary in a food processor and pulse several times to combine. Add the butter and pulse until the mixture resembles pea-sized crumbs, about ten 1-second pulses. Add the water, 1 tbsp at a time, and pulse briefly after each addition. After 4 tbsp of water have been added, process the dough for several seconds to see if it will come together. If not, add the remaining 1 tbsp water. Process just until the dough comes together in a rough ball. Do not overprocess or the dough will not be flakey. Transfer the dough to a lightly-floured work surface and knead briefly to for a smooth ball. Flatten the dough into a 5-inch disk and wrap it in plastic wrap. Refrigerate the dough for at least 1 hour and up to 2 days.  Note: My dough was very sticky with just 4 tbsp of water, so I wound up adding some flour to help it to come together. The final dough should be smooth and supple before refrigerating. Also, if you don't have a food processor, you can still make the dough by using forks or a pastry blender to cut the butter into the flour mixture, then add your water.
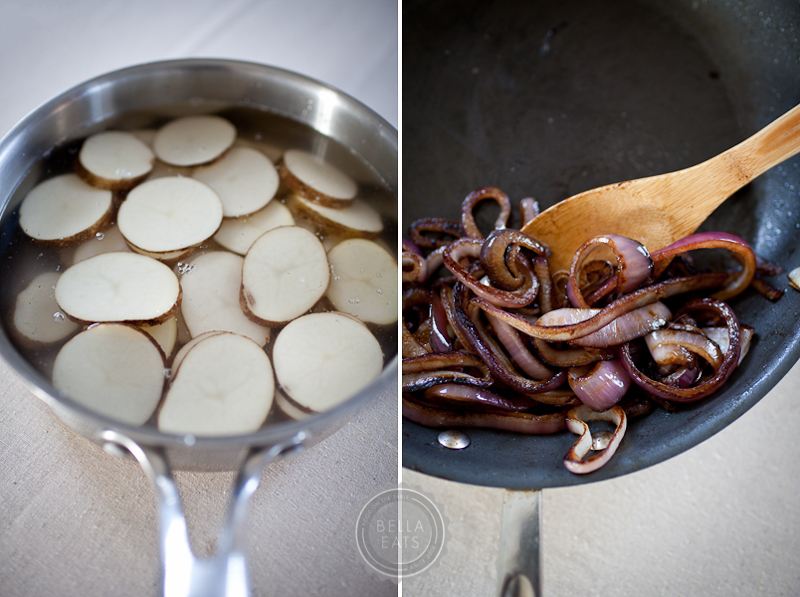
  2. While the dough is chilling, prepare the filling ingredients.  Scrub the potatoes and remove any eyes or rough patches, leaving most of the skin in place.  Slice potatoe into 1/4-inch thick rounds. Place in a large pan and cover with water. Bring to a boil, and simmer for about 10 minutes until the potatoes are just tender. Drain and set aside.
  3. Meanwhile, heat the olive oil over medium-high heat in a large skillet.  Add the onion rings and stir to coat with oil.  Drop heat to medium-low and allow unions to caramelize, stirring occasionally, for 20-30 minutes.  Remove from heat and set aside.
  4. Whisk together the milk and egg yolks, set aside.
  5. Preheat oven to 350℉.
  6. After an hour, remove the dough from the refrigerator.  Roll to a round about 12 inches in diameter. Place the dough in a 9-inch tart pan with removable bottom.  Press the dough to the bottom and sides of the pan, and remove excess dough from around edge of pan.
  7. Place cooked potatoes in concentric rings along the bottom of the pan, overlapping and adding layers until pan is full. Distribute the caramelized onions across the tops of the potatoes. Pour the milk/egg mixture over the potatoes and onions. Drop bits of blue cheese evenly across the surface of the tart.  Sprinkle with sea salt and freshly ground pepper.
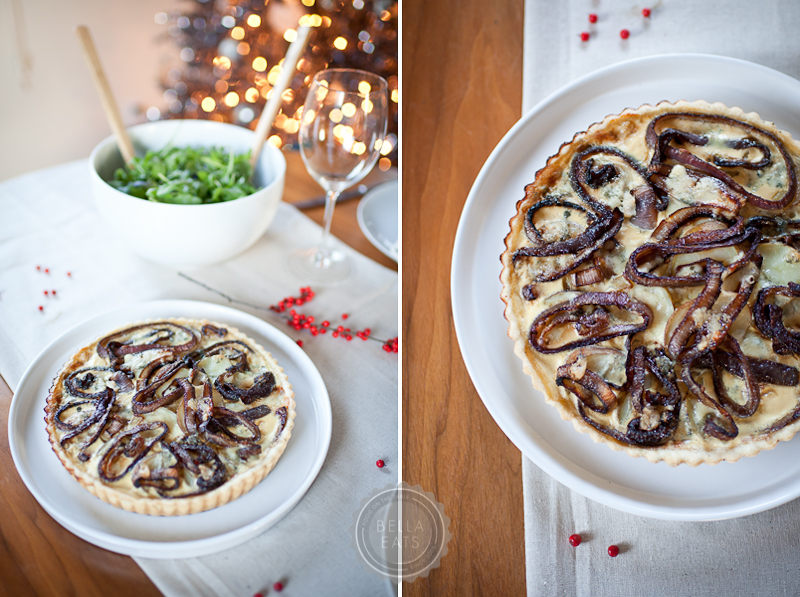
  8. Bake the tart for 45-55 minutes, until browning at edges.  Filling will still be slightly jiggly, as the milk to egg ratio doesn't allow for it to set as a quiche would.  The final consistancy should be creamy.

pear, ricotta + honey tart

Andrea

I have been a little obsessed with ricotta cheesecake lately.  I've made it several times, trying out a few different recipes, tweaking as I go.  I've landed on one that I love but cannot seem to get a decent picture of it to save my life. And, quite frankly, I can't continue to eat ricotta cheesecake every other week. That doesn't work with the ol' 'stay in my jeans' plan. While browsing the produce section last week I came upon these lovely red pears and knew that a Thanksgiving dessert recipe must be developed to showcase their beauty. And then I thought, why not combine that idea with what I've learned about the perfect ricotta cheesecake? Voila, a new dessert star is born.

This recipe combines three of my favorite things: seasonal fruit, tender crust, and ricotta cheesecake. Shared with loved ones it makes the perfect end to an Autumn meal. Enjoy, my friends!

Pear, Ricotta + Honey Tart
serves 8

for the crust
  • 1-¼ cup all-purpose flour
  • 1 tbsp sugar
  • 1 stick (½ cup) unsalted butter, cold, cut into ½-inch cubes
  • 4-5 tbsp water
for the tart
  • 16 oz whole milk ricotta
  • 6 oz cream cheese
  • 4 tbsp honey, divided
  • 1 egg
  • 1 tsp vanilla extract
  • 3 pears, sliced and pressed between paper towels to remove some moisture
method
  1. First, make the tart dough.  Blend the flour and sugar in a food processor.  Add the butter and pulse until the mixture resembles small peas, about 10 times.  Add 4 tbsp of the water and process until the dough comes together, adding the last tbsp of water if needed.  Gently gather the dough into a ball and press to a disk.  Wrap with plastic wrap and refrigerate for at least 1 hour, up to 2 days.
  2. Preheat the oven to 350°F.
  3. After the dough has been refrigerated, remove it from the plastic and roll flat to a circle approximately 12-inches in diameter.  Lay the dough across a 9-inch tart pan and press the dough to the bottom and sides of the pan.  Roll a rolling pin over the top of the pan to cut the excess dough.  Prick the bottom of the dough with a fork in several places.  Bake the tart crust for 10 minutes and remove from oven.
  4. Blend together the ricotta, cream cheese, 3 tbsp of the honey, the egg, and the vanilla extract until well combined. Pour the mixture into the tart pan and smooth the top.  Lay the pear slices across the top of the ricotta mixture, and drizzle with the final tbsp of honey.
  5. Bake for 45-60 minutes, until the tart only jiggles slightly and is starting to brown at the edges.
  6. Let sit for 1 hour before slicing and serving.

blueberry lemon tartlets

Andrea

There have been a lot of sweets around here lately. I would apologize, but this little blog is a glimpse into my kitchen and sweets are what I am craving these days. Ice cream. And popsicles. And tiny tartlets with fresh fruit mounded on top. Even though Summer has officially just arrived, here in Virginia you'd think she'd been around for at least the last month.  And when Summer lands firmly on our dry + crispy lawn I like for the food passing my lips to be cool and refreshing, laden with flavors of citrus and berry. Of course, there are salads abounding as well, but salads aren't nearly as much fun to photograph, write about, or share here in this space. Except that I've been slicing kumquats to sprinkle overtop of my spinach lately and that, my friends, is a really good idea. If you can find kumquats in your area I suggest you give it a try, I think you'll be pleased.

While you're out, pick up a few pints of fresh blueberries, and then hurry home to whip up these sweet little tartlets. The blueberries are such a nice accompaniment to the sharp tang of lemon curd nestled within the butter pastry. You'll only need one of those pints for this recipe, but if you're like me you won't be able to resist eating berries by the handful as you prep. 

Oh! And if you're in central Virginia, pick up the Summer issue of Flavor Magazine. Not only because Flavor is a wonderful resource for sustainable eating in the Capital Foodshed, but because you may just recognize a photograph in the Pairings section on page 79...!

Happy Summer, friends!

Chantilly cream is one of my great pleasures. I experienced it for the first time at K-Paul's in New Orleans when it was served with my cafe au lait, and I just about licked the bowl. Sprinkled with dried lavender, it is a lovely accompaniment to sweet blueberries. Add in the lemon curd and butter pastry and you've got quite the divine dessert.

I should also note that I've never, ever been able to achieve a non-shrinking tart or pie crust. This recipe is suggested by Joy of Cooking for tartlets specifically because the pastry is not supposed to shrink, but, mine still did. Apparently pastry dough and I just don't get along. I'm working on it.

Blueberry Lemon Tartlets with Chantilly Cream + Lavender

crust and curd recipes from The Joy of Cooking, chantilly cream recipe from Chef Paul Prudhomme's Louisiana Kitchen

makes (6) 4-inch tartlets, with some leftover lemon curd and chantilly cream (darn!)

Pastry

  • 1 cup plus 2 tbsp all-purpose flour
  • 1 tbsp white sugar or 2 tbsp powdered sugar
  • 1/4 tsp salt
  • 6 tbsp (3/4 stick) cold unsalted butter
  • 3 oz cold cream cheese
  • 2 to 3 tbsp cold heavy cream

Lemon Curd

  • 1 cup sugar
  • 8 tbsp unsalted butter (1 stick), cut into small pieces
  • 8 large egg yolks
  • 1/2 cup strained fresh lemon juice (from 2 to 3 lemons)
  • 1 tbsp grated lemon zest, plus more for garnish

Chantilly Cream

  • 2/3 cup heavy cream
  • 1 tsp vanilla extract
  • 1 tsp brandy
  • 1 tsp Grand Marnier
  • 1/4 cup sugar
  • 2 tbsp dairy sour cream

Assembly

  • 1 pint fresh blueberries
  • 1 tsp dried lavender

Method

  1. Place a medium-size bowl and beaters in the refrigerator, to be used for the chantilly cream.
  2. To make the pastry, whisk together the flour, sugar, and salt. Cut the butter and cream cheese into 1/4-inch pieces. Using a pastry blender or 2 knives, cut the butter and cream cheese into the dry ingredients until the mixture resembles coarse crumbs with some pea-sized pieces. Drizzle the heavy cream over the mixture and cut in with the blade side of a rubber spatula, or stir with a fork until the dough begins to gather into moist clumps. Press the dough into a flat disk, wrap tightly in plastic, and refrigerate for at least 1 hour or up to 2 days.
  3. On a lightly floured work surface, roll the dough about 1/8 inch thick, then cut into rounds wide enough to cover the bottom and sides of your tartlet pans, with 1 to 1.5 inches extra dough to spare. Press the dough rounds into the pans, then fold the overhanging dough back on itself over the crust sides, doubling their thickness. Press the doubled dough firmly to seal, then thoroughly prick the sides and bottoms with a fork. Arrange the crusts on a baking sheet and refrigerate for at least 30 minutes.
  4. Position a rack in the center of your oven and preheat to 400°F. Bake the crusts for 5 to 7 minutes, then prick the bottoms of any that have puffed. Continue to bake until the crusts are golden brown and firm to the touch, 12 to 15 minutes more.
  5. For the lemon curd, preheat your oven to 350°F. Combine the sugar and butter in a heat proof bowl. Bring 1-inch of water to a bare simmer in a skillet, and set the bowl of sugar and butter in the skillet. Stir until the butter is melted, and remove the bowl from the skillet. Add the egg yolks and beat until no yellow streaks remain. Stir in the lemon juice and return the bowl to the skillet. Heat the mixture over medium heat, stirring gently until it thickens to the consistency of heavy cream and lightly coats a spoon, 6 to 8 minutes. Strain the lemon mixture through a clean fine-mesh sieve into a bowl, then stir in the lemon zest.
  6. Pour the filling into the tart crusts. Bake the tartlets until the center looks set but still very quivery, like gelatin, when the pan is nudged, for 15 to 20 minutes. Let cool completely on a rack.
  7. Meanwhile, make the chantilly cream. Combine the cream, vanilla, brandy, and Grand Marnier in the chilled bowl and beat with an electric mixer on medium speed for 1 minute. Add the sugar and sour cream and beat on medium just until soft peaks form, about 3 minutes. Do no overbeat!!!
  8. To assemble, pile blueberries on top of each tartlet. Add a generous dollop of chantilly cream and sprinkle with fresh lavender and lemon zest.
  9. If you make the tarts ahead, lightly oil sheets of plastic wrap and press directly on the filling in each tartlet. They can be stored in the refrigerator for up to 1 day. Dress with blueberries and chantilly cream when ready to serve.

at summer's end

Andrea

Hello. My name is Andrea. I write this food blog, Bella Eats. You may remember me, or due to my long absence you may not. I’m sorry about that, truly I am. I miss this space! Life has been busy. So so so busy. I started teaching architectural design at the University of Virginia. Teaching. At a University. !!! And before that teaching officially began there was training for teaching. And in the middle of all of that I photographed the wedding of a dear friend I’ve known since the fifth grade. Fifth grade! She was such a beautiful bride, and if you’re interested in seeing some of those images please check out the AHPhoto blog.

Oh, and I started a photography business. Because I love taking pictures of people. And buildings. And food. So if you know anybody who needs somebody to take pictures of people, or buildings, or food...feel free to send them my way. I’d appreciate it so so much. And thank you, all of you, who have commented and tweeted and emailed your support. You’re the best, truly.

And yes, I am still working for an architecture firm here in Charlottesville. So...yeah. Busy.

It feels as though summer has completely passed by Bella Eats. Since June I’ve posted about cherries, blackberries, and blueberries. There have been no luscious heirloom tomatoes, no juice-laden peaches, no golden ears of corn. I even have a new trick for releasing kernels from their cob without making a complete mess of the kitchen counter and floor, and I haven’t had the opportunity to share it with you. That is sad my friends, because this trick is a good one. It will change the way you view corn entirely. Soon, I hope.

Way back in the middle of July our dear friend Kristin celebrated her birthday. She celebrated with us, and with this lime tart topped with blackberries from our garden. Blackberry season is just about over, a sign that summer is drawing to a quick close. Our bush has shed it’s bounty completely, leaving only the tiny shriveled berries that didn’t ever come to full ripeness. Our freezer is packed full of quart-size bags of the frozen fruit, our pantry shelf stocked with various forms of blackberry jam. This tart was one of the last recipes made this summer using berries fresh from the garden, and looking at these pictures already has me feeling nostalgic.

What is it about food that stirs memories stronger than those evoked by any other sense? While blackberries don't take me back to any point of my childhood, they do plop me down solidly in our backyard here in Charlottesville. For the past 4 years we've spent countless July and August evenings standing in our garden, bowls in hand, fingers stained purple, arms eaten by mosquitos, quietly and contently plucking berries one-by-one from a bush WE planted. I know that forever, no matter where we are, when I pop a freshly picked blackberry into my mouth I will be transported back to this place. I love that.

If you’re lucky you can still find pints of deep purple blackberries at your local farmers’ market, and if you do, I recommend you make this dessert before summer's end. The crust is quite perfect, nearly the consistency and flavor of a shortbread cookie. It doesn't flake and melt in your mouth like many pastry shells, but instead offers a firm vessel on which to carry a scoop of zippy lime curd. And scoop you will, because this tart never really sets up to a solid, sliceable state. Which is fine by me. The delightful combination of sweet shortbread, tart curd, and fresh blackberries had us all going back for seconds, despite our use of a spoon rather than a fork.

For the record, I am so unhappy with the spacing that this new Wordpress theme defaults too, but I just haven't had the time/energy to dig into the CSS code to fix it. And, we're working on a redesign of Bella Eats to be launched right around the two year (two years!) anniversary of this site at the end of October.  So, please bear with me and the awkward/awful spacing of the text in my recipes... Thank you.

Lime Tart with Blackberries

from bon appetit, June 2010 Ingredients for the lime curd:
  • 3 large eggs
  • 3 large egg yolks
  • 1 cup sugar
  • 3/4 cup fresh lime juice
  • 6 tbsp (3/4 stick) unsalted butter, cut into 6 pieces
for the topping:
  • (3) 6-ounce containers fresh blackberries
  • 1 tbsp blackberry jam
for the crust:
  • 1/2 cup (1 stick) unsalted butter, room temperature
  • 1/4 cup sugar
  • 1 large egg yolk
  • 1 1/4 cups all purpose flour
  • 1 large pinch of salt
Method for the lime curd:
  1. Set a fine metal strainer over a medium bowl and set aside. Whisk the eggs, egg yolks, and sugar in another medium metal bowl to blend.  Whisk in lime juice.
  2. Set bowl over large saucepan of gently simmering water (do not allow bottom of bowl to touch water). Whisk constantly until curd thickens and an instant-read thermometer inserted into curd registers 178ºF to 180ºF, about 6 minutes.  Immediately pour curd through prepared strainer set over bowl.
  3. Add butter to warm strained curd; let stand 1 minute, then whisk until blended and smooth.  Press plastic wrap directly onto surface of curd, covering completely.  Refrigerate until cold, about 4 hours.*
*Lime curd can be made up to 2 days ahead.  Keep chilled. for the crust:
  1. Using an electric mixer, beat the butter and sugar in a medium bowl until well blended, 1 to 2 minutes. Add egg yolk; beat to blend. Add flour and salt and mix on low speed until mixture resembles large peas. Using hands, knead in bowl just until dough comes together.
  2. Transfer dough to a 9-inch diameter tart pan with removable bottom. Break dough into pieces, then press dough evenly up sides and onto bottom of pan. Cover and chill 1 hour.**
  3. Preheat oven to 350ºF. Uncover crust and bake until golden brown, about 35 minutes. Cool completely in pan on rack.
**Dough can be made 1 day ahead. Keep chilled. assembly:
  1. Remove sides from tart pan and place crust on plate. Spread lime curd evenly in baked crust. Arrange blackberries in concentric circles on top of tart.
  2. Place am in small microwave-safe bowl. Heat in microwave until jam is melted, about 15 seconds. Whisk to loosen and blend, adding water by teaspoonfuls if thick. Brush jam over berries.*** (I only brushed jam over the outer ring, because I liked how they looked without the glaze.)
***Tart can be made up to 8 hours ahead. Chill uncovered.
Read More