Contact Us

Use the form on the right to contact us.

You can edit the text in this area, and change where the contact form on the right submits to, by entering edit mode using the modes on the bottom right. 


123 Street Avenue, City Town, 99999

(123) 555-6789

email@address.com


You can set your address, phone number, email and site description in the settings tab.
Link to read me page with more information.

Blog

Filtering by Tag: chocolate

black forest chocolate cookies + an old favorite

Andrea

Happy holidays, friends! Wow, they sure snuck up quickly this year. Brian and I are staying home in Charlottesville after having traveled to see family in Florida for Thanksgiving, and I truly thought that there would be all kinds of time for baking and hot cocoa and homemade marshmallows in the last few weeks. But here we are, days away, and I've baked exactly two kinds of cookies and drunk exactly zero cups of cocoa. To be clear, I use the term 'baked' loosely...one of them requires no heat whatsoever. I may feel that I've failed as a holiday baking goddess this year, but the presents are wrapped and shipped, the tree is up and trimmed, and Christmas music plays from my computer the majority of the time. And, as of tomorrow evening, I'll be unplugging for 4 full days to hang out with my honey.  I. Can't. Wait.  That right there is what the holidays are about; cherishing those you love and taking time just to be.  But, having a few cookies laying around never hurts either.  :)

All things merry to you and yours!!!  xoxo.

Brian is originally from Michigan, making the chocolate + cherry combination dear to his heart and stomach. I am always looking for recipes that combine the two, and this one from Baked in New York is quite perfect.  The dough is very sticky and fudge-like, and the resulting cookies are super-moist and chewy.  The dried cherries provide the perfect burst of tartness to counter the rich chocolate.  I realized as I typed up the recipe that I completely left out the brown sugar, but the cookies were still delicious.  In fact I think I like them better than what they should have been, as I really can't imagine them being any sweeter than the version I made.  

Black Forest Chocolate Cookies
makes 24 large cookies, or 48 small (1 tbsp scoop)

accidentally modified from Baked

Ingredients
  • ¾ cup all-purpose flour
  • 1 tsp baking powder
  • ½ tsp salt
  • 16oz dark chocolate (60 to 72% cocoa), coarsely chopped
  • 10 tbsp unsalted butter, cut into 1-inch pieces
  • 6 large eggs
  • 1-¼ cups granulated sugar
  • 1 cup firmly packed light brown sugar
  • 1 cup semisweet chocolate chips
  • 1 cup white chocolate chips
  • 1 cup dried cherries (we used tart cherries straight from Michigan)
Method
  1. Sift the flour, baking powder, and salt together into a medium bowl and set aside.
  2. In a large nonreactive metal bowl, combine the dark chocolate and butter.  Set the bowl over a saucepan of simmering water and cook, stirring with a rubber spatula, until the chocolate and butter are completely melted and the mixture is smooth.  Set aside to cool.
  3. In the bowl of an electric mixer fitted with the whisk attachment, beat the eggs and sugars on high speed until the mixture is pale and thick, about 5 minutes.
  4. Add the cooled chocolate mixture and the vanilla and beat until just combined.  Scrape down the bowl and beat again for 10 seconds.
  5. Add the flour mixture and mix on low until just combined, about 10 seconds.  Do not over mix.
  6. Using a spatula or wooden spoon, fold in the chocolate chips, white chocolate chips, and dried cherries.  The dough will look very loose, but it will harden in the refrigerator.  Refrigerate for 6 hours or overnight.
  7. Preheat oven to 375℉.
  8. Spread two cookie sheets with parchment paper. Using a 1 tbsp scoop or a spoon, place dough in rounded mounds on sheets, about 1-1/2 inches apart. Bake for 12-15 minutes until the tops of the cookies are beginning to crack. Let cool on sheet for 10 minutes and then move to a cooling rack to cool completely. Cookies can be stored in an airtight container for 3-5 days.

Speaking of Michigan (Brian's home state), this cookie comes from his Nana, and has been a staple since he was a little boy. I think that this may be his very favorite cookie recipe. I get the best reaction from him when I make a batch, way better than any layer cake I labor over for a full day. They take 10 minutes to whip up, another 20 to harden, and you're done. So simple. Plus, we always have the ingredients needed to pull these treats together, so they are perfect for last-minute guests or a holiday pot luck.

I tried once, years ago, to make these cookies healthier by substituting out the butter, using less sugar, etc.  Big mistake.  Just keep them as are and enjoy.

Chocolate No-Bake Cookies
makes 4 dozen cookies

Ingredients
  • ¼ cup unsweetened cocoa powder
  • 2 cups granulated sugar
  • ½ cup butter
  • ½ cup milk
  • ½ cup peanut butter (go for the non-natural stuff…like Jif or Peter Pan)
  • 1 tsp vanilla extract
  • 3-½ cups instant oatmeal
Method
  1. Combine cocoa, sugar, butter, and milk in a medium-size sauce pan over medium heat.  Simmer for 2 minutes and remove from heat.
  2. Add peanut butter, vanilla, and oatmeal to pan and stir to combine well.
  3. Spoon onto waxed paper in 1 tbsp lumps (a small ice cream scoop works well for this) and let sit until the cookies are set.
  4. Store in a sealed container for 3 days.

red velvet cupcakes with cinnamon cream cheese frosting

Andrea

We're not big on Valentine's Day plans in our house, typically choosing to stay home for a dinner cooked together paired with a nice bottle of wine. And really, how is that different from most nights around here? But this year Brian has something special up his sleeve, and despite my persistent quest for answers, he hasn't slipped me the slightest hint about what he's up to. It's impressive, really, because we're usually the couple that exchanges gifts as soon as we've purchased them, never able to hold out for the birthday, anniversary, or holiday they are truly meant for. I've got to say, I'm pretty excited. The anticipation is killing me! :)

When you're a recipe blogger you really can't avoid Valentine's Day, despite our typical lack of celebration at home. The red food coloring and sprinkles and heart-shaped cookie cutters are part of the job, and I really am okay with it. Any excuse to bake is fine by me. This year for my Valentine's baking (a week early, so that I could share with you here) I decided to go with a more natural palette - a toned-down burgundy cake and cream frosting, adorned with a simple craft ribbon. Which, I think, makes these red velvet cupcakes the perfect "all-grown-up" Valentine's Day dessert. 

Now I wouldn't call myself a red velvet cake aficionado, as I've never really understood the appeal of it before now. It's just red cake...right?!? Not really. I love the subtle chocolate flavor and soft crumb of these cakes, made light and moist with buttermilk. And the cinnamon cream cheese frosting is so completely delicious that it's a wonder any made it to the domed tops. Seriously, I could have eaten the entire bowl on its own. Don't skip this frosting in favor of a fluffy white version, the cupcakes just wouldn't be the same.

Happy Valentine's Day, all! I hope you spend the day, and each one after that, with those you love.

PS: There's nothing wrong with sprinkles, and if you're looking for some (along with the story of my breaking a little boy's heart), I suggest my Valentine's Day post from last year. :)

Red Velvet Cupcakes with Cinnamon Cream Cheese Frosting

from Hummingbird Bakery Cookbook via Joy The Baker

makes 12 cupcakes. double the recipe to make two 9-inch layer cakes.

Cupcake Ingredients

  • 4 Tablespoons unsalted butter, at room temperature
  • 3/4 cup sugar
  • 1 egg
  • 3 Tablespoons unsweetened cocoa powder
  • 2-1/2 Tablespoons red food coloring (I used a gel food coloring...about 1 tsp mixed with enough water to make 2-1/2 tablespoons...which is why my cupcakes are more burgundy than red)
  • 1/2 teaspoon vanilla extract
  • 1/2 cup buttermilk
  • 1 cup plus 2 Tablespoons all-purpose flour
  • 1/2 teaspoon salt
  • 1/2 teaspoon baking soda
  • 1-1/2 teaspoons distilled white vinegar

Method

  1. Preheat oven to 350*. Line standard muffin pan with paper liners.
  2. In the bowl of a stand mixer with paddle attachment, cream the butter and sugar together until light and fluffy. Add the egg, and beat until well-incorporated, scraping down the bowl as needed.
  3. In a separate bowl, mix together the cocoa, food coloring, and vanilla extract to form a paste. (I used 1 tsp of gel food coloring with water added to equal 2-1/2 tbsp, which is why I think my cupcake color isn't as vibrant as Joy's.) Add to the batter and mix thoroughly, until completely combined. Be sure to scrape the sides and bottom of the bowl to be sure that all of the batter is equally colored.
  4. Turn the mixer to low and slowly add half of the butter milk. Mix to combine. Add half of the flour and mix to combine. Repeat with the last of the buttermilk and the last of the flour. Scrape the bowl, turn mixture to high, and beat until smooth.
  5. Turn the mixer back to low and add the baking soda, salt and vinegar. Turn mixer up to high and beat for 1-2 minutes until smooth.
  6. Spoon the batter into paper-lined cupcake pan and bake at 350* for 20-25 minutes, until a toothpick inserted in the center of a cupcake comes out clean. If you have doubled the recipe and are baking 2 pans at once, be sure to rotate the pans halfway through baking.
  7. Cool on rack in pan for 10 minutes, then remove from pan and allow to cool completely before frosting.

Frosting Ingredients

I go light on frosting, so this made the perfect amount for a double-batch of cupcakes. If you're making a layer cake, you'll probably want to double it.

  • 2-1/3 cups powdered sugar, sifted
  • 3 Tablespoons butter, room temperature
  • 4 ounces cream cheese, cold (I used room temperature)
  • scant 1/4 teaspoon ground cinnamon

Method

  1. Cream the butter in the bowl of a stand mixer with paddle attachment.  Add the powdered sugar and cinnamon and mix at medium-slow speed until well combined. 
  2. Add the cream cheese all at once and beat at medium-high for 5 minutes, or until the frosting is light and fluffy. Do not over-beat as the frosting can become runny quickly.

tall, dark, handsome and dreamy

Andrea

March is a month full of birthdays, a month for celebrating family and friends.  Twelve family members and good friends, to be exact.  It seems that every other day Brian and I are passing a card between us, signing our names and licking an envelope, sending our best wishes and good cheer zipping across the country to loved ones. Each of these special days surely contributes to my attachment to this third month of the year, with so many excuses to reach out and connect with people we don’t see or talk to nearly enough.

It is a part of the start of Spring, the phone calls and cards and Facebook messages, a routine as comfortable and happy as the emergence of lemon-hued daffodils and the pop of blushing cherry blossoms.  We send wishes for a year better than the last, marvel at the changes that have come in just twelve months' time.  Across the line there are promises to visit, promises to talk more, promises to write often. The phone disconnects and we return to our routines, our hearts a little more full with the knowledge that we are better for knowing that other person, for being able to share another year with them even if from a distance.

I’ve come to think of March as the beginning of the new year, with all of its fresh growth and rekindled promises to keep in better touch, rather than the dreary gray and reclusive hibernation that is typical of January.  I find myself with renewed motivation, making plans while seeking spontaneity, striving to keep up with the ever-changing state of the surrounding environment. Each new clump of tiny chartreuse leaves, each cotton ball puff of Bradford Pear blossoms is a reminder of time's quick passage, a kick in the backside that jolts the gears in my head to life, prompts me to take action on the ideas swirling through my brain.

I realize that these feelings come in part because Brian and I each celebrate our birthdays in March, his falling on the 2nd and mine on the 29th. We can’t help but to reflect on years passed as yet another draws to a close, setting goals for the coming weeks or in our case, the next two years before we hit the big Three-Oh.  Three.  Oh.  Wow.

We've started a ‘thirty before thirty’ list, although I don’t think either of us has finalized the catalog of things we’re set to accomplish. A lot can happen in two years’ time, and I’ve come to terms with the reality that is a sliding scale of goals, an evolving list of priorities. The point is to think about it, to make an effort towards trying new things, towards bettering and challenging ourselves in the smallest or biggest of ways.

One of the ways I am seeking to improve upon what is already a lovely life is to increase the connections we have with distant friends and family beyond the every-few-months phone calls. I want to follow through on the March promises, pick up the phone more frequently to catch up with those we hold dear.  This is a goal I'm not willing to let slide, a priority at the top of my list as I embark on my 29th year.  Phone calls to loved ones.  Often.

And, if I had my way, along with those phone calls there would be more cake.  Shared on actual birthdays.  We'd sit across from each other at my dining table, forks in hand, three-layer pillar between us.  There would be wine and coffee, stories and laughter, a vase of Spring flowers in the corner.  It would be so simple if only I could convince each person we love to move to Virginia, to live within a few hours of Charlottesville. Perhaps a task for the 'forty before forty' list...

This cake I'm sharing today was made for Brian, on his 28th birthday, just 3 weeks ago.  It is the same chocolate cake that I baked for him last year, which was the first from-scratch cake I'd ever made.  When I asked Brian what I should make for his birthday this year he requested the same chocolate cake, and left the frosting and adornment up to me.

The praline was a good choice, the crunchy texture a nice contrast to the dense, moist crumb of the cake and the creamy, stick-to-your-tongue ganache.  The whole ensemble is tall, dark, handsome and dreamy, just like my Hubb.

Happy 29th year, my love.  I feel certain it will be a good one.

I said it last year and I'll say it again, this is the best chocolate cake recipe.  Ever.

Double Chocolate Cake with Praline Topping

Makes 12-14 servings. Cake recipe from Epicurious, praline recipe from Bon Appetit Ingredients for cake layers:
  • 3 ounces fine-quality semisweet chocolate such as Callebaut
  • 1 1/2 cups hot brewed coffee
  • 3 cups sugar
  • 2 1/2 cups all-purpose flour
  • 1 1/2 cups unsweetened cocoa powder (not Dutch process)
  • 2 teaspoons baking soda
  • 3/4 teaspoon baking powder
  • 1 1/4 teaspoons salt
  • 3 large eggs
  • 3/4 cup vegetable oil
  • 1 1/2 cups well-shaken buttermilk (for dairy free variation: mix 1 1/2 cups soymilk with 1 tablespoon cider vinegar and set aside to curdle)
  • 3/4 teaspoon vanilla
for ganache:
  • 1 pound fine-quality semisweet chocolate such as Callebaut
  • 1 cup heavy cream (or soy creamer)
  • 2 tablespoons sugar
  • 2 tablespoons light corn syrup
  • 1/2 stick (1/4 cup) unsalted butter (or margarine)
for praline topping:
  • 3/4 cup (packed) dark brown sugar
  • 1/4 cup heavy whipping cream
  • 3 tbsp unsalted butter
  • 3/4 cup powdered sugar
  • 1 tsp vanilla extract
  • 1 cup pecans, toasted, chopped
Method make cake layers:
  1. Preheat oven to 300* F and grease two 10″ cake pans, or three 8″ or 9″. Line bottoms with rounds of wax paper and grease paper.
  2. Finely chop chocolate and in a bowl combine with hot coffee. Let mixture stand, stirring occasionally, until chocolate is melted and mixture is smooth.
  3. Into a large bowl sift together sugar, flour, cocoa powder, baking soda, baking powder, and salt. In another large bowl with an electric mixer beat eggs until thickened slightly and lemon colored (about 3 minutes with a standing mixer or 5 minutes with a hand-held mixer). Slowly add oil, buttermilk, vanilla, and melted chocolate mixture to eggs, beating until combined well. Add sugar mixture and beat on medium speed until just combined well.
  4. Divide batter between pans (pans should only be half full – if you use 8″ pans you will have some batter leftover) and bake in middle of oven until a tester inserted in center comes out clean, 1 hour to 1 hour and 10 minutes for 10″ pans, 50 minutes for 8″-9″ pans.
  5. Cool layers completely in pans on racks. Run a thin knife around edges of pans and invert layers onto racks. Carefully remove wax paper and cool layers completely. Cake layers may be made 1 day ahead and kept, wrapped well in plastic wrap, at room temperature.
make ganache:
  1. Finely chop chocolate. In a 1 1/2- to 2-quart saucepan bring cream, sugar, and corn syrup to a boil over moderately low heat, whisking until sugar is dissolved. Remove pan from heat and add chocolate, whisking until chocolate is melted. Cut butter into pieces and add to frosting, whisking until smooth.
  2. Transfer frosting to a bowl and cool, stirring occasionally, until spreadable (depending on chocolate used, it may be necessary to chill frosting to spreadable consistency). I found that stirring this over a bowl of ice water did a great job of cooling it off quickly and evenly.
assemble cake:
  1. Use a serrated knife to cut off domes of cakes if needed (mine came out perfectly flat, so there was no need to take a knife to them).
  2. Place first layer on the plate you'd like to keep the cake on.  Spread a layer of ganache across the top of that layer, about 1/8-inch thick. Place the second layer on top of the first, and spread ganache on top of it.  Place the third layer on top of the second, and cover the sides and top of the cake with ganache.
make praline:
  1. Stir first 3 ingredients in a large, heavy sauce pan over medium-high heat until butter melts.  Boil 1 minute without stirring.
  2. Remove pan from heat, whisk in sugar and vanilla.
  3. Add pecans, stir just to incorporate.
  4. Pour praline over top of cake and spread to edges, working quickly to get even coverage before praline sets.
Cake will keep stored in an airtight container at room temperature for 3-5 days (and will stay incredibly moist, too!)
Read More

the clearest route

Andrea

Why, hello March! How sneaky of you, creeping up behind me quickly and quietly, propelling past February’s tail just outside of my peripheral vision. It was nice of you to bring gifts - warm, sunshine-filled afternoons set against a bright, sapphire sky.

Walking through the park on Thursday, I noticed that beds are filled with the lime green leaves of young daffodils, and the tiny bell-shaped snowdrops are in full bloom. I even unbuttoned my coat, let it drape open to expose my sweater-clad chest, loosening the protective shell I’ve encased my body in for months.

Friday morning I glanced out my kitchen window and a bright spot of yellow caught my eye. Crocuses(!), peeking out from underneath a layer of leaves and mulch.

And yesterday, out taking care of errands with Brian, wandering in and out of shops, I had to dig my sunglasses out from their hiding place in our car. Oh Ray-Bans, how I’ve missed you!

As I write this, there is bright southern light streaming through the back door of my kitchen, the pattern of the glass casting a gridded shadow across the floor. And the window right over the sink, open as wide as it will go, grants permission to the cool breeze to filter through, picking up the scent of banana bread before moving on to the rest of the house. So motivating, the near-Spring feel of the space is calling to me, luring me to the pantry to gather ingredients for my next project.

I am constantly amazed at the affect that weather has on moods, on preferences, on behavior.

I am inspired to cook again, to browse my books and magazines in search of the perfect use for the local spring produce arriving any week now. Arugula and swiss chard, broccoli and kale. Green, green and more green.

The need to see something grow, to cover my hands with soil and coax tiny seeds to life, is overwhelming. The desire to walk out my back door with clippers in hand, returning with arms full of fresh produce, is palpable. Soon, so very soon.

Oh, and we've been talking about moving. Wanting to start over on a new (old) house, to tackle different renovation projects and to pick out brighter paint colors. I am addicted to our local real estate site, checking my email for new listings first thing each morning.

And then there's photography, which I've been practicing regularly. Photographs of people and flowers and jewelry and food are popping up on my newly established Flickr page. It seems that inspiration is everywhere, and I am desperate to capture it all.

It's a very nice change, this desire to invent, to create, to produce in place of the urge to sit still with a mind devoid of motivation. I credit the Spring-ish weather, feeling as if I am emerging from hibernation, stretching my legs and taking confident strides towards goals set with the new year. Some personal, some professional. Some big, some small. All important.

At any given moment my mind is flickering between half a dozen thoughts, trying to decide which to settle on and move forward with.  I am often overwhelmed, the trails in front of me not entirely clear and me standing at the head of them with my shoes laced up, ready to go but not sure of which to choose.

But when the kitchen is an option, it is undoubtably the route that I embark on.  Always the clearest, with a succinct set of instructions to accompany me, the outcomes are mostly joyous. Even if I get lost. And then there's that southern light, and the crisp breeze, and the possibility of banana-scented air.  Who can say no to that?

And so, in this time of overwhelming possibility I’ve busied myself with baking, covering my hands (and face, and hair, and thighs) with flour, watching cakes and cookies rise to gentle domes through the oven door. I enjoy the satisfaction of this productivity, of harnessing some of the energy emanating from the Earth as it prepares for this next season, directing it towards bowls of sifted sugar and flour, creamed butter and silky eggs. As my hands work to chop walnuts and mash bananas my mind is able to wander, to slowly wrap itself around all those other thoughts, to sort through and file them away for a different time when the sun isn't shining through the window quite so perfectly.

This cake, while not the prettiest kid on the block, certainly has the possibility of being the most popular with its stellar personality. So dense, so moist, the banana-scented crumb is perfectly balanced with dark chocolate and toasty walnuts. I brought it in to share with my office, a group notoriously hesitant about sweets, and it was polished off within a day.  That says something, something very good, I assure you.

banana cake with dark chocolate and walnuts

from gourmet, february 2008 serves 8-10 Ingredients
  • 2-1/4 cups all-purpose flour
  • 1 tsp baking soda
  • 1/2 tsp salt
  • 1 stick unsalted butter, softened, plus 2 tbsp, melted and cooled
  • 1 cup sugar, divided
  • 2 large eggs
  • 1-1/4 cups mashed very ripe bananas (about 3 medium)
  • 2/3 cup fat-free, vanilla, greek yogurt
  • 1 tsp vanilla extract
  • 1 (3-1/2 to 4-ounce) bar bittersweet chocolate, or 1 cup bittersweet chocolate chips
  • 1 cup walnuts, toasted, cooled and coarsely chopped
  • 1/2 tsp cinnamon
Method
  1. Preheat oven to 375* with rack in middle.  Butter a 9-inch square cake pan.
  2. Stir together flour, baking soda and salt.
  3. Beat together softened butter (1 stick) and 3/4 cup sugar in a medium bowl with an electric mixer at medium speed until pale and fluffy.  Beat in eggs one at a time until blended. Beat in bananas, yogurt and vanilla (mixture will look curdled).
  4. With mixer at low speed, add flour mixture and blend until just incorporated.
  5. Toss together chocolate, nuts, cinnamon, melted butter and remaining 1/4 cup sugar in a small bowl.  Spread half of banana batter in cake pan and sprinkle with half of chocolate mixture.  Spread remaining batter evenly over filling and sprinkle remaining chocolate mixture on top.
  6. Bake until cake is golden and a wooden pick inserted in center of cake comes out clean, 35-40 minutes.  Cool cake completely before cutting.

retail relay

Charlottesville folks, have you heard of Retail Relay?  I had my first experience with the company last week, and am so impressed by the service they are providing to local consumers and businesses.  It's a one-stop shopping experience for most of your favorite local food providers, at no additional cost to you.  Our order included items from Foods of all Nations, Feast, The Organic Butcher, Belle Haven Farm Bakery and Mona Lisa Pasta. I'll be doing a post about the experience soon, but wanted to extend a coupon code they've offered my readers as soon as possible.

**For $10 off your Retail Relay order of $50 or more, enter 'bellaeats' in the coupon bar on the online order form.**

Read More

just can't help myself

Andrea

I have a bit of an issue with baked goods.  One might actually be more inclined to call my 'issue" a minor addiction, as my mind seems to focus on one track when I find myself in a room that also harbors some form of baked treat.  Like a moth to a flame I am drawn to whatever chocolate-y, vanilla-y, fruity, fluffy, cakey, crumbly goodness my eyes or nose pick out.  It takes an immense amount of willpower to resist the temptation of dessert no matter the time of day, and there are certain months of the year when what little willpower I have takes off on vacation and leaves me defenseless to the siren song of sweets.

Those months would be November and December, when it is nearly impossible to take ten steps without encountering a variety of cookie, cake or brownie that somebody is offering up. I brought the temptation upon myself even earlier last year, filling the month of October with various types of pie in preparation for the upcoming holidays.  I grew accustomed to dessert every night until finally, in the first week of the new year my practical self, the side of me that recognized that my pants were getting a little *ahem* snug in certain areas, intervened and told my over-indulgent self to lay off the 'goods.

Not one to jump on board with any overly restrictive, treats-prohibiting, quit-cold-turkey diets, I recognized the fact that I simply needed to find some healthier options to satiate my cravings for sweets rather than eliminating them from my life completely.  I browsed the archives of Bella Eats' leaner, more fitness-focused days and came across this recipe for banana date bread*, an old favorite and one that I'd nearly forgotten about.  In no time my kitchen smelled of baking banana and cinnamon as I pulled a loaf from the oven.  Spread with a bit of almond butter and paired with fresh fruit it served as breakfast for Brian and I several mornings in a row.

Inspired by my first healthy baking activity in months, I decided that afternoon to start experimenting with a new type of cookie. Or, rather, a granola bar masquerading as a cookie.  That was my hope, anyway, to create a cookie so chock-full of good-for-me ingredients like oat bran, rolled oats, dried fruit and whole grain flour, without the less desirable ingredients such as butter and refined sugar, that I'd be able to eat several of them for breakfast.  Or for a snack before my new workout routine.  Or right before I go to bed while I'm waiting for the dogs to come in from outside.  You get the idea.

What resulted is a soft, chewy cookie that IS full of delicious and hearty ingredients, minus butter, refined sugar and even eggs. The whole grains provide a flavorful backdrop for the dried cherries and dark chocolate that punctuate each bite.  I made them three times within two weeks, tweaking the recipe until I was satisfied with the final result.  The photographs in this post are actually of the second batch - the final batch saw the addition of a bit more baking soda and the resulting cookies weren't as flat as those pictured below, so don't be surprised if yours look a little different.

In the end, I don't know that there is actually any caloric difference between these cookies and your standard variety.  But I can assure you that they are delicious, and any calorie savings I might have seen were made up for when I reached for another cookie. And another.  I just can't help myself. I've decided to start running again instead.

Chocolate Cherry Granola Cookies

(dairy free, egg free, naturally sweetened) adapted from Sweet & Natural Baking makes 20 cookies Ingredients
  • 1-3/4 cups spelt flour (if you can't find spelt flour, use white whole wheat flour instead and only 1 tsp of baking soda)
  • 1-1/2 tsp baking soda
  • 1/2 tsp cinnamon
  • 1/4 tsp salt
  • 1/4 cup oat bran
  • 1/2 cup rolled oats
  • 3/4 cup liquid fruit juice concentrate (I use FruitSweet, which I find at Whole Foods)**
  • 6 tbsp canola oil
  • 1-1/2 tsp vanilla
  • 1/2 cup semi-sweet chocolate chips
  • 1/2 cup unsweetened dried cherries
Method
  1. Position oven racks in center and top third of oven.  Preheat to 350*.  Line 2 large baking sheets with parchment paper.
  2. Sift the flour, baking soda, cinnamon and salt together in a large bowl.  Add the oat bran and rolled oats and whisk to combine.  Make a well in the center.
  3. Whisk the fruit juice concentrate, canola oil and vanilla together in another bowl.  Pour into the well and mix together with a wooden spoon.  Stir in the chocolate chips and the dried cherries.  Cover and refrigerate until firm enough to scoop, about 1 hour.
  4. Using about 3 tbsp dough per cookie, transfer the dough to the baking sheets and space 2-inches apart.  Bake the cookies until the edges are lightly browned and they feel firm in the center, 12-15 minutes.  Halfway through baking, switch the position of the baking sheets.  Cool the cookies for 2 minutes on the baking sheets, then transfer to a wire rack to cool completely.
* A note about that bread - I substituted  a 1/2-cup of fat-free vanilla greek yogurt for the applesauce and it was absolutely divine.  Try it! ** The third time I made these cookies I only had a 1/2-cup of FruitSweet left, so I substituted a 1/4-cup of pure maple syrup for the remaining sweetener.  It was delicious, and I loved the extra flavor added to the cookies.  If you can't find liquid fruit juice concentrate, I'd try substituting maple syrup for the full amount of sweetener.  Maybe leave out the vanilla though.  And then tell me how they turn out!
Read More

positively dreamy

Andrea

Its that time of year again, when each week offers a party of some sort, when all around our house you’ll find little pieces of paper scribbled with frantic ‘to do’ lists, when our kitchen becomes coated with a fine film of flour and the den floor is sprinkled with a confetti of wrapping paper, ribbon and tape. Our tree is up and decorated, a Christmas-themed Pandora station dialed into the iPod sitting in its dock, and my cravings for mulled cider and creamy eggnog are daily occurrences. There’s no denying it, the holidays have latched on to our life and won’t be letting go until January. I am feeling particularly festive this year, I think because, for the first time ever, Brian and I are staying in Charlottesville for Christmas. In our own house with our own vintage-inspired silver tree and fresh wreath hanging on our door. We’re pretty excited, especially since we managed to convince two of our four sets of parents to come and visit. We’ll have my momma and stepfather for Christmas and Brian’s dad and girlfriend to help us ring in the New Year. Thats two big meals to host and we, who love to entertain, have already started planning the menus. By now you’ve all probably figured out that I love to bake. Dessert is the first course of menu planning that I tackle, I can’t bring myself to buy bread from a store if we’re having guests over for a meal (unless its an Albemarle Baking Co. baguette, because they are magical) and whenever I am asked to contribute a dish to a dinner party I offer up a cake or pie. I’ve developed a bit of an obsession, and have been known to get downright giddy as I browse my cookbooks and magazines looking for the perfect cookie recipe.  So, as you can imagine, I get pretty darn excited about holiday baking. These days I'm leaning towards heavy, comforting desserts; dense cakes, thick custards, rich pies.  I'm craving chocolate, in all forms, the darker the better.  I've dog-eared pages to mark recipes for Spiced Ginger Cookies, Rum-Drenched Pound Cake and Dulce de Leche Bread Pudding.  And for this Chocolate Bourbon Bundt Cake, which I actually made for a dinner with friends months ago.  That was before the cold air hit Charlottesville and, while this dessert is really good no matter the time of year you make it, when I took my first bite I couldn't help but to think of December.  And hot cider.  And twinkling lights on trees.  And snow. This gem of a recipe will surely have a place on one of our holiday menus or perhaps as a take-along dish for a party.  Dense and moist with a deep, dark chocolaty flavor laced with a hint of bourbon, the cake is easy to make, better when made a day or two in advance and, to top it all off...positively dreamy.  I promise that not a crumb will remain after your party.  But if I'm wrong and there are some leftovers, a thick slice makes a mighty fine accompaniment to your morning coffee.

Chocolate Bourbon Bundt Cake

adapted from Gourmet, September 2005 Ingredients
  • 1 cup unsweetened cocoa powder (not Dutch-process) plus 3 tbsp for dusting pan
  • 1-1/4 cups brewed coffee
  • 3/4 cup bourbon (I used Maker's Mark)
  • 2 sticks (1 cup) unsalted butter, cut into 1-inch pieces
  • 2 cups sugar
  • 2 cups all-purpose flour
  • 1-1/4 tsp baking soda
  • 1/2 tsp salt
  • 2 large eggs
  • 1 tsp vanilla
  • confectioner's sugar for dusting
Method
  1. Position oven rack in middle of oven and preheat to 325*.  Butter 10-inch bundt pan well, then dust with 3 tbsp cocoa powder, knocking out excess.
  2. Heat coffee, bourbon, butter and remaining cup of cocoa powder in a 3-quart heavy saucepan over moderate heat, whisking, until butter is melted.  Remove from heat then add sugar and whisk until dissolved, about 1 minute.  Transfer mixture to a large bowl and cool for 5 minutes.
  3. As chocolate cools, whisk together the flour, baking soda and salt in a bowl.  Whisk together the eggs and vanilla in a small bowl, then whisk into cooled chocolate mixture until combined well.  Add flour mixture and whisk until just combined - the batter will be thin and bubbly.  Pour batter into bundt pan and bake until a wooden pick or skewer inserted in center comes out clean, 40 to 50 minutes.
  4. Cool cake completely in pan on a rack, about 2 hours.  Loosen cake from pan using tip of a dinner knife, then invert rack over pan and turn cake out onto rack.
Read More

perfect on its own

Andrea

pie logo mousse About a year ago, my momma started talking to me about a chocolate mousse pie. Or, more specifically, a chocolate mousse pie whose mousse was so delectable that she and my stepfather decided to eliminate the crust, and therefore the element that made the dessert a “pie”, altogether. They’d served the mousse at a few dinner gatherings and even to my stepbrother (who is notoriously picky and known to complain about most dishes that come from our parents’ kitchen) with much success. “You’ve GOT to make it sweetie”, she’d say, “Its just soooooo yummy!” mousse pie-1 I put it off because, honestly, I’m not a big chocolate mousse fan. Give me a slice of moist chocolate cake with raspberry filling that oozes from its interior, or a rich chocolate cheesecake so dense that your tongue has to work to break it down in your mouth, even a petite chocolate cupcake with berry-flavored buttercream. But chocolate mousse? Eh. I can take it or leave it. When it comes to dessert, I like each bite to be substantial. None of this “melt in your mouth” or “light as air” stuff for me. I even like my ice cream extra thick so that each spoonful lingers for seconds longer than the regular stuff. mousse pie-4 But my momma, she’s stubborn. She was determined that I would like THIS chocolate mousse and so added it to the dessert menu for our Christmas meal last year. I’m willing to try anything, but honestly, I was looking forward to the coconut mango white chocolate bread pudding WAY more than the fluffy, mocha-hued blob resting in the refrigerator. The time for tasting came and I dropped a small serving of mousse next to my [much larger] mound of bread pudding. I dipped my spoon in and brought the chocolate fluff to my mouth. My eyes closed as my tongue deciphered the flavors resting on it - the rich dark chocolate mingling with the tang of buttermilk, all lightened to the silkiest texture by the homemade whipped cream folded in. I did a little shimmy in my seat, the classic food dance that lets everyone present know that I am very, very happy. And then I took another bite. And another. I was completely, totally, hopelessly hooked. mousse pie-5 When the C’ville Pie Fest was brought to my attention a couple of weeks ago I, of course, emailed my Momma for her opinion on what I should make. She, of course, said “Chocolate Mousse Pie!” (its her standard answer for most of my “what should I make for dessert” questions...). I didn’t think it was such a good idea, since I wasn’t sure how the mousse would hold up outside of the refrigerator for multiple hours. And room-temperature mousse pie is messy - its not the kind of pie that wins you big points in the “appearance after sliced” category. I did, however, add her suggestion to my list for Bella Eats Pie month knowing that I would not only be sharing a worthy recipe with all of you, my readers, but I would also be pleasing my Momma.  And who doesn't love to please their momma? mousse pie-6 There's something you should know about me...I'm a tweaker.  I like to experiment with recipes, especially baked goods, to make them my own.  My momma sent me the chocolate mousse recipe, which my stepfather had modified slightly from Emeril, and I immediately started thinking of ways to improve it.  I debated various crusts and other layers that I could add to the pie, resting finally on an idea inspired by Helen of Tartelette...salted caramel mousse.  The mere thought of the rich dark chocolate paired with salted caramel swirling around my tongue actually evoked the food dance from me way before sugar, cream or butter ever came into contact on my stovetop.  Very excited by my own brilliance, I called my momma to brag about the sure-to-be-delectable pie that I'd be making that weekend.  She gasped and ooh'd and aww'd appropriately, then turned to my stepfather to tell him of my plans.  "Why", he asked, "would she want to do that?  The mousse is perfect on its own!" mousse pie-8 Determined to prove him wrong, I set to work last Sunday morning on my Chocolate and Salted Caramel Mousse Pie (pictured in photos above).  I tweaked the chocolate mousse (from Emeril) slightly, but made the crust as he specified.  I made Helen's Salted Butter Caramel, but instead of folding a mousse base into it after it cooled I folded in homemade whipped cream, creating more of a salted caramel cream that I then layered over the chocolate mousse base.  It was all pretty loose, especially the caramel layer, so I stuck the whole pie in the freezer to let it firm up until we were ready to serve it to our evening guests. There was much anticipation for dessert, especially from me since I had already given my pie a food dance without ever tasting it.  We let it sit for a bit to soften then sunk the server deep into the pie's center, watching as it pulled the mousse toward the outer rim of the dish.  Normal-sized slices were served, small enough that ten people could be served from one 9" pie.  We all dug in and let out happy exclamations for each of the first three to four bites, and then started to slow down.  Drastically.  Because this pie was RICH.  So rich that even I, queen of heavy, decadent desserts, couldn't finish a whole slice. mousse merge 2 And so I moved on to plan B.  I had this feeling that because both the chocolate and caramel layers were light and mousse-like, they oozed together in your mouth without maintaining their own identities and created a bite that was overwhelmingly rich.  After some consultation with Brian and my Momma, I decided to try a pure caramel layer topped by the same chocolate mousse along with a new cookie crust, having not been completely thrilled with Emeril's mix of chocolate cookies and graham crackers in the first pie. (Have I mentioned how easy it is to make homemade salted caramel?  SO easy.  TOO easy.  There have been visions of caramel apples and caramel candies and caramel sauce for ice cream swimming in my head since I learned how easy it is.  Yum.) mousse merge 1 As it turns out, pure caramel doesn't adhere well to chocolate cookie crust.  After placing a slice of pie #2 on a plate to serve, I watched as the mousse and caramel slowly slid down the length of the shell that was meant to keep the slice intact and maintain its shape.  Even after an overnight rest in the freezer, it took a mere 5 minutes out before the caramel started oozing from beneath the chocolate mousse, lethargically making its protest at being forced to share the stage with another star. mousse pie-16 Apparently, my parents DO know a little something about desserts - the chocolate mousse is perfect on its own. So, here is my recommendation after this week of experimentation.  Make the chocolate mousse.  Put it into a chocolate cookie crust and place the whole pie in the freezer for a few hours.  Serve with a generous blob of homemade whipped cream.  Pure. Simple.  Delicious.  And if you're dying to try the salted butter caramel, DO!  Just coat an apple with it or drizzle it over ice cream.  It deserves its own spotlight. Or better yet, follow Helen's instructions for her triple-layer mousse.  It looks delicious, and I bet that layer of vanilla mousse would really help to cut the richness of the chocolate and caramel layers. mousse pie revised-1 Chocolate Mousse Pie adapted from Emeril's recipe on foodnetwork.com serves 10 Ingredients:
  • one 9" cookie crust, baked (recipe below)
  • 1 cup plus 2 tbsp sugar
  • 3/4 cup heavy cream, plus 1-1/2 cups
  • 3/4 cup buttermilk
  • 3-1/2 tbsp cornstarch
  • pinch salt
  • 4 egg yolks
  • 4 oz high-quality chocolate (I used 60% cocoa), finely chopped
  • 1 tbsp butter
  • 3/4 tsp vanilla extract
  • 3 tbsp confectioner's sugar
Method:
  1. In a small saucepan combine sugar, 3/4 cup heavy cream, buttermilk, cornstarch and pinch of salt, and whisk until smooth. Place over medium-high heat and bring to a boil, whisking from time to time until the sugar and cornstarch dissolve and the mixture thickens, about 5 minutes.  Continue cooking at a low boil for an additional 5 minutes, whisking constantly.
  2. In a mixing bowl, beat the egg yolks lightly.  Pour 1/2 cup of the hot mixture into the egg yolks and whisk thoroughly.  Pour the egg yolk mixture into the saucepan and whisk over the heat until thoroughly combined and very thick, 1 to 2 minutes.
  3. Pour the mixture into a mixing bowl and whisk in the chocolate, butter and vanilla.  Continue whisking until thoroughly combined (mixture will be very thick).
  4. Cover the mixture with plastic wrap placed directly on the surface of the mixture.  Refrigerate until cooled to room temperature, about 30 minutes.
  5. Place 1-1/2 cups heavy cream in a chilled mixing bowl and add the confectioner's sugar.  Beat until stiff peaks form (I used a stand mixer).  Refrigerate until ready to fold into chocolate mixture.
  6. Remove the chocolate mixture from the refrigerator.  Gently fold in about 1/2 of the whipped cream.  Spoon the chocolate mousse into the cooled, pre-baked cookie crust.  Refrigerate until firm and cool, at least 4 hours.  (Or freeze if you want a really firm pie, one whose bites have more oomph to them. Just remove from freezer about 10 minutes before cutting).
  7. Refrigerate remaining whipped cream until ready to serve with pie.
Chocolate Cookie Crust Ingredients:
  • enough chocolate cookies, cream centers removed, to make 2 cups of fine crumbs (I used one package of Newman O's)
  • 1/4 cup sugar
  • 1 stick unsalted butter, melted
Method:
  1. Preheat oven to 375*F.
  2. Process cookies in a food processor until fine crumbs.  Measure 2 cups into a mixing bowl.  Add the sugar and toss to combine.
  3. Add the melted butter and use your fingers to combine thoroughly.
  4. Press the crumb mixture evenly into a 9 inch pie dish.  Bake for 15 minutes.
  5. Let cool completely before filling.
And if you really want to try a caramel layer, here you go.  The combination is delicious, really, just be glad that the pie keeps well in the freezer because it will take a looooong time to finish it all. Salted Butter Caramel from Tarteltte Ingredients:
  • 1 cup sugar
  • 4 tbsp water
  • 1 tsp fine sea salt
  • 1/2 cup heavy cream
  • 4 tsp unsalted butter
Method:
  1. Place the sugar and water in a medium heavy-bottomed saucepan and bring to a boil over high heat.  Continue to cook until a shade lighter than caramel (it will continue to cook a bit after you remove it from the heat.  if it overcooks the caramel gets a little bitter.).
  2. Remove from the heat and add the salt, stir quickly to dissolve.  Add the heavy cream and butter, stirring constantly with a wooden spoon until completely smooth.  Let cool to room temperature.
Salted Caramel "Mousse" (from pie #1) Once the caramel is cool, fold in the other half of the whipped cream prepared for the chocolate mousse.  The mixture will be much runnier than the chocolate, so layer it on top.  Place in the freezer for at least 4 hours before serving. mousse pie-17 Up next Thursday on Bella Eats Pie:  Apple! And, I'm going to try really hard to get some savory fall dinner posts up in between...
Read More

its not the flavor i'm after...

Andrea

Zucchini has been gracing the booths of the farmer’s market for several weeks now. I’ve picked some up each Saturday, usually to use in simple pasta dinners or grilled alongside chicken or fish. This week I decided it was time for some zucchini bread, and knew just the recipe I wanted to modify to accommodate the green squash - Molly Wizenburg’s banana bread from A Homemade Life, which I made several weeks ago. zuke merge 1 Now, admittedly, I didn’t substitute zucchini in this recipe for its flavor. Its so mild on your palette that the stronger flavors of dark chocolate, ginger, cinnamon and cloves overpower its delicate scent. What I wanted from the zucchini was the moisture that the banana typically provides without adding an additional competitor to the mix. You see, while Molly’s recipe was quite good, for me the combination of banana, chocolate and ginger was a bit overwhelming. Maybe its because I am a banana bread purist, and want the banana to be the center of attention even when complimented with another ingredient like apples or dates. zuke 3 I did, however, love the idea and taste of chocolate and dried ginger combined together in a loaf, and decided to seek out another way to utilize it. Enter the zucchini, and a few other substitutions that I like to make to any bread recipe I re-create. White whole wheat flour in place of all-purpose, turbinado sugar in place of refined, fat free greek yogurt in place of regular whole milk yogurt. Throw in a couple of additional spices (cinnamon and clove) and a 12-cup tin instead of a loaf pan and the result is a muffin that is perfectly moist, not too sweet, hearty enough for breakfast yet satisfying as a dessert with a tall glass of milk or hot cup of tea. zuke merge 2 Because these muffins are very moist, I suggest eating them within 3 days if you’re going to keep them on your countertop in an airtight container. Refrigeration would probably save them from mold for a few days longer, but I didn’t try that so I can’t tell you what happens to their texture. I did freeze 1/2 the batch though, and am hoping that Molly’s claim that her bread freezes extraordinarily well will extend to my muffins. If you’re interested in the original banana bread recipe, you can find it reviewed here. zuke 6 If you fill the cups to the tip-top, you will be left with 12 delicious yet oddly-shaped muffins. Fill them 3/4’s of the way full, and you’ll probably have enough batter left for two additional muffins if its worth it to you to dirty another pan. I didn’t mind their appearance, since they were just for Brian and I to share. Zucchini Muffins with Dark Chocolate and Ginger adapted from the banana bread recipe in A Homemade Life by Molly Wizenburg, pg 26 Ingredients:
  • 6 tbsp unsalted butter
  • 2 cups white whole wheat flour
  • 1 cup turbinado sugar
  • 3/4 tsp baking soda
  • 1/2 tsp salt
  • 1 tsp cinnamon
  • 1/4 tsp ground cloves
  • 1 cup semisweet chocolate chips
  • 1/3 cup finely chopped dried ginger (not crystalized, although I'm sure it would work fine too)
  • 2 large eggs
  • 3 cups coarsely shredded zucchini (about 2 medium zucchini)
  • 5oz container of fat free vanilla-flavored greek yogurt (I used Oikos)
  • 1 tsp vanilla extract
Method:
  1. Set a rack in the center of the oven and preheat to 350*.  Grease a 12-cup muffin tin with cooking spray or butter.
  2. In a small bowl, microwave the butter until just melted.  Set aside to cool slightly.
  3. In a large bowl, whisk together the flour, sugar, baking soda, salt, cinnamon and ground cloves.  Add the chocolate chips and ground ginger and stir well to combine.
  4. In a medium bowl, lightly beat the eggs with a fork.  Add the yogurt, melted butter and vanilla and mix well.  Add the zucchini and stir to coat.
  5. Pour the zucchini mixture into the dry ingredients and stir gently with a rubber spatula until just combined.  Make sure to incorporate all flour but do not overmix.
  6. Spoon the batter into wells of muffin tin, using spoon to pack it down.  If you don't want your muffins to overflow like mine did, just fill the wells to 3/4 of the way to the top.  This will leave some batter leftover, but only enough for maybe 2 muffins.  If you don't mind oddly shaped tops, just fill the wells evenly until you've used all of the batter.
  7. Bake for 25-30 minutes (mine took 28 minutes), until a tester inserted in the middle of a muffin comes out clean.  Cool in pan on wire rack for 10 minutes, then remove muffins from pan to cool completely on rack.
zuke 9
Read More

no better cure

Andrea

You may have noticed that I’ve had quite a few baked goods featured here lately. Bella Eats is starting to look more like a baking blog than an all foods blog, which is not my intention even though I do have a not-so-secret desire to be a baker. The truth is, when I am stressed, overwhelmed or even underwhelmed with life in general, or just want an excuse to be lost in my head for an hour or two, I bake. Some people go for a run, others practice yoga, I pull out the flour and sugar and butter and get to work mixing and shaping. drops Maybe its because I am training to be an architect, spending my days working on minute details for buildings that won’t break ground for another six months and won’t be complete for another two years. It takes a lot of time, and a lot of patience, to get to the point in a project where you feel the satisfaction of seeing the results of your hard work. The days can be frustrating, the hours long, and at the end of it all you may not even be happy with the final result. But you continue forward, filing away the lessons learned on one project for a similar situation on the next, always striving for the perfect design against the odds of disagreeable clients and undesirable sites. drops merge 2 There are a lot of similarities between baking and architecture - formula, precision, a bit of risk taking, structure - but one very notable difference is timing. I can enter the kitchen, experiment with a new recipe that I’ve been dreaming about and have results in 1-2 hours. And if the final product doesn’t come out exactly as I had imagined, I can try again the next evening. Or immediately even, if the desire to get it right then and there is strong enough. That [nearly] instant gratification is what I love most about baking. The reactions from friends presented with something you’ve made from scratch help as well - who isn’t happy to be surprised with a plateful of baked goods? drops merge 1 There are nights when I get home from the office needing to bake. Not just wanting to, but needing to. Sometimes I’ll pick a recipe that is tried and true, other times I’ll try drastic experiments that go horribly wrong but always teach me something new. Last week I was looking for a recipe somewhere in the middle - a recipe that someone else had tried and recommended, that I could play with and put my own twist on. Luckily I had recently discovered Sweet Amandine and spent most of Sunday reading through her archives, soaking in her lovely writing and photographs. I found these chocolate hazelnut bites, put my own little spin on them and got to work. drops 7 
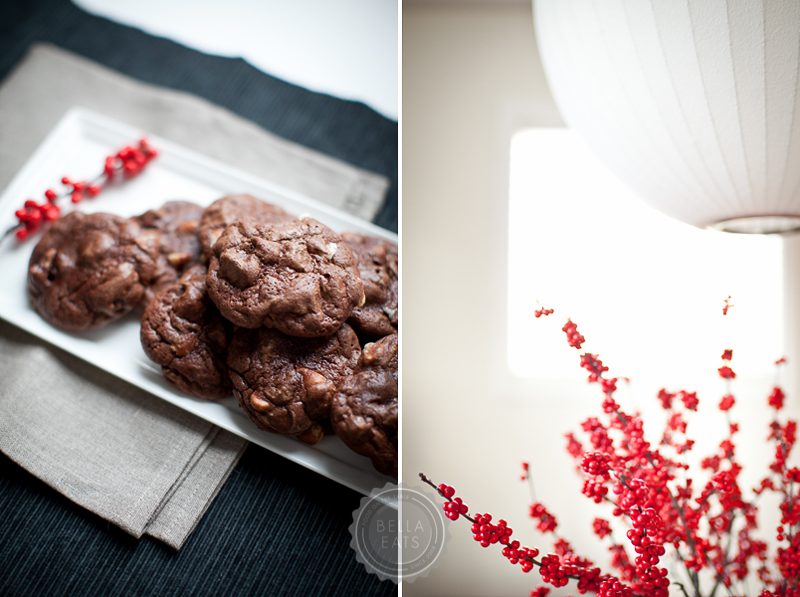
There are a lack of preparatory photographs in this post because baking these cookies on that particular night was purely for my mental well-being.  I was tired, a little bit frazzled and a lot in need of the dark chocolatey, almondy, slightly salty goodness that these three-bite cookies delivered to my mouth.  The process to make them was really quite simple - melt chocolate, amaretto and butter in one pan while whipping together the egg and sugar in another.  You combine the two, fold in some finely processed toasted almonds and then chill the batter for 1-2 hours.  If you have the patience, shoot for two hours of chilling.  I couldn't stand it and pulled them after just one so that I could get to work on the methodical task of rolling each lump of dough between my palms and coating each ball with granular sugar and then powdered.  They bake for a quick 10-12 minutes and then you are free to pile them onto a plate, grab a glass of wine and cuddle up to your partner on the couch.  There's no better cure for a long day, I promise. Also, if you are in need of some cheer the next evening as well, they are great crumbled over vanilla ice cream. Dark Chocolate Almond Bites adapted from Sweet Amandine who adapted from Chez Pim who adapted from David Lebovitz's Room for Dessert - goodness, this cookie's been around! makes 3-4 dozen 3-bite cookies Ingredients:
  • 8 oz bittersweet chocolate (I used Ghirardelli 60% Cacao)
  • 3 tbsp butter
  • 3 tbsp amaretto
  • 2 large eggs at room temperature
  • 1/3 cup granulated sugar
  • 1 cup sliced almonds, toasted
  • 1/2 cup white whole wheat flour
  • 1/2 tsp baking powder
  • 3-4 pinches sea salt
*1 cup each of granulated sugar and powdered sugar, in separate bowls, for rolling dough balls in Method:
  1. Preheat the oven to 350*.
  2. Spread the almonds onto a baking sheet and toast for 8-10 minutes, until fragrant.  Do not burn.  Remove from oven and allow to cool completely.
  3. Meanwhile, chop the chocolate into small pieces and melt it in a double boiler with butter and amaretto until smooth.
  4. In the bowl of a stand mixer, whip together the eggs and 1/3 cup sugar on high speed until pale, as pictured above (5-8 minutes).  Stir in the melted chocolate mixture.
  5. Pour the cooled nuts and flour into a food processor and pulse until finely ground.  Add the baking powder and the salt, and pulse a few more times.  Stir the ground nut mixture into the chocolate batter.
  6. Chill for 1-2 hours, preferably 2, until batter is firm.
  7. When you are ready to bake the cookies, preheat your oven to 350 again and set up your bowls of granulated sugar and powdered sugar.  Roll the chocolate cookie batter into 1-inch balls.  Roll each ball first in granulated sugar and then in powdered sugar.  Set the cookies in rows, at least 1-inch apart, on two parchment-lined baking sheets.
  8. Bake the cookies for 10-12 minutes, swapping the top and bottom baking sheets about halfway through.  The cookies should be slightly firm around the edges, but otherwise soft.
  9. Cool on a rack completely, then store in an airtight container.
drops 2 Oh!  And if you haven't noticed, I've added helpful links to the right side of the page for you to subscribe to Bella Eats, or follow me on Twitter, if you desire.
Read More

perfect summer cupcakes

Andrea

Let's talk about cupcakes.  Really, really, good cupcakes that don't need too much of an explanation.  Why?  Because its a three-day weekend dear readers, and I have a date with my husband and some good friends at the bowling alley in an hour! I want you to have this cupcake recipe today though, just in case you want to make them for a 4th of July party, summer picnic or barbeque, a little girl's birthday party or just because you have a craving for some chocolate this weekend.  They would be well-received at any event, as they were at our barbeque last Saturday. cupcake 4 Many thanks to the lovely Tara, whose family is filled with a bunch of chocolate fiends, and whom I knew would pull-through for me when I asked "What is your favorite chocolate cupcake recipe?".  Pull-through she did, even helping me out as I pondered the type of frosting to use.  You see, as I've mentioned before, my dessert of choice for any outdoor event in the middle of a hot Virginia summer typically involves lemon.  After realizing this problem, I decided to go with chocolate for our barbeque, but was worried that a chocolate on chocolate combo would be too heavy and rich.  Tara agreed, and supported my idea of going with a berry-flavored buttercream, a la Love and Olive Oil.  Now, if only I could learn to decorate my cakes as beautifully as both of these ladies do... cupcake 2 
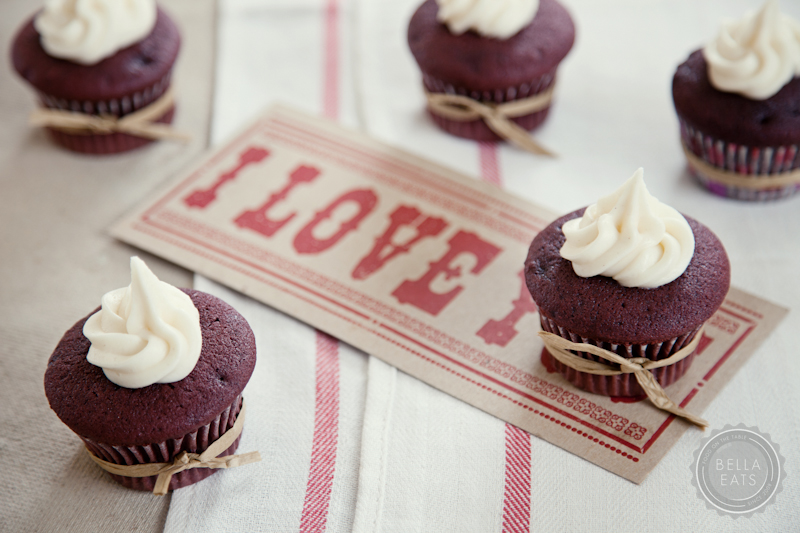
The cupcakes were delicious - rich and moist with a delicate crumb and perfectly domed tops.  The tang of fresh raspberry puree' whipped into sweet buttercream frosting complimented them wonderfully.  The combination was so good, in fact, that they caused a dear friend of ours to eat the two cupcakes sent home with her that were meant for her 3-year old daughter.  Shhhh...I won't tell, no worries.  I can't say that I wouldn't do the same thing. For those of you celebrating, have a Happy 4th! cupcake 6 Chocolate Cupcakes original recipe from Martha Stewart’s Baking Handbook (One-Bowl Chocolate Cupcakes) with adaptations suggested by Tara at Seven Spoons makes 24 cupcakes Ingredients:
  • 2-1/2 cups all-purpose flour
  • 1-1/4 cups dutch-process cocoa powder
  • 2-1/2 cups sugar
  • 2-1/2 tsp baking soda
  • 1-1/4 tsp baking powder
  • 1-1/4 tsp salt
  • 2 large eggs, plus 1 large egg yolk
  • 1/2 cup sour cream
  • 3/4 cup milk (I used 2%)
  • 1/2 cup vegetable oil, plus 2 tbsp
  • 1-1/4 tsp pure vanilla extract
  • 1-1/4 cups warm water
Method:
  1. Preheat oven to 350*. Line two standard 12-cup muffin pans with paper liners.
  2. Sift together the flour, cocoa, sugar, baking soda, baking powder and salt into the bowl of an electric mixer. With the paddle attachment, mix in the eggs, yolk, milk, sour cream, oil, vanilla and warm water. Beat on low speed until smooth and combined, about 3 minutes.
  3. Divide batter evenly among the muffin cups, filling each about 2/3s full. I actually over-filled mine a bit, and still had enough left over for 2-3 additional cupcakes. Next time I’ll probably plan to make 30 cupcakes total with this recipe.
  4. Bake, rotating pans halfway through, for 20-27 minutes, until a cake tester comes out clean. Mine took 26 minutes, but like I said, they were slightly over-filled.
  5. Transfer to a wire rack to cool completely.
Raspberry Buttercream Frosting inspired by Love and Olive Oil I made two batches of this frosting for 24 cupcakes and had about 1/4 of it left. Ingredients:
  • 1/2 cup (1 stick) unsalted butter, room temperature
  • 3 cups confectioner's sugar
  • 5 tbsp fresh raspberry puree, strained
  • 3/4 tsp vanilla extract
Method:
  1. Cream the butter in a stand mixer with the whisk attachment until light and fluffy.   Slowly add 1 cup of the sugar and beat until smooth.
  2. Slowly add the raspberry puree and mix until combined.
  3. Add remaining confectioner's sugar, 1/2 cup at a time, and beat until well incorporated.
  4. Add the vanilla extract and continue to beat at medium-high speed until light and fluffy, 2-3 minutes.
The frosting can be made the night before, but do not refrigerate it.  Store in an airtight container at room temperature. cupcake 7
Read More

there will be cookies

Andrea

I didn't have a food blog in the summer of 2008, so I feel like I missed out on the David Leite's  Chocolate Chip Cookie fun that I've read about in the archives of a few of my favorite blogs, like Orangette and The Kitchen Sink.  Now, I love a good chocolate chip cookie.  Who doesn't?  But I've seen plenty of recipes out there claiming to make the best chocolate chip cookies ever, so I was skeptical that this one would be any different from all the rest.  I was intrigued, however, by the large amount of chocolate in the recipe...1-1/4 pounds for only 18 cookies!  That, my friends, is a lot of chocolate.  Also, the recipe called for the sprinkling of sea salt on the tops of the cookies just before baking...hmmm.  I am a big fan of sea salt caramels, so this seemed like a touch that would agree with me nicely. 090119-cookie-1 Typically I would take a recipe like this and try to healthify it, using natural sweeteners and substitutes for the refined sugar, oil and white flours.  But it had been awhile since I'd made a full-fat, high-cal decadent cookie, and this seemed just the recipe to indulge on.  And it helped to know that I would be sharing the 18 resulting cookies with 12 friends and co-workers tomorrow during the inauguration ceremony.  I followed David Leite's instructions almost completely, but did have to make two substitutions.  The first was to use ghirardelli chocolate bars chopped into 1/2" pieces instead of chocolate disks.  The second was to replace the cake flour.  I scoured the shelves on the baking aisle at Whole Foods and found no such flour.  I decided to substitute the whole wheat pastry flour I had at home and hope for the best. 090119-cookie-2 A warning:  the dough requires 24 hours of refrigeration before baking.  I made the dough last night and of course sampled it, which made me all the more excited to come home from work tonight to bake the cookies.  Its kind of nice, the phasing of the recipe.  You get all of the mess out of the way the first night and are left with the simple pleasure of balling dough and pulling perfectly golden cookies from the oven the second night. 090119-cookie-3 090119-cookie-4 These cookies are worth the 24-hour wait and the extensive blogger hype.  Totally worth it.  They are perfectly crisp around their golden edges, soft and chewy in their centers.  The sea salt adds an unexpected depth that heightens the flavor of the chocolate while at the same time reducing its richness...a quality that makes it even easier to finish the entire 5" mammoth cookie all at once.  In case you missed the link above, here is the recipe and the article it accompanied. So tomorrow, as we welcome our new president and toast the changes to come with a group of friends, there will be cookies.   I can't think of a better way to celebrate. 090119-cookie-5 Here's a recap of my other eats for the day, although who wants to read about them now that I've introduced cookies to the mix?!?  Especially when its a day full of repeats...  Breakfast:  the standard oat bowl.  I know, I know.  But I love it and its very filling and that's good enough for me. 090119-b11
  • 1/2 cup oats, 1 cup water, pinch of salt, dribble of vanilla, sprinkle of cinnamon
  • 1 mashed ripe banana
  • 1 tsp ground flax seeds
  • 1 dried fig, chopped
  • 1 tbsp natural peanut butter
Lunch:  leftover veggie soup, 3 Back To Nature Multigrain Flax flatbreads, 2 tbsp hummus. 090119-l11 Snacks:  my Oikos is back!!!!!  1 blueberry Oikos and a tangelo.  Sadly, I didn't actually eat the Oikos 'cause I just wasn't hungry enough.  The tangelo was excellent though. 090119-s11 Dinner:  leftover veggie soup with some bulgur added to it and a hearty oat biscuit.  So good, and this is the last of it.  :) 090119-d1 090119-d2 Dessert:  a cookie.  Of course.  :) And I'm off.  Have a great Tuesday, everybody!  Happy Inauguration!!!
Read More

holiday gift boxes

Andrea

Hello bloggies!  Thank you for all of the lovely comments about my cranberry apple holiday pie...it was a big hit at the office holiday party last night!  This was my first time using all butter in the crust instead of a combination of butter and lard (I just can't bring myself to buy a tub of lard anymore, even if it does produce a heavenly crust!!!).  It tasted great, but the bottom of the pie was really hard to cut.  Any ideas why?  Would it be the difference in using just butter and no lard?  Maybe I should have bought a veggie oil shortening to substitute instead... Any suggestions you have are much appreciated!  :)  I read a great article in the NY Times Dining & Wine section about the importance of butter in baking, if anybody is interested the article is here.  I'm dying to try this recipe that they provided too! We had an awesome dinner over at my boss' house last night.  Salmon, green beans, risotto and a beautiful salad.  I don't have any pictures as it was a small gathering and neither my boss nor co-worker know about the blog.  That's going to be a theme in this post, I've been running around like a crazy woman and haven't had time for meal pictures.  Don't worry though, I'll make up for it with holiday treat photos!  :)  Other than dinner last night and a lovely breakfast at our friend Amy's house this morning you wouldn't be interested in my eats these last couple of days anyway, especially since my breakfast yesterday consisted of marshmallows, hot cocoa, and more marshmallows!  :) The hubb and I were really busy yesterday making boxes for our friends and co-workers.  I decided a week or so ago that I wanted to do something really simple for everybody, so picked out a couple of recipes from Good Things Catered and  A Kitchen Story.  These two ladies have some awesome recipes to share, so be sure to check out their blogs!  Of course, the gift boxes wound up being far from simple but we had a great time working on them together. We started with marshmallows Saturday night.  Katie's recipe is perfect, I didn't change a thing.  A note of warning if you want to double the recipe (which I did), still make the recipe in individual batches.  One batch will completely fill your mixing bowl by the time it is done, so you'd never have enough room for two. m7 marsh-3 Make sure to be quick with getting the marshmallow goo from your mixer to the pan and smoothing it out, it starts to harden pretty quickly.  After we had our batches settled in their pans (we made 2, one vanilla flavored and the other peppermint), we let them sit overnight to set.  In the morning, I released the marshmallow from the pan to cut it into little 'mallows. m1 I tried several different methods of cutting, and didn't have any knives that worked for me.  The hubb suggested that I use my stainless steel scraper, and it was perfect.  The key is to push the blade straight down through the marshmallow, don't pull it through like you would cut a cake.  The 'mallow is just too sticky and it deforms if you try to pull a cutting utensil through. m6 They turned out beautifully, and are so amazingly good.  You've never had a marshmallow if you've only had the store-bought variety...these are 100 times better. m2 m4 m5 After cutting the marshmallows (and eating quite a few!) we moved on to dark chocolate bark with cherries and walnuts.  Four batches of bark.  I've never made bark before so I followed Kristin's recipe exactly, the only thing I changed was my method of melting the chocolate.  We used a double boiler on the stove top rather than the microwave. b1 The chopped cherries, walnuts and crystalized ginger were perfect compliments to the dark chocolate. b2 The chocolate-y goodness spread out nicely on the sheet pan, but at this point I was still skeptical of how the bark would turn out.  I was worried that when we cut it into individual pieces it would shatter into much smaller pieces than I was hoping for. b33 But it came out perfectly.  I was shocked at how easy it was to cut and how nicely it sliced into small pieces.  And the flavors are amazing together, not too sweet. b4 We also made hot cocoa with Katie's recipe, although I was in such a rush at that point that I wasn't taking any pictures.  Nothing too exciting though...other than the vanilla sugar.  It turns out vanilla sugar is pretty hard to find in Charlottesville, especially in the quantity that I needed (16 cups, I made 4 batches of cocoa).  And the small amounts you can find are expensive, I found out why when I bought vanilla beans to make my own vanilla sugar.  The beans are $5 each!!!  I bought 4, and then read after the fact that Katie recommends 1 bean per 2 cups of sugar, so I actually needed 8.  That coupled with the fact that you really need 1-2 weeks for the vanilla flavor to seep into the sugar and I only had 6 days before needing to make my cocoa means that my hot cocoa mix isn't nearly as vanilla-y as it should be. I'll definitely be trying this recipe again next year and will follow it properly because I think it has the potential to be amazing. We packed all of our goodies up in recyclable packaging - brown paper boxes, shredded paper grocery bags and paper ribbon.  I had to use cellophane baggies for the marshmallows and bark because I couldn't think of anything else that would be as pretty... box-3 box1 box2 box4 box51 This was so fun.  I love doing projects like this with my hubb.  It probably took us two full days with all of the candy making, shopping for ingredients + materials and assembly of the boxes, but it was so worth it.  We've had great reactions from our friends and had such a great time putting the gifts together! Ok lovelies, I'm off to another holiday party tonight, this one is for the hubb's office.  And tomorrow morning, at a VERY EARLY 5am, we are loading the car up with luggage, presents and dogs for our 13 hour drive to FLORIDA!!!  YAY!   Have a fabulous evening...  :)
Read More

don't mess with a good thing

Andrea

Well, the poor little No Bake Cookies never hardened.  I figured out why with the help of my very wise (and somewhat disappointed) hubby.  I wandered into the office to sheepishly confess that I had "slightly modified" the cookies to "try and make them a little healthier" while he gave me a blank look and simply asked "WHY?". Fair enough.  I explained that I wanted to substitute honey for some of the sugar in the recipe, and that since I was adding a liquid I felt like I should subtract some liquid from the recipe.  Makes sense, right?  Well, the liquid I decided to subtract was butter (which was to be melted before adding to the cookie mix). "But the butter is what holds them together and makes them firm up!"  Right.  Point taken. So, I leave you with Nana's No Bake Cookies, which I assure you are little bites of heavenly goodness, and look just like this before they harden up into actual cookies that you can pick up and hold rather than mushy, sticky blobs... 081203-d31 Nana's No Bake Cookies makes 4 dozen "2 bite" cookies Ingredients:
  • 1/4 cup unsweetened baking cocoa
  • 2 cups sugar
  • 1/2 cup butter
  • 1/2 cup milk
  • 1/2 cup peanut butter
  • 1 tsp vanilla
  • 3-1/2 cups instant oatmeal (I've used rolled oats too, they are just a bit chewier)
Steps:
  1. Mix cocoa, sugar, butter and milk in a medium saucepan and simmer for 2 minutes.
  2. Remove from heat and add peanut butter, vanilla and oatmeal.
  3. Spoon onto wax paper or foil until set, 1-2 hours.
So easy, so tasty...so going to be making them soon because now I have a CRAVING!!! Oh, and I'm fully aware that this is my second post on the day that I'm starting "one post a day"...  :) Goodnight!
Read More